This post may contain affiliate links. Please read our disclosure policy.

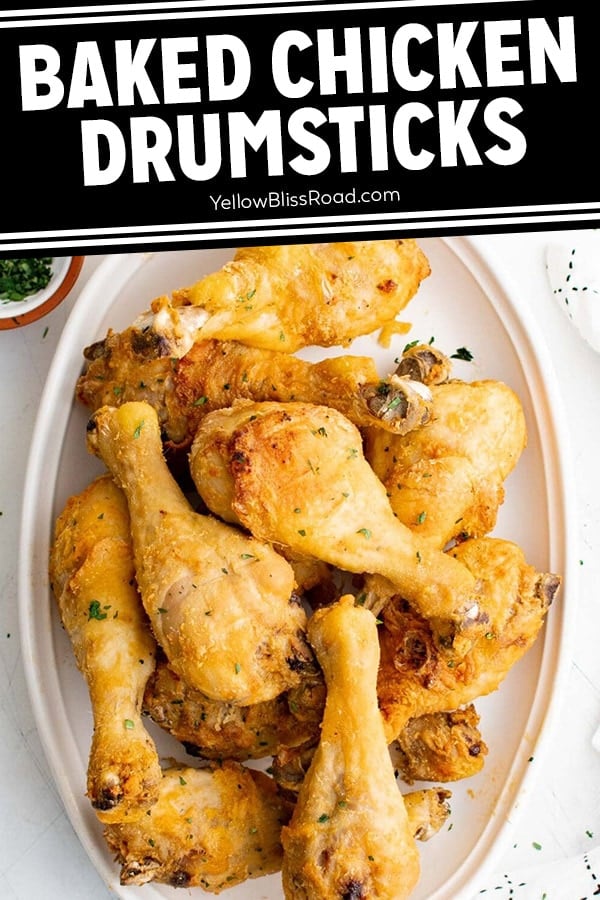

Learn how to bake chicken legs in the oven in three easy steps with my easy, crispy Oven Baked Chicken Drumsticks recipe! Simple to whip up and so much healthier than frying, these crispy chicken legs will be your new go-to for dinner.
We love chicken for dinner and have lots of different chicken recipes to choose from, like baked chicken breasts, grilled chicken thighs, and easy stovetop chicken.
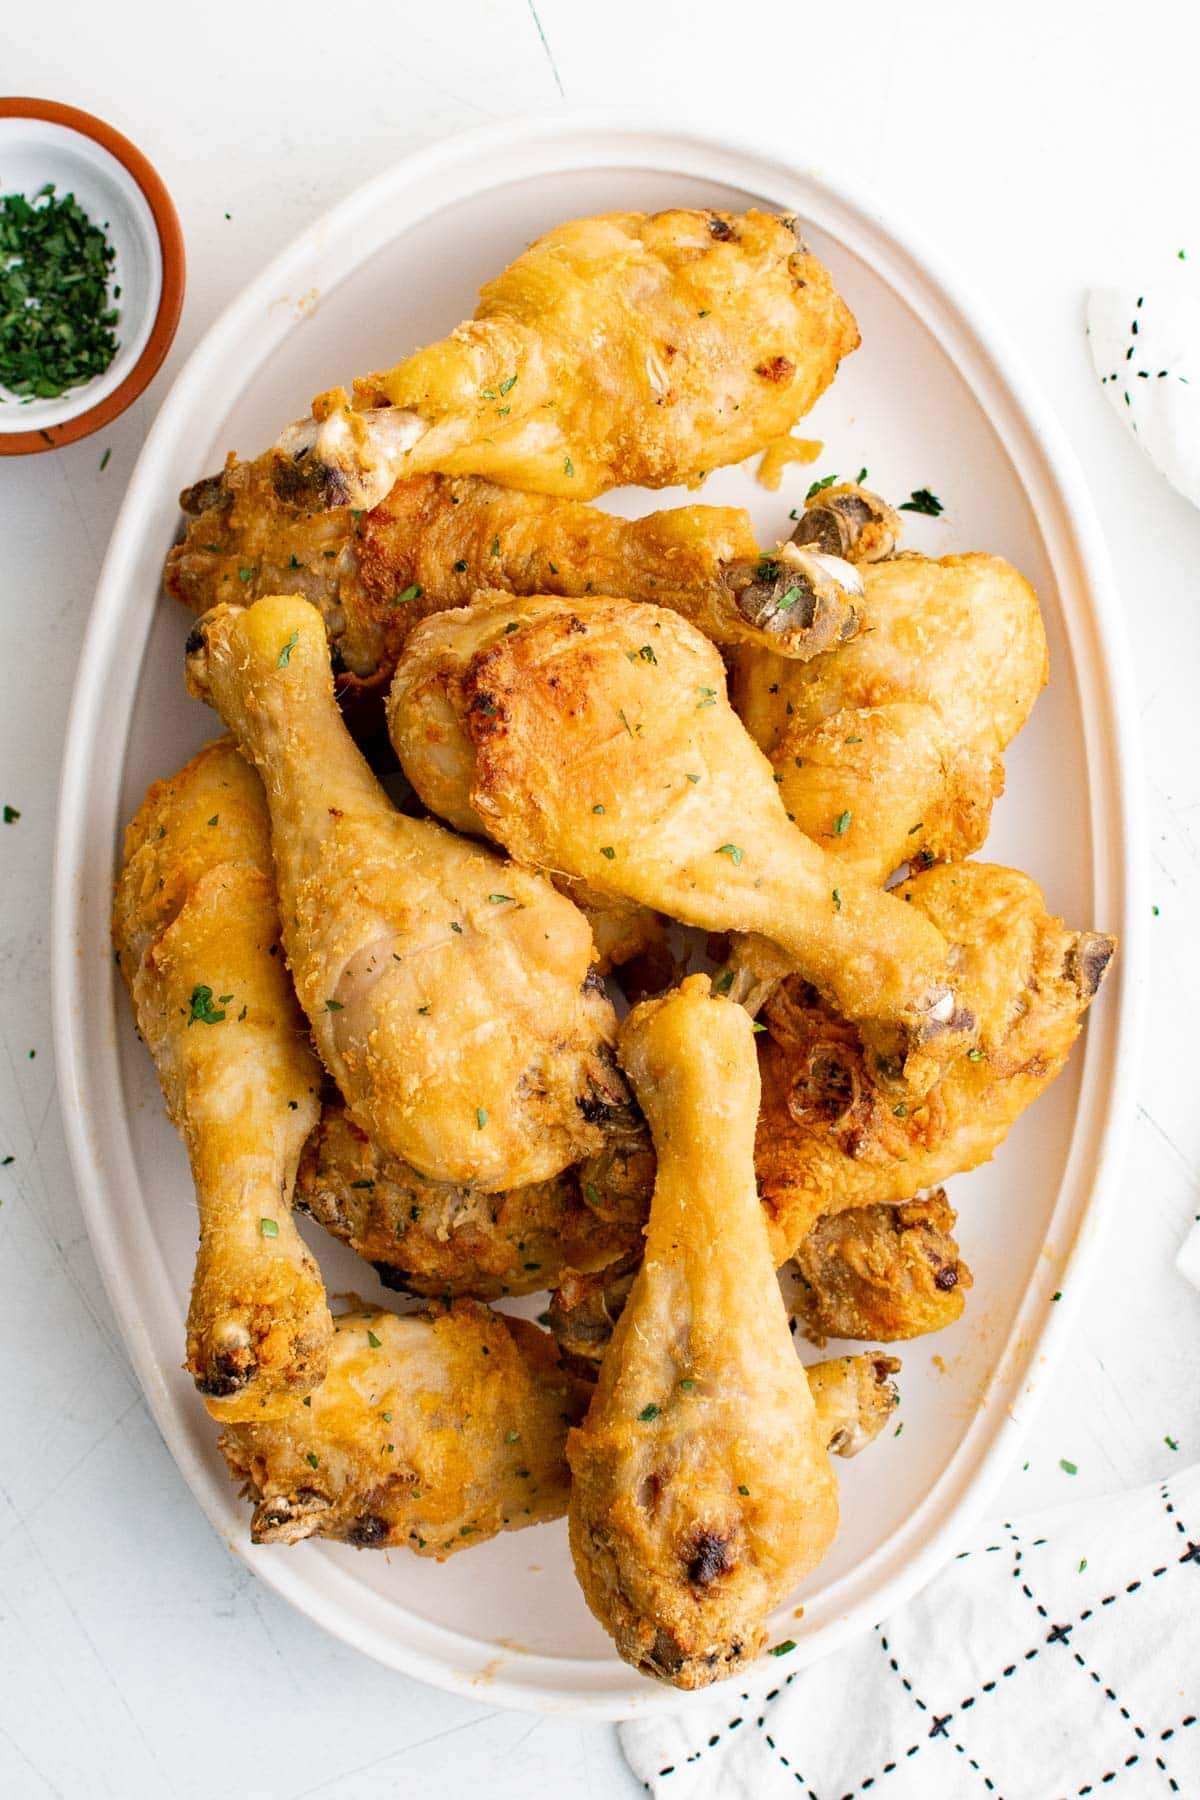
Table of Contents
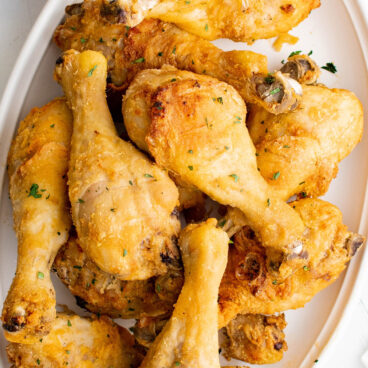
Crispy Baked Chicken Drumsticks
Everyone loves my Crispy Baked Chicken Wings so we put that method to the test to make these juicy baked chicken legs!
I’ve had lots of people ask how the baked chicken wings recipe would translate to larger pieces, like drumsticks. This recipe is a family favorite, easy to make, and completely kid-friendly!
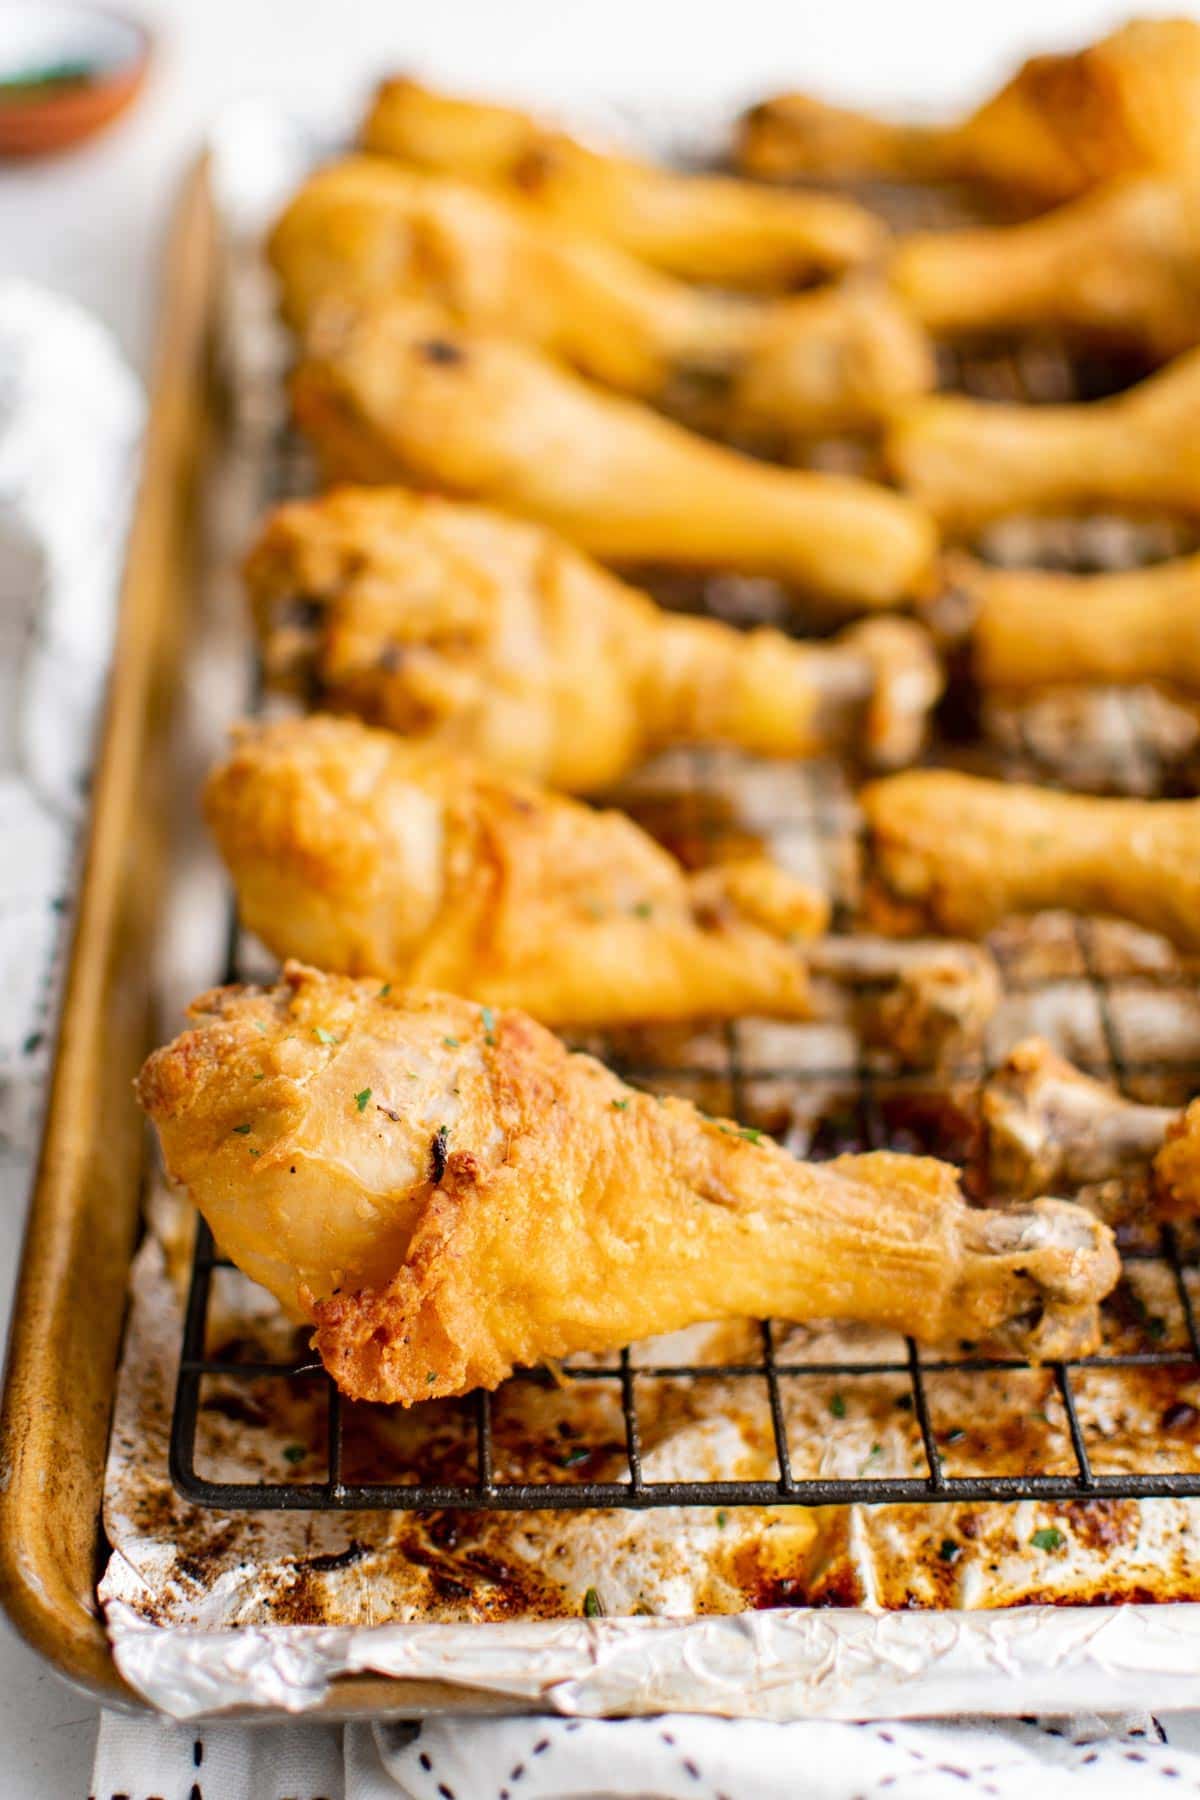
Get crispy, juicy chicken legs without frying, using my tried and true tips and my Crispy Baked Chicken Drumsticks recipe. It’s great for a busy weeknight and uses pantry staples you already have on hand.
For more ways to cook chicken legs try my recipes for Slow Cooker BBQ Chicken Drumsticks, Air Fryer Chicken Drumsticks, and Lemon Garlic Roasted Chicken Drumsticks.
Ingredients for Crispy Baked Chicken Drumsticks
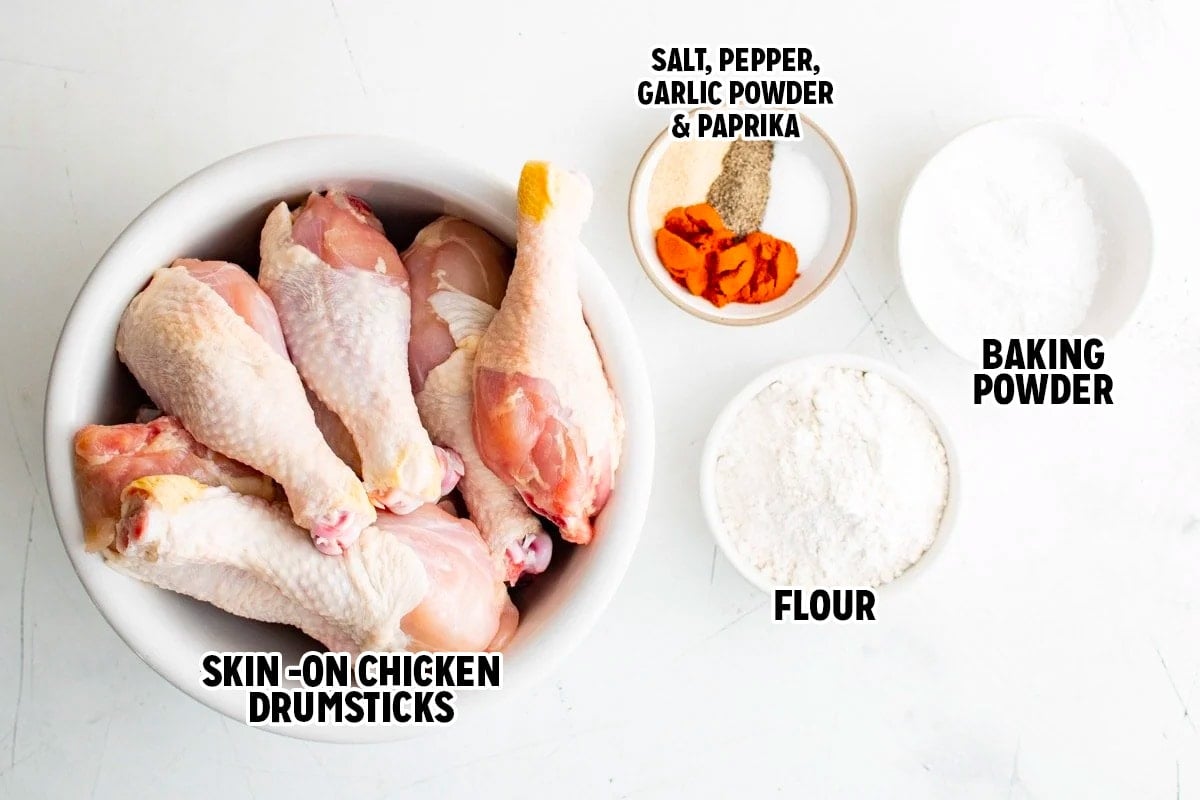
- Chicken Drumsticks – In order to get crispy skin, you need bone-in, skin-on chicken. You can trim some of the larger pieces of skin if needed.
- Coating – All-purpose flour and baking powder. The baking powder reacts with the skin and draws out the moisture, which in turn helps the skin get nice and crispy.
- Chicken Seasoning – Kosher salt, smoked paprika, garlic powder, and black pepper.
How to Make Crispy Oven Baked Chicken Legs
See recipe card below for ingredient quantities and full instructions.
You’re just three steps away from crispy, juicy chicken legs!
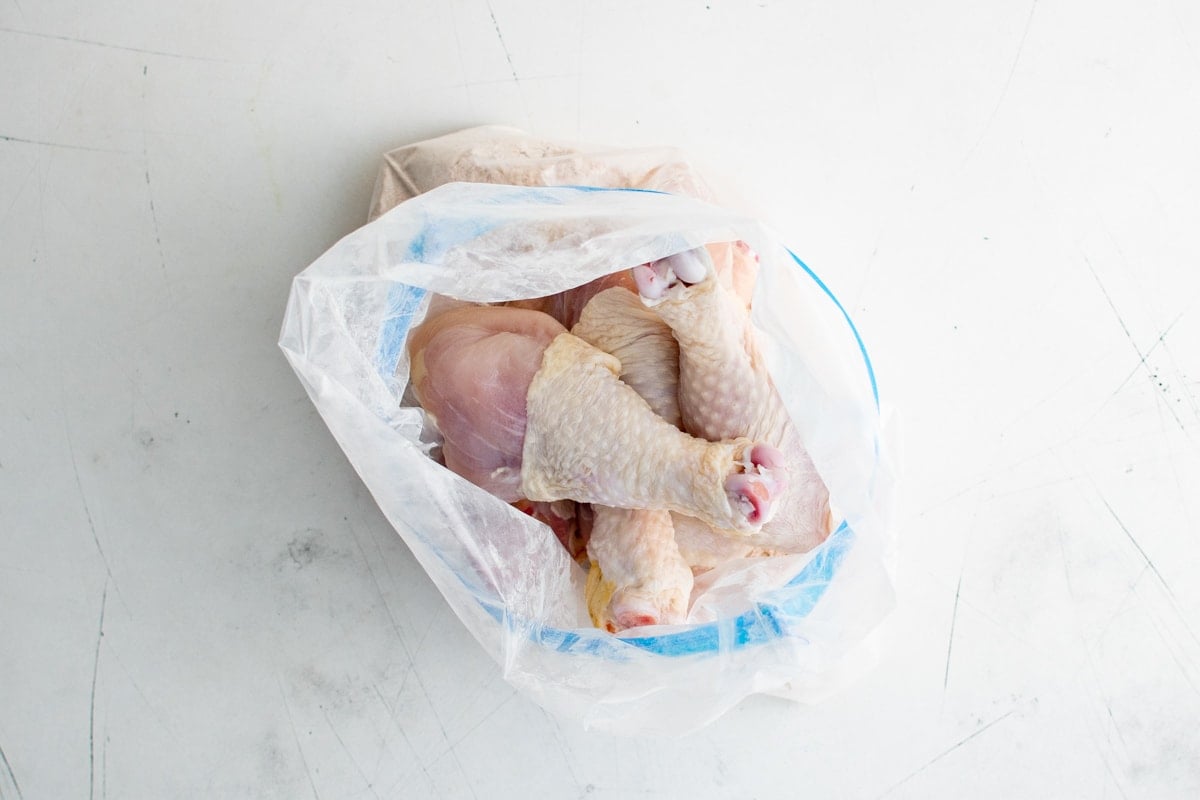
Pat the chicken as dry as possible with paper towels. The drier the skin, the crispier it will get. Place the chicken in a resealable plastic bag – you may need to do this in two batches so you don’t overstuff the bag.
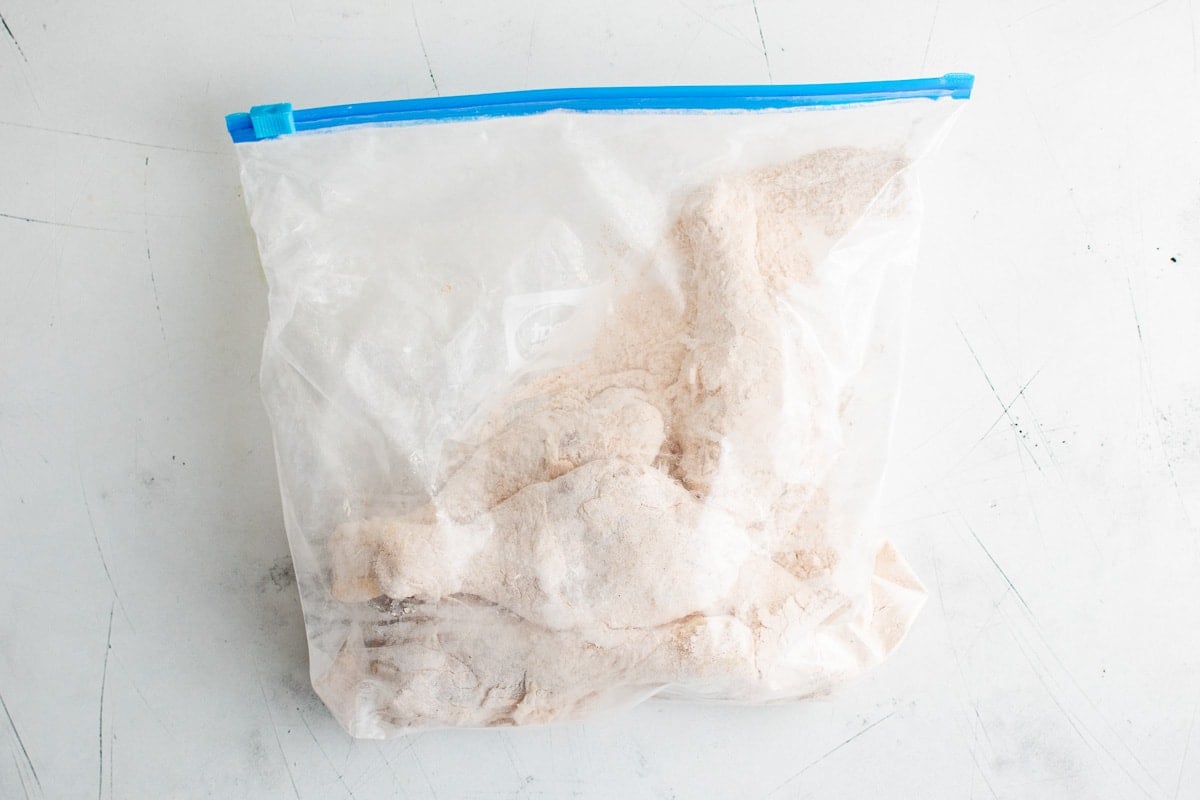
Add the flour and spices to the bag and shake it up to coat the chicken in flour, baking powder, and seasonings.
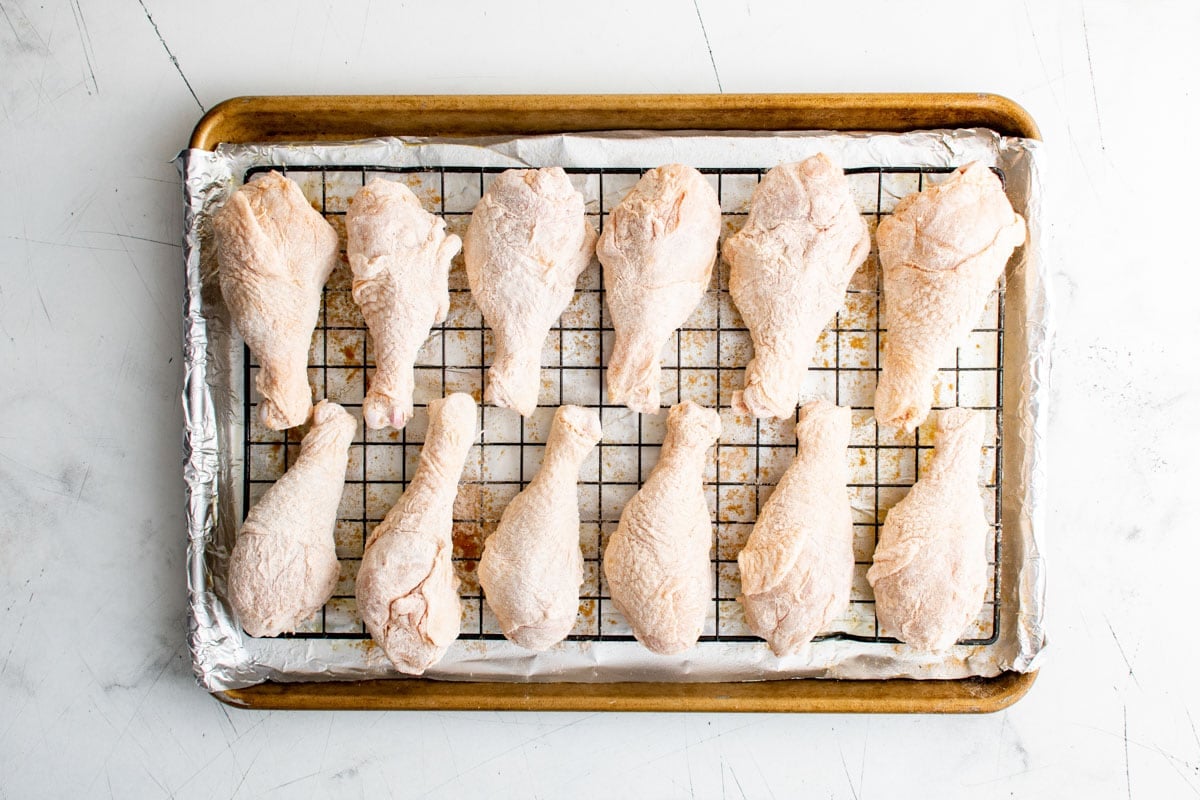
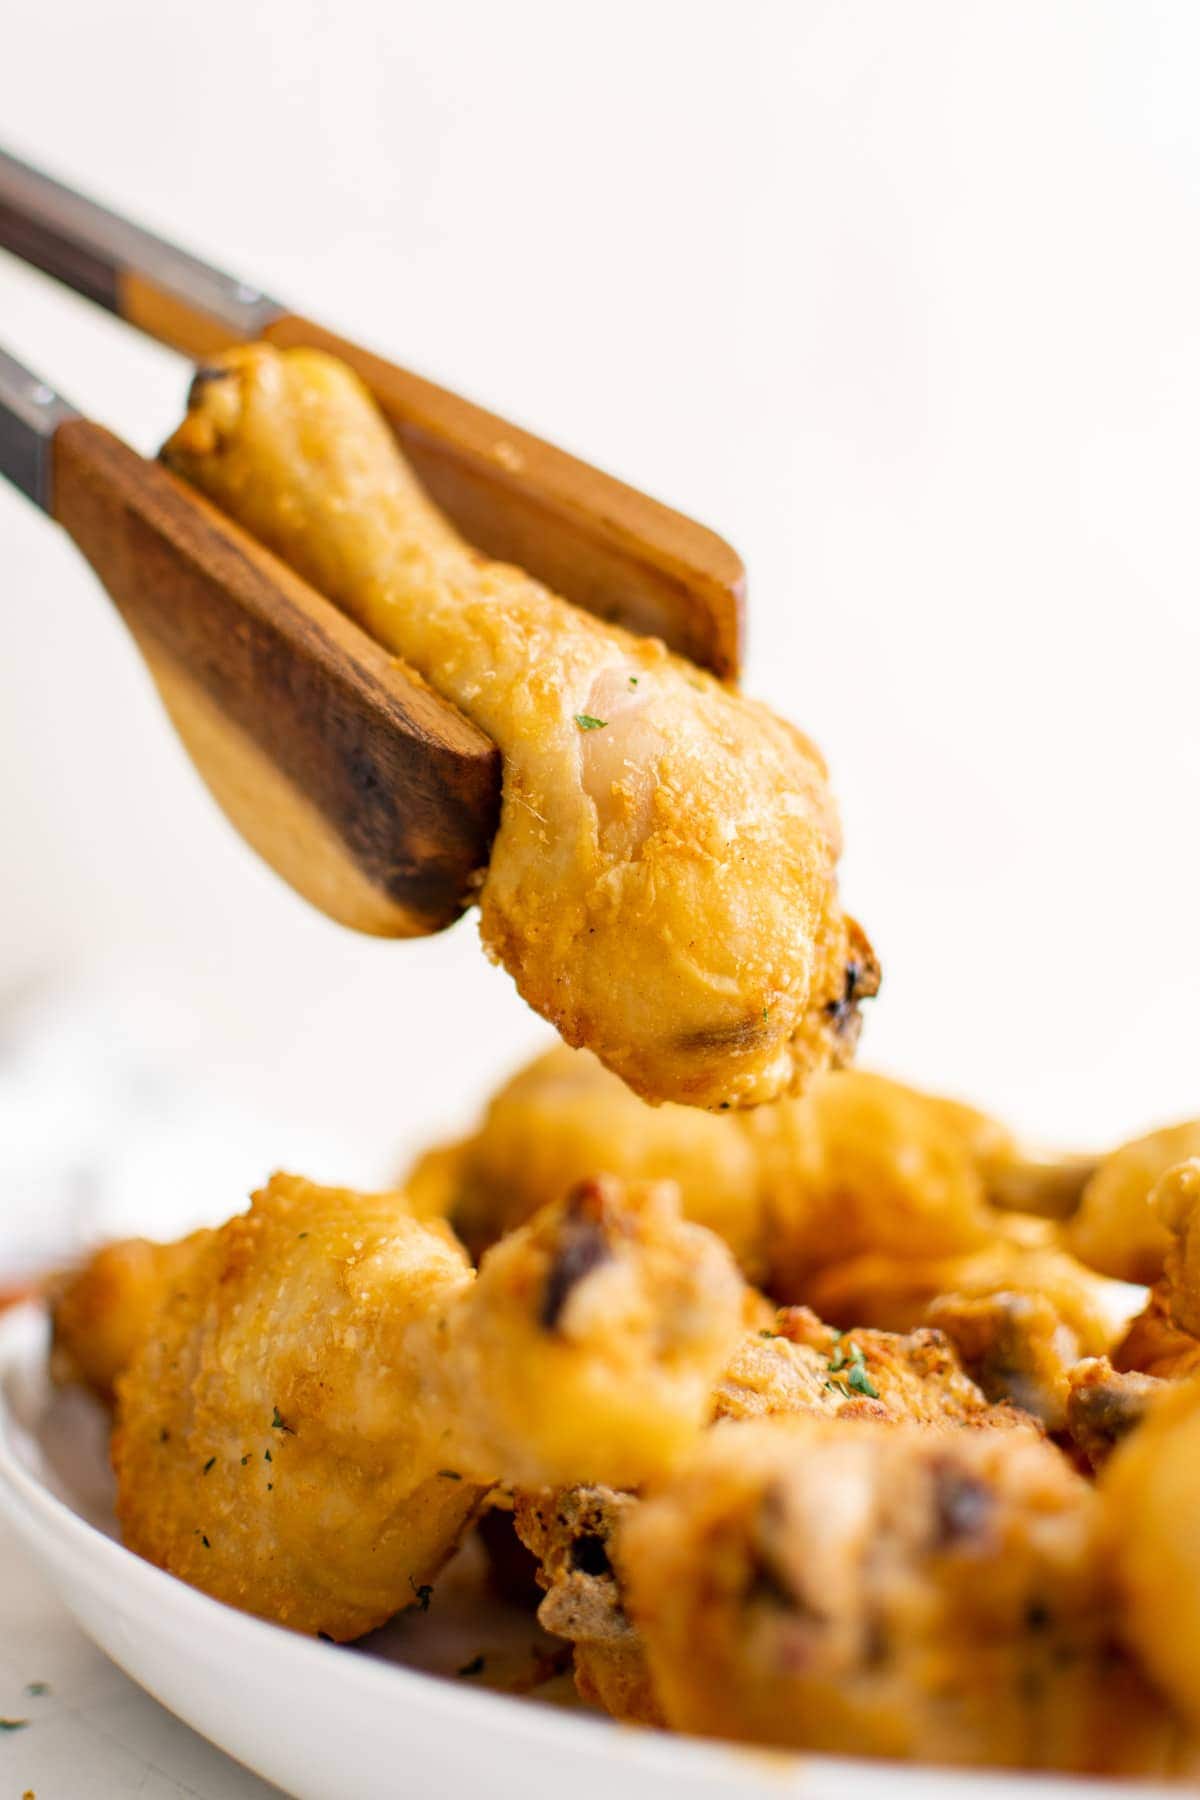
Arrange chicken in a single layer on a wire baking rack set over a rimmed baking sheet to ensure even cooking. If you don’t have a wire rack, you can place the chicken legs right on the foil that’s been sprayed with nonstick cooking spray. The wire rack helps air to circulate around the pieces of chicken so they can cook more evenly.
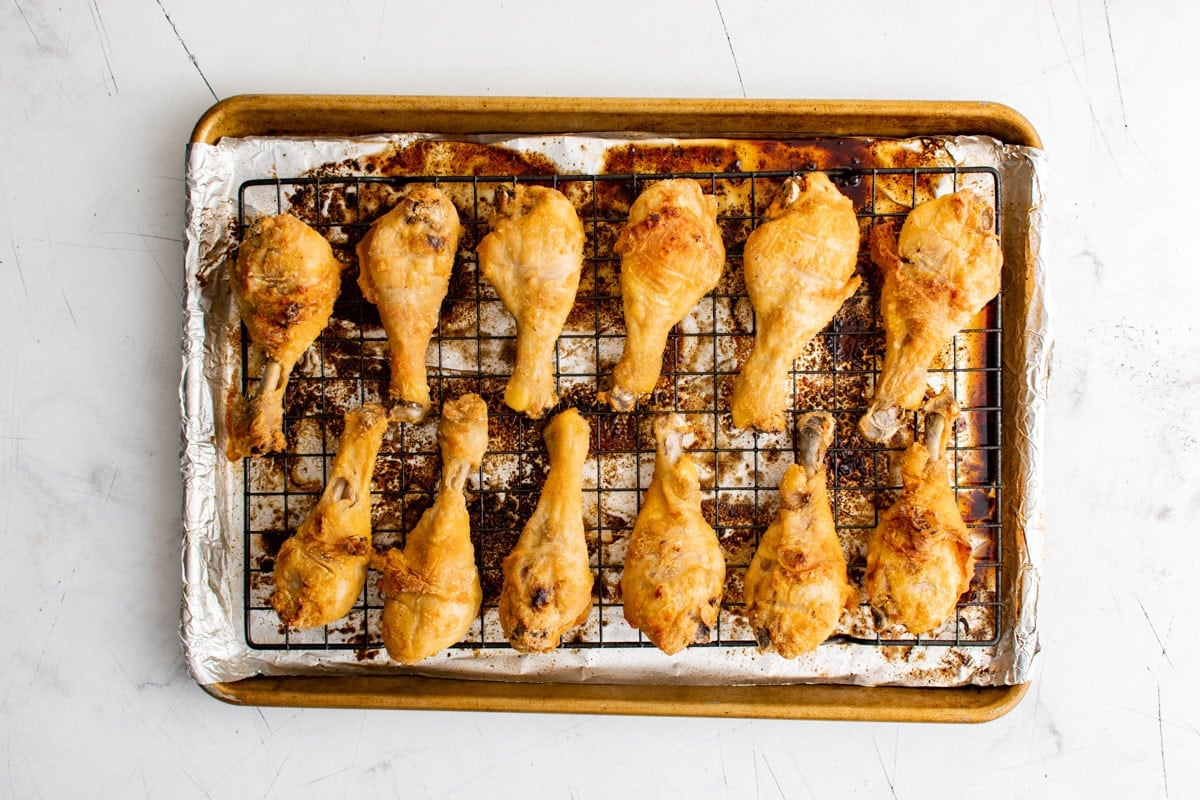
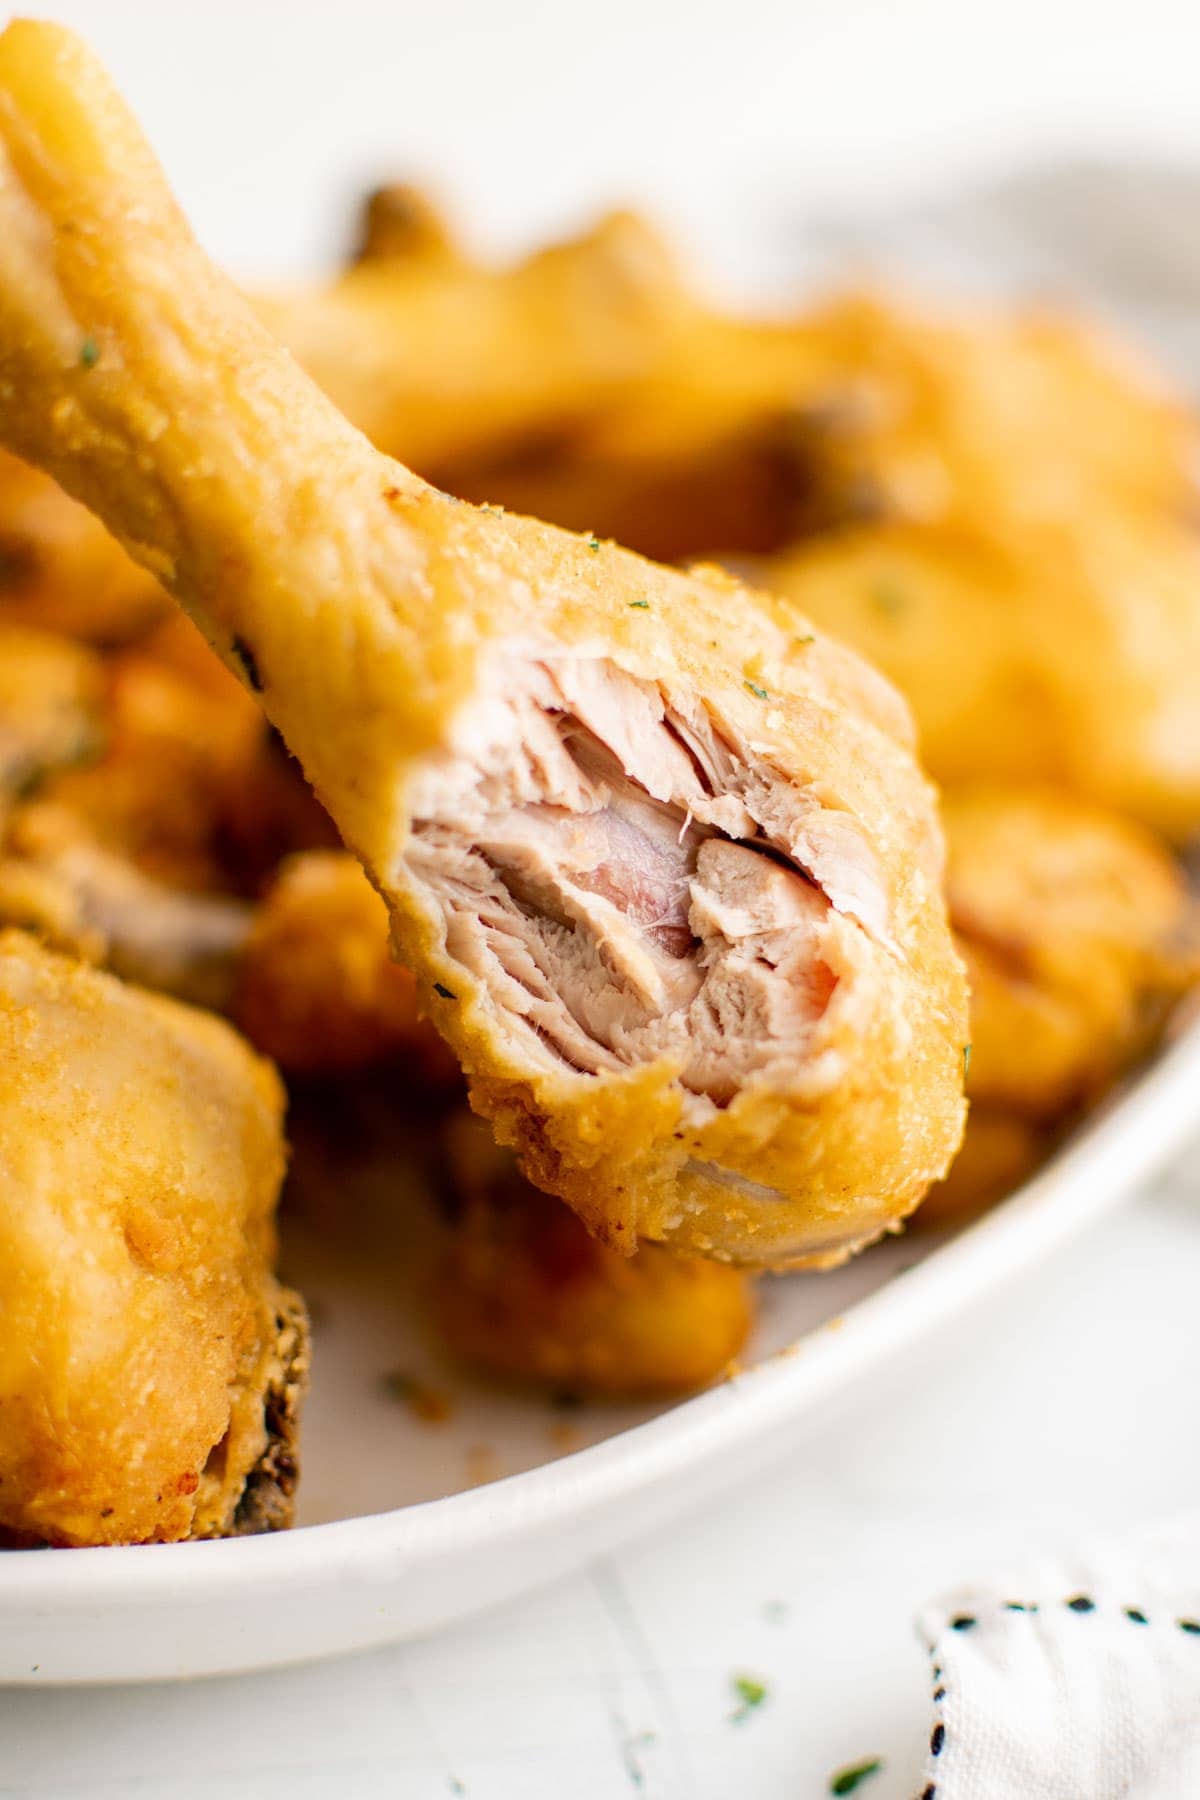
Preheat the oven to 425 degrees and bake the chicken drumsticks for about 40-45 minutes, turning them over after about 30 minutes. You’ll know they are done when the meat is no longer pink at the bone and the juices are clear. A meat thermometer inserted near the bone should register 165 degrees.
FAQs
Bake chicken legs for about 40-45 minutes, or until the juices are clear and the internal temperature registers 165-170°F.
A chicken leg refers to the entire upper leg portion of the chicken, which is the drumstick and thigh. A drumstick is strictly the lower leg. However, it’s common to hear drumsticks referred to as “legs.”
I highly recommend it so the skin is cooked and crispy on each side. However, if it’s raised on a baking rack you can get away with not turning them. Just know that they may not be as golden brown on the bottom.
Variations
- All-purpose seasoning – The coating is a simple mix of basic seasonings, flour and baking powder. You could easily swap out the spices I used for anything you like, or add a little onion powder or seasoned salt.
- Poultry seasoning – If you have poultry seasoning on hand that would certainly taste amazing. Poultry seasoning has lots of herbs, like sage, rosemary and marjoram.
- Spicy – Increase the heat level by adding some chili powder or cayenne pepper to the seasoning blend. You could also brush on some buffalo sauce towards the end and broil them.
- Ranch – Add a tablespoon of dry Ranch seasoning mix to the flour.
Serving Suggestions
This recipe for Baked Chicken Drumsticks uses an all-purpose seasoning and goes with just about anything. These are some of our favorite side dishes to serve with chicken.
- Crock Pot Mashed Potatoes – perfect for when you want creamy mashed potatoes but don’t want to cook on the stovetop.
- Cheesy Broccoli Casserole – One of my family’s all time favorite vegetable side dishes. I think it’s the cheese!
- Cheesy Garlic Bread – One of the easiest sides to whip up is some cheesy, crunchy garlic bread. I always have a loaf in my freezer ready to go.
- Baked Macaroni and Cheese – This is a great recipe when you’re looking for some kid friendly comfort food. It’s also good for feeding a crowd.
- Honey Roasted Carrots – Add a little sweetness to your side!
- Seasoned Rice with Herbs and Garlic – A classic recipe that’s full of flavor that nicely compliments the chicken.
Storage and Reheating
- Storage: Store leftovers in an airtight container or resealable plastic bag in the fridge for up to 3-4 days. Sometimes I’ll cook extra just for the leftovers, and pull the meat off to use for sandwiches and salads.
- Freezing: You can free cooked drumsticks for up to 6 months in an airtight, freezer safe container. Thaw completely before reheating.
- Reheating: If you want to warm up the leftovers, you can heat in the microwave for 60-90 seconds, but keep in mind the skin will not be crispy. I recommend heating at 350°F for 5-10 in the oven or in an air fryer. You can also just eat it cold!
Expert Tips
- My best tip for getting crispy skin is to really pat the chicken dry with paper towels. The less moisture in the skin, the crispier it will get. If you have the time, pat the drumsticks dry and lay the out on a baking sheet and pop them in the fridge for a few hours, or even overnight.
- The baking powder is a key ingredient for crispiness. You can use less, but don’t omit it.
- Make sure to shake off the excess flour mixture after coating.
- For easy clean up, line the sheet pan with aluminum foil before adding the baking rack.
- For a nice, golden color, spray with a little olive oil cooking spray and broil for a few minutes towards the end.
More Delicious Chicken Leg Recipes
- Crispy Garlic Parmesan Baked Chicken
- Crispy Cheesy Baked Chicken Tenders
- Instant Pot Chicken Pasta
- Slow Cooker Teriyaki Chicken
- Chicken Salad Recipe
- Dorito Chicken Casserole
- Easy Garlic Chicken Bites
Crispy Oven Baked Chicken Drumsticks
Ingredients
- 4 pounds chicken drumsticks bone-in, skin-on
- 2/3 cup all-purpose flour
- 2 tablespoons baking powder
- 2 teaspoon kosher salt
- 3 teaspoons paprika
- 2 teaspoons garlic powder
- 3/4 teaspoon black pepper
Instructions
- Preheat oven to 425 degrees F. Line a large baking sheet with foil and set a baking rack on top if you have one. If you don’t have a baking rack just spray the foil with nonstick cooking spray.
- Pat the chicken dry with paper towels. This is really important to get super crispy skin.
- In a large zip-top bag, combine flour, baking powder, salt, garlic powder, paprika and black pepper. Place the chicken in the bag a few pieces at a time and shake to coat. Set chicken pieces skin side down on the baking rack that has been placed on top of the baking sheet (or on the foil lined baking sheet that’s been sprayed with nonstick cooking spray). Place larger pieces toward the outside; pieces can be close together but should not touch.
- Bake in the preheated 425 degree oven for 45-50 minutes, turning over after 30 minutes. Juices should be clear and temperature should register 165-170 degrees. For a more golden color, spray with olive oil cooking spray and turn on the broiler for a few minutes, watching closely to ensure the chicken doesn't burn.
- Let cool 5-10 minutes before serving.
Notes
- Make sure to really pat the chicken dry with paper towels. The less moisture in the skin, the crispier it will get. If you have the time, pat the drumsticks dry and lay the out on a baking sheet and pop them in the fridge for a few hours, or even overnight.
- The baking powder is a key ingredient for crispiness. You can use less, but don’t omit it.
- Store leftovers in an airtight container or resealable plastic bag in the fridge for up to 3-4 days or freeze for up to 6 months in an airtight, freezer safe container. Thaw completely before reheating.
- Reheat in the microwave for 60-90 seconds, but keep in mind the skin will not be crispy. I recommend heating at 350℉ for 5-10 minutes in the oven or in an air fryer. You can also just eat it cold!
This was delish!!!
If I use chicken leg quarters ( thigh and drumstick connected) would I have to increase the cooking time?
Hi! I actually have a great recipe for that – Check out my Baked Chicken Leg Quarters.
the 5 minute prep time promised didn’t include putting it in the fridge for a few hours before cooking.
Good catch rob! That’s because that step is listed in the notes as optional if you have the time. The recipe can and should be made as stated in the instructions. The notes in recipes are just there to help problem solve or to make suggestions for enhancing the recipe even more.
Kristin,
This is the absolutely best recipe I have found for oven “fried” drumsticks. I have been cooking for over 50 years & this proves there is always something new to learn. My husband says this is his favorite drumstick recipe!
Thank you!
You are so welcome Diane! Thank you for the awesome comment.
Made these last night and they were great!! Followed the receipe exactly and legs were great!! Will definately fix these again!!
Love the feedback Bill! Thanks for stopping by.
Made it last night and found it made a nice crisp drumstick but lacked flavour. Suggest finishing it with either more spice variety or a touch of good old bbq sauce .
You can certainly add more spice if you like, or dip in BBQ sauce. I wouldn’t add the sauce prior to baking though as it could make the breading soggy.
Hi Kristin, I’ve made this recipe so many times that I’ve lost count! My mom insisted that these are fried chicken. My son can never have enough of this chicken. I just want to add that if we have some rather large drumsticks, we can slash it on both sides and bake them a little longer. Thank you for sharing the recipe! It’s the keeper!
That’s awesome ann! Thanks for stopping by to share.
Can you use crisco that is melted
Hi Bonnie, I’ve never cooked with Crisco so I’m not sure how that would work. I think it might be too thick though.
What can you use if you do not have oil at the house can you use melted margarine
I haven’t tried melted margarine, but since it’s partially oil based it could work.
What can you put on the chicken if you don’t have oil
Using a cooking spray can work, but the oil is what make the skin get nice and crispy.
I use melted butter and it is yummy
I really love this recipe. I enjoyed it a lot. Thank you souch for sharing since I cannot eat fried foods
.Now I can try your other recipes.
Thank you so much.
You are so welcome Joanne! Love the feedback, thanks for stopping by.
Me and my boyfriend love the chicken made like this the second time I made it and it’s better than fried chicken
Nice! Thanks for your feedback Bonnie.
Hello, Thanks for this article on how to prepare a delicious coated drumstick. Please I have a question from the last part where you mentioned this “Juices should be clear and temperature should register 165-170 degrees. For a more golden color, spray with olive oil cooking spray and turn on the broiler for a few minutes, watching closely to ensure the chicken doesn’t bur.” Please what do you mean by the temperature, are we going to reduce the temperature to that degree? Please kindly explain? Thanks
Hello – the temperature refers to the internal temperature of the chicken. You’ll need to use a meat thermometer, but if you don’t have one you can pierce it and as long as the juices are clear (not pink) it’s cooked. Just let it rest for 5-10 minutes.
Made this many times, love it! Crispy and juicy.
Love the feedback Eileen! Thanks for stopping by.
They didn’t brown as I expected from the photo, and some of the flour showed. I decided to brush a bit of butter instead of olive oil, and it help appearance considerably. The flavor was great and the family enjoyed them. So much easier than frying, so there are several reasons for enjoying this recipe. Thanks for sharing.
Hi Phyllis, thanks for your feedback! It’s important to make sure you tap off the excess flour, but also spray the drumsticks with cooking spray before baking. Your broiler can always brown real quick if they don’t brown enough when you bake them.
I have made this recipe seven times now, exactly as it is written. I am so in love with this dish I now make drumsticks every two weeks! I\They are so flavorful, crispy and not oily. You can’t go wrong here!!!!
Awesome feedback Val! Thanks for stopping by.
Bring baking powder to a new level in cooking. Just cooked 8 chicken drumsticks improvised with this recipe, I added a little sugar, used chicken powder and less salt. I also pulled back the skin so more meat got coated with the mix for a few minutes, then pulled up the skin again. However, in ding so, my fingers got stuck with some of the moist mix. But if I did it with the plastic bag in between, or perhaps using gloves might avoid the mess on the fingers and losing some of the mix. Just shared one piece with my fiance, he absolutely loved it! I found to adjust to the individual oven temperature is paramount. I only cooked 30 minutes.The meat came away from the bone beautifully. This recipe will be in my collection, thank you for sharing. xx
It was good but we thought the spray on butter gave it a strange taste. Think next time I will try without spray on or else maybe melt a little butter and drip it on.
Love the feedback Linda! thanks for stopping by.
Yes chicken is safe at 165 but 185 is the temp to cook dark meat
Actually that is incorrect. Leg and thigh meat is safe at 165.
Can u also use chicken breast instead of chicken legs
Hi Donale, You can marinate chicken breast instead of the legs and it will be delicious, but the cook time will be different, and will also depend on if you are using bone-in breasts or boneless.
I completely agree. I always cook or oven-fry legs and thighs to 180-185F. Otherwise they are chewy and tough.
Hi Vera, I’ve never had this problem, and always cook chicken (dark and white meat) to 165 degrees. But, it’s your personal preference.
Great lil recipe and it tasted really good… I added an additional 2 teaspoons of poultry/steak seasoning and it woke up the flavor even more… I used to oven fry like this And it’s so much healthier than oil frying!
Also I found that I had to cook it and additional 15-21 minutes! It was one hour and 11 minutes but worth it! Just check internal temp every oven is different!
I’m going to try it on the gas grill next!! And I’ll get back to you.
Thanks again
Tommy
That’s awesome Tommy! Thank you so much for the awesome feedback.