This post may contain affiliate links. Please read our disclosure policy.
This canning jar ring pumpkin is an adorable fall craft that can be completed in under ten minutes. This is where you will find the original design. 🙂

I knew I wanted to create some kind of pumpkin project, and when I saw my canning jar ring wreath that’s been hanging on the back of the front door, (you know, since CHRISTMAS), I got a brilliant idea.
Well, I thought it was brilliant, but you might think it’s lame. Whatever.
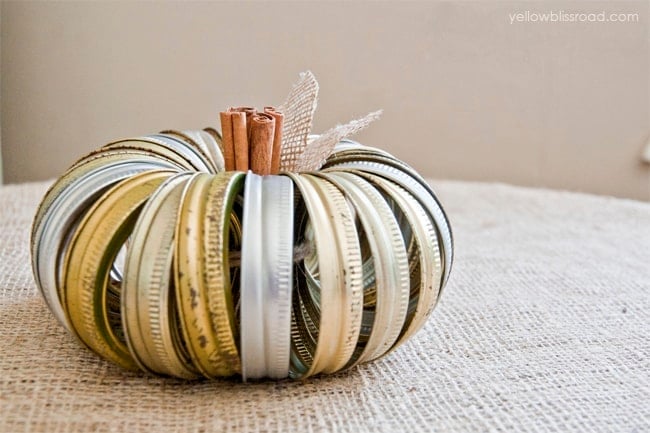
I figured, the shape and texture are perfect, why not turn it into a cute little junky pumpkin?
HOW TO MAKE A CANNING JAR RING PUMPKIN
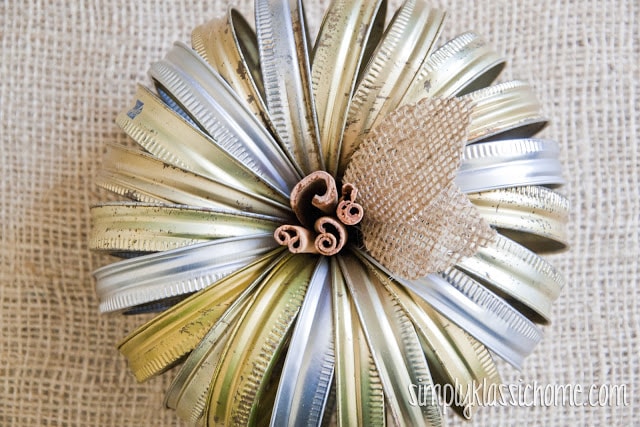
To make the wreath, you just get a bunch of canning jar lids and string them together, tying the string tightly. The original idea came from Funky Junk Interiors.
All of the lids should be the same size.
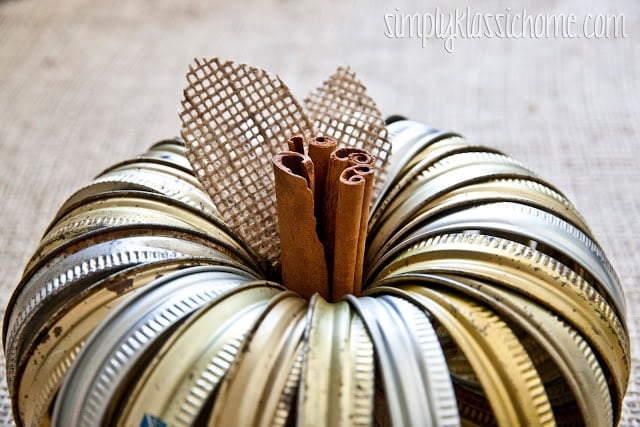
I just stuck some cinnamon sticks in the center, and added a couple of burlap leaves.
It seriously took me about three minutes.
I thought about spray painting it white or orange, but I actually like the rustic quality of the tarnished gold and silver lids.
What do you think? Totally brilliant?or Totally lame?
UPDATED: Thank you so much to all of my wonderful readers and friends who voted in the Country Living Pinterest Pumpkin contest. I still can’t believe that I won. Also, a huge thank you to Country Living Magazine!!!
I’m so thrilled you all love this pumpkin so much. I’d love it if you would follow along on Facebook so you won’t miss any future projects!
If you would like to share this project, or plan to make your own, please do not use my photos without permission. Also, if you share your own, I would really appreciate a link back to the original. Thanks!


Love it I’m msking crafts tomorrow and I will be using this thanks ???
Hi Kristen. This is a fabulous easy craft project for Halloween! Our readers will love it. I’ve included it in our Top 10 in Halloween Crafts roundup. https://craftylikegranny.com/halloween-crafts/ Cheers Jodie 🙂
So this is the second time I’ve visited this sight today and I love these cutie patootie ideas…and they are so cheap and easy, not to mention clever.
Love it!
While this is cute, these rings are the things I use over and over. Any ideas for the lids that we can’t re-use and that pile up a lot for those of us who are canning regularly?
This is such a great idea! SOOO cute 🙂
So precious! I love stuff upcycled from the unexpected! Thanks for sharing at the #findingfall link up!
What an incredibly cute and clever idea. I want to buy mason jars just for the lids to make this. So different! I’m sure I could figure out a purpose for all of the mason jars. Thanks for sharing !
I’m obsessed with these pumpkins – SO CUTE!!
I love this idea! I use my mason jars to store things and for photos and have a ton of those rings that I never use- this is the perfect little craft for fall, I can’t wait to make one!
I saw this and thought it was so cute but when I tried to make it it didn’t turn out. I still have all of my orange painted jar rings in a pile I could not get them to fit together correctly in a circle. What is the secret? What did you tie them together with? I was so frustrated.
Hi Charlotte. Sorry to hear you were having trouble. Make sure you have all the rings facing the same direction and arrange them one on top of the other on some twine or ribbon. Then tie the ends of the twine together. If it’s not working, you might need more or fewer rings.
where do u buy the canning rings
Kathy, you can get them at craft stores or even Target.
I actually made this and painted it orange, added some fake leaves and flowers, along with the cinnamon stick and actually was able to sell them at a local festival for $10.00 a piece. thank you for the Idea and giving me the inspiration to take them a little farther to make my daughters clogging group some money.
I think this is awesome!
Brilliant! How did you keep the lids together? Did you use glue? I want to make this for sure! I love it!! Not lame AT ALL !
Hello, thank you for sharing your tutorial. I love the idea. I found a box full of mason jars last weekend at a yard sale and I was looking for some ideas to use them for crafts. And I stumbled upon your blog. I have included a link to your page from mine. I do hope that is ok. If not please let me know I will have it removed. Thank you again for the great post! http://dailydiylife.blogspot.com/2014/07/coolest-mason-jar-crafts.html
Kind regards,
Heather
http://dailydiylife.blogspot.com
This is ingenious! I am making one as soon as I am finished typing this comment. It doesn’t need spray paint as the various colors of the rings give it a unique and interesting look. Thank you.
I just linked to this on my Facebook page.
This is genius and I can’t wait to make one! I featured it today on my Friday Favorites 🙂
~Katie @ Upcycled Treasures
Just found this…so adorable. Where the heck can you pick up all those rings?
Love, love, love your Junkie Pumpkin, brilliant idea! We would love to have you share this at our Saturday Link Party. Each link will be shown on two blogs, Made From Pinterest and Bakerette! It starts Fridays at 3pm, hope we see you there!
Please remember to put a link back to Made From Pinterest at the bottom of your post(s).
Just wanted to let you know that I’m featuring this post in a fall decor compilation post I’ve put together on my blog! For the past couple weeks I’ve been gathering some great ideas for fall decor and I loved this! ~mysnippetsofinspiration.com Hope you have a great day!
Brilliant idea!
how did you tie them together???
Totally brilliant
O.M.G- I just keep letting out a little shriek of joy whenever i pass my pumpking! Really, this was utter brilliance! You GO, girl!! THANK you!!!
i can’t wait to get home and do this!!! FAN-TASTIC!! Thanks!!
Oh, oh, little mistake!!!
On the board: Have to try this.
Gery
This really is brilliant.
I will put it on my pinterestboard: Wreaths
Groetjes Gery
Super cute and beautiful. Found you through Country Living Magazine and Pinterest. I pinned the pumpkin and shared it on my Facebook page. I’d love for you to link up to the blog hop as well on Wednesdays if you can. I think my readers would just adore seeing this and not all of them are on Facebook. Congratulations on the win! I am your newest follower :)~Melissa
That is so lovely! I would love for you to post it on my craft link party…..SHOW-licious Sunday Craft Showcase. Just follow this link! 🙂
http://sewliciousdecor.wordpress.com/2012/10/14/sunday-craft-showcase-3.
I would love for you to link up and add my site to your blog party’s so we can share crafts. The link for the code is:
http://sewliciousdecor.wordpress.com You can grab the code on my sideboard, I was not able to leave the code here for you. 🙂
very simple very cool! I shared this awesome idea on my pintrest
Thanks Colojunkett
Love this!!! Shared it on my “Home made is a lost art” FB page!!! I think the members will love this idea!!!
Brilliant!! I’m going to make one this afternoon!! I think I’ll use green for the leaves tho…. pretty sure I dont have any extra burlap, but I have tons of scrap fabric!!
I’ve put together a round up of fall decorating ideas on Craft Gossip today and included your post. 🙂 You can see it here
http://homeandgarden.craftgossip.com/13-fall-decorating-ideas-for-your-home/
If you would like a Craft Gossip badge showing you’ve been featured, you can grab one here 🙂
http://homeandgarden.craftgossip.com/grab-a-craft-gossip-button/
Thanks for sharing your craftiness!
I actually really like this! AND, I like it just how it is, non-painted. Brilliant, easy, fun idea! I will have to try this!
Wish I hadn’t thrown out all my nasty canning rings earlier in the summer. Now the ones I have look a little too clean to use, but I’m going to make it anyway.
I ♥ it! What a unique, clever idea! Awesome! I shared on my blog with a link back to you! I’m happy to be your newest follower and would love for you to stop by for visit! Blessings ~ Judy
This is so stinking cute! I am in love! I featured it on my blog this morning at http://iamonly1woman.blogspot.com/2012/09/pumpkin-crafts-ideas.html
Love this idea!! Great use of lids. I’ve got about a million of them. Little did I know that I could be putting them to great use. Cute!!!
http://www.sawdustandpaint.com
Awesome. I’m going to find out about this pin board. Actually I may google it.
My daughter told me of this pin on her board and I had to check it out. You are very clever and have made a follower out of me. I love you blog, I am new at blogging, but NOT new at crafting. I love your creativeness. I only hope I can have a great blog like yours. http://www.inforformydaughters.com
My daughter told me of this pin on her board and I had to check it out. You are very clever and have made a follower out of me. I love you blog, I am new at blogging, but NOT new at crafting. I love your creativeness. I only hope I can have a great blog like yours. http://www.inforformydaughters.com
utterly brilliant! i’m sad i’m just NOW discovering it! thank you for sharing!
I LOVE IT! super cute! I have a ton of lids and I was thinking of something to do with them! Now I know! I am going to make this tomorrow!
I vote totally BRILLIANT!!! Eye catching indeed, love it!
Holy chickens you are sooooo talented….i am so doing this….Thank you!!!!
Sarah
Jax, fl
HI, This is my second post,my first one I said I may spray paint mine orange, but, I meant in addition to the natural ones, cause I too liked that look of
the woren used one…I think I may just use a paint wash in orange instead so the charater can come thourgh.3 grouped together would look cute. Thanks again for sharing . Pamela 🙂
I wondered what these were….how cute! I love this pumpkin!Linking from Debbidoos,Ricki Jill
This is absolutely one of my favs linked up on Debbiedoo’s! Too darn cute! Thanks!
http://www.the-finishing-touches.net/
what a great idea you had. I took my rings and painted them orange and I used a small piece of wired ivy to tie my cinnamon sticks for the middle. It is sooo cute, thank you so much for sharing your idea.
Great Idea .I work at an auction …. Great place to pick up rustic canning jar rings,, Thanks for sharing
So incredibly cool! I have a large box filled with canning rings. Craft night anyone?
Seriously…one of the coolest thing EVER!!!
I am so impressed. My daughter has already made one and is loving it. Thanks for sharing!!!
I love this pumpkin so much I’ve voted for it, pinned it and joined your blog! ~ Maureen
I’m going to be selling homemade jams and jellies at an artisan’s market inside my local Williams-Sonoma at the end of October. How perfect will this be as a table decoration. Love it! You’re amazing!
Sydney
InaJamColorado.blogspot.com
Broken-Branch.com
What a cute idea. I love your little “Junkin’ Pumpkin.” Thanks for sharing.
Blessings,
Deborah H. Bateman-Author
What perfect timing! I was just trying to figure out something to do with a bunch of lids yesterday. I am so excited! What a genius idea! Visiting from Savvy!
I love this idea!!! Genius… I might have to copy you on this 🙂
Totally brilliant!
So sweet, Kristin! I love easy craft projects and this is adorable! I’m including a link back in my 5 minute fall crafts highlights tomorrow. Thanks for sharing. Hope all is well – looks like you’ve been one busy girl!
This is my first time visiting your site. It’s amazing! I love this idea. I have canning lids coming out my ears, and I love to decorate with pumpkins for Fall. I would be happy to have you share this and any other idea you would like to link up to “One Creative Weekend” at OneCreativeMommy.com. The party is open every Fri-Wed.
I’m a new linky follower.
OMG! This is the most creative pumpkin project I have seen!! Thanks for sharing! Will be sharing on my FB/Twitter:)
Seriously love this Kristin!
I didn’t make it out to fallbrook this year 🙁 Every Fri Sat and Sun is booked with soccer and baseball, mama needs a break.
XO
Kristin
PS, i’ll be featuring it later today.
LOVE!! Totally trying this! I have the lids and wanted to do a wreath BUT I didn’t have ENOUGH lids…I bet I have enough for a pumpkin!!
Brilliant!!! Love it!!
Love it.
Totally brilliant idea!!~and now I am tearing my house apart looking for my stash of old jar rings! Where did I put them?????
brilliant, so much i want to make some of these and hope to share my version of your brilliant ideal, thanks so much for posting …….amazing!!!
ava
Totally Brilliant! Love it!!!!
Love this!! I have to make one for fall! Thanks for sharing! Pinned!
Love it! Going to give it a try…thanks for posting
Totally brilliant!! I love the creativity I see in others, I never would have thought of using canning lids!!
Hay I really liked your jar pumpkin.I am going to try one of my on
Me again! Obviously I am not the only one that totally loves this! lol! Thanks so much for sharing at the Clean and Scentsible. I’ll be featuring this tomorrow. Hope the weather has cooled down for you a bit and you are enjoying your weekend!
Jenn xo
I absolutely love this!!! This is gonna be my centerpieces for my wedding:)
I love this!
I love this!
Genius!
Where is the link to the Christmas wreath? Love the pumpkin!
Totally Kickass AWESOME~! I love it when something is SEEN in a different light. Just wish I would’ve thought of it, will make my own spin on it, but yep, so doing these :*)
God bless and thanks for sharing, so stealing~! and amending to make it my own so I don’t feel so guilty either :*) weeeeeeeee~!!!!!!!!!!!
This is so super cute. My mom has 5 boxes of canning jar rings. I’m going to snitch some. This would be cute painted red for a teacher. Love this!
Brilliant! So simple and yet so wonderful! And I too love it without the paint. Thank you for sharing your talent! Absolutely is NOT lame!
This is one I think even I can do. Definitely going to make one. Love it without paint.
Love this so unique! I shared on Facebook!
i think you are a genius!!!!!! thanks so much for sharing! 🙂 i am going to make one (or two) 😉
Super cute! Love the rustic look of the old vs. new, gold vs. silver of the rings. Love it! Maybe put in a note that they are canning rings (also called screwbands), not lids. I mention this only because someone going out to purchase them might get confused. (You cannot buy the screwbands without the lids but you can vice versa.)
thanks for this. I was wondering why the lids had holes, and feared that I would have to cut them!!! You have saved me, and set me back on course for a ‘simple’ project. *Sigh*
I know this will sound ridiculous, but where are you tying them together so they don’t move around? I love them just the way you made then and if I can get them tied together, I would stick an LED light in the middle for sitting outside or on a porch. I think it would be really cute lite up. If you want to contact me about the tying part,my E-mail, is donnalgentry@hotmail.com. Thanks, great idea!
Brilliantly awesome!
Love this; just made one! Thanks for sharing!
Lovely! this is very inspiring! Good going
Cheers
Murtaza
http://www.dzinetrip.com
SO cute!
Cutest thing I have seen for a LONG time!
Totally Brilliant!! I love this pumpkin I’m going to make one!!! Thanks
Not lame at all — just plain stinkin’ cute! Seriously — really, really stinkin’ cute!
oh I love this…;) can’t wait to give it a shot.;)thanks for sharing.)
Adorable. And to think I’ve been tossing out my rusty rings.
TOTALLY BRILLIANT! I’M PINNING AND I’M MAKING ONE … AND I’M SHOUTING!
🙂
Linda
Agreed—-Totally Brilliant!!! Guess what the grandkids will be making for their next craft????
Thanx a bunch
Love this! Featuring it on my next blog. I love upcycling!
Totally cool!
Brilliant! So fun. I’m not a person who decorates for the different holidays, but this is one that I would probably try!
Definitely Brill!
gotta make me one !!!!! LOVE IT !!!!
Absolutely the cutest, most clever pumpkin idea I’ve seen this season! How inventive! I’d like to invite you to share this at my linky party, Twirl & Take a Bow at http://www.houseontheway.com. I think it’d make a great addition!Leslie
Brilliant!!! I’ve been working on some shabby/rustic pumpkins myself and I think this one would fit in perfectly! I like that you didn’t paint it.
visiting from http://www.sarahdawndesigns.blogspot.com
I love the rustic look, but I think if I try it I’ll spray it. Just because it won’t look as cool with brand new lids 🙂 and mine aren’t all cool and rustic :(.
Its terrific, I so have to make this..
This is awesome Kristin – such a great idea!
You’re right … it’s brilliant! I absolutely love it.
I love this….so dang creative!! Come link up to Centerpiece Wednesday and share your amazing idea with us.
Karin
Kristin, this is so ME because I can a lot! I hope you don’t mind if I copy you. Love it!
Kristin, that is so brilliant and I like it just like it is.
Awesome! I love this & plan to make one!
I totally love it, how creative!!!
Oh my word! I totally completely LOVE this!
love it
Brilliantly Junky!!! Pinning!
<3 Christina at I Gotta Create!
Wildly Original linky party is open.
Forgot to mention, newest linky follower!
HOPE TO SEE YOU VISIT AND FOLLOW TOO!
well you can tell by your comments, totally brilliant. I am pinning this, love it, and want to make one!
Totally, TOTALLY brilliant!
Oh my you are a genius! This is absolutely adorable! <3
Brilliant. I love this cutie. I have a tons of rings on a string sitting there and never saw a pumpkin…you are genius!
Always looking for ways to use my junk. Can’t wait to do it. Thanks. Brilliant? Yes indeed!
So cool! I now wish I had saved all my slightly rusted lid rings!
olá
surpreendente a sua criatividade
estou encantada
ficou lindissima
e com reutilização de tampinhas
parabéns
bj
lu
Loooove this!! Totally going to raid my canning stuff. So smart!!
BRILLIANT!
Great idea! I am featuring this at somedaycrafts.blogspot.com. My readers will love this.
How many lids did you use.looks like about 18 or 20?
So, so cute! From the pic a friend posted on facebook, I thought it was from bent rulers and thought “Uhh…HOW!?” But this is so cute and so easy, i LOVE it!
Love! I am picking up some cinnamon sticks in this weeks grocery run and will definitely snag a few to do this. I might have to make them as a harvest gift for friends. I like the rusted look also but can see the cuteness of painting them and may have to do a couple although my husband may want them back for canning once fall is over. We’ll see.
So cool! I love it the way it is! Great job!
Very creative. I have about a million of those lids laying around here. I might just try this.
Zero Lameness! Thanks for sharing!!
Totally brilliant! This is a can-do for my Italian rustic kitchen. Thanks for sharing.
this is soooo cute!! I think I am gonna try to find a way to do it with baby food jar lids.
Most definitely brilliant!
brilliant! i love things like this!!!
Lame… had to throw it out there for good measure 😉 totally going to make some!
I think its brillian and I just subscibed to you blog on the basis of this find …dazzle me some more!!!
My vote is Brilliant! How cute and easy and inexpensive! I will definitely be making one for myself. Pinned!! I’d love for you to share this at my link party. http://adventuresofadiymom.blogspot.com/2012/09/terrific-tuesdays-32.html
Rachel
It’s so Cute and already all over pinterest.
adorable, and so original~ LOVE IT!
Totally brilliant! I’ve got some lids, so I’m going to be brilliant like you. : )
Oh my gosh Kristen this is soooo cute!!! I love it!
This comment has been removed by the author.
I LOVE THIS! I am addicted to Mason Jars and MUST make some of these! Thanks for the inspiration.
love it! definitely leave “as is”, it’s really fun!
I love it, very creative – is your Christmas wreath on your blog somewhere (hint hint 😉
JoAnn
Totally Brilliant….who would have thought?
I LOVE this and would totally leave it unpainted too!
This is a really cool and creative idea! Love it!
Brilliant! I love it!!
Brilliant !!!!!!!!!! (and we ALL have things still hanging up since christmas, so no big deal!) But now I;m curious, what does (did) the wreath look like ??????
just saw it on a friend’s FB, and I like it! Will do it, too!
I LOVE it! But of course I’d say that! Thanks so much for the mention in your post too!
I have a feeling your industrial pumpkin will go viral.. 🙂
Oh my cuteness! LOVE it!
Totally cool! I love it!
Adorbs!!
I think it is great and plan to make one.
I love it, but…they are rings, not lids! The lids are the little flat things that the rings hold on to the jars!
This is one of those “WOW” tutorials. Love how unique and fun this is for fall! Found you on 36th Avenue FB page, and I’m sending my readers your way, too!
Kari-Ucreate
LOVE THIS!!! They will make great place markers.
Absolutely love it!!
You just saved a bunch of rusty rings I was going to toss, lol. They are going to make perfect pumpkins, thanks for the idea, love it!!!!
Very cute and simple! LOve it!
I love this! Great idea!
Totally Brilliant!
Brilliant – thanks for the idea!
Genius! I am so going to make a bunch of these for fall decorations (I have more rusty rings than I know what to do with)
Oh wow! Cutest thing ever!
I love it too! Just plain fun! 😉
Donna
Brilliant! I love it and will definitely be making my own!
Totally brilliant – I love it.
This is super cute! Pinning and sharing on my FB page!
Super cute!! I like all of the different colored lids rather than spray painting it as well. Fab!!
LOVE that pumpkin! What a great idea!
Jen
athomeinthenorthwestblog.com
Definitely totally brilliant and so easy.
Totally brilliant! I’m pinning this to my “Autumn Wonderful” board on Pinterest! 🙂
I love it! I have a box full of lids that I have been saving…totally doing this!
I loved it when I saw it on Facebook, but I love it even more now that I see the post and how easy it is to make!! Great idea! 🙂
BRILLIANT
Love it girly
xoxo
Kate
LOVE this! SO sweet for a kitchen! Adorbs 🙂
Add me to the totally brilliant camp! I love the variation of colours and what a fun, quirky decoration this can be for any space. I’m hoping I have a enough rings in my stash to replicate this because it is awesome 🙂
I had to click on this to see how you made it! Love this!!! I like that you didn’t spray it. Looks perfect just the way it is!
I love the rustic fabulousness of it too! How adorable!
Totally brilliant indeed!! Love it. Megan
Totally Brilliant.
I love the canning lid pumpkin! That’s Awesome! Happy Autumn! Suellen!
Awesome! So natural and just right for the kitchen. Very pretty.
My kind of project,fast and easy! Thank you! Now to find me some some jar rings! Hmmm!
The ” Junkin Pumpkin ” is adorable ! And so easy to make ..I have to say that your facebook page is wonderful .Thanks for all your beautiful ideas…
Love it. I am going to make some for table centerpieces for a conference next month! Totally Brilliant!!!
Beautiful !!! How were you able to keep them together, glued?
I love love LOVE IT! Cutest thing EVER!
I <3 it!!!!!!
Absolutely the cutest idea I’ve ever seen!
I’m a bit late for autumn but I love this idea and I am sharing it on my facebook page. I am going to make these for this autumn. Great idea! Thanks for sharing.