This post may contain affiliate links. Please read our disclosure policy.


These Candy Cane Cookies are a holiday favorite. Buttery cookies with a hint of peppermint and an adorable candy cane shape!
Is there anything cuter than cookie candy canes on your Christmas cookie tray? They fit in perfectly with my popular Cheesecake Cookies, Eggnog Cookies, and Christmas Pinwheel Cookies.

Why I Love This Recipe
Holiday baking is always my favorite. Every year, I try a few new Christmas cookie recipes, but I always revisit a couple of favorites, like these Candy Cane Cookies.
The cookies aren’t too sweet – they taste a bit like a peppermint-infused shortbread. The texture is tender and buttery, but it’s the adorable candy cane shape and bright red color that makes them completely irresistible.
recipe walk-through
How to Make Candy Cane Cookies
Making the cookie dough for this recipe is very simple – but they do take a little work to form the dough into the candy cane cookie shape. Trust me though, it’s totally worth it!
- Make the dough. Cream together softened butter and sugar, then add egg yolks and peppermint extract before mixing in the dry ingredients.
- Divide the dough. Divide the cookie dough into two equal pieces, then mix the red food coloring with one half. The other half will just stay a natural color.
- Chill. Form each half of the dough into a ball and wrap with plastic wrap. Pop them into the fridge for at least 4 hours or up to 2-3 days.
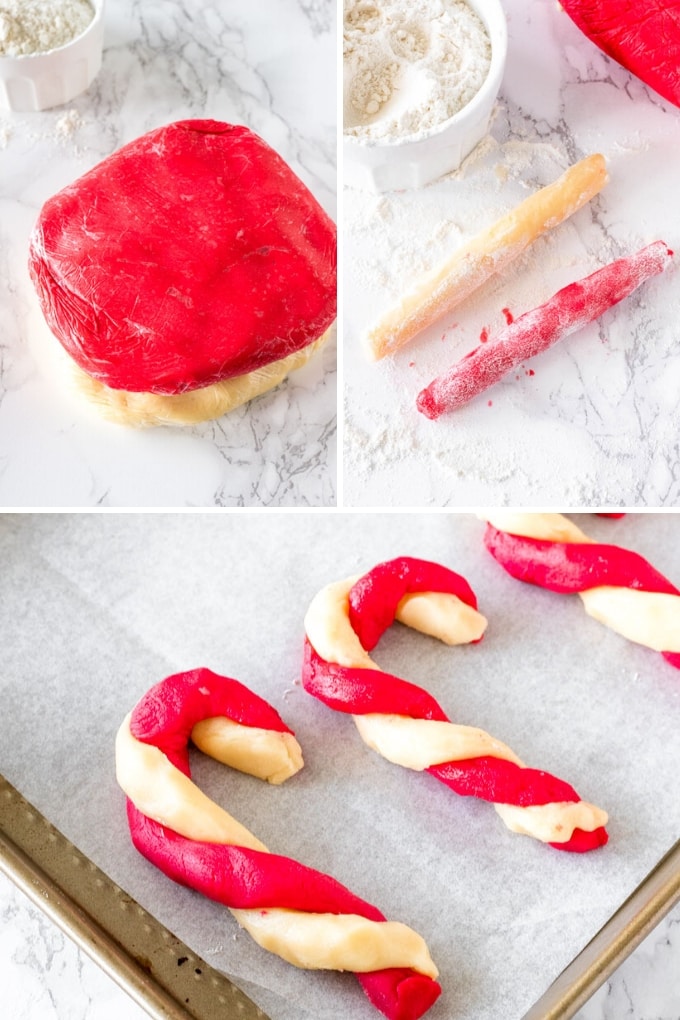
- Form the candy cane shape. Take the dough out of the fridge for about 10-15 minutes and let it sit on the counter so it will be easier to work with but not sticky. Using lightly floured hands, take a golf ball-sized piece of each color and roll into a log shape about 4-5 inches long. Pinch the red and white pieces together and twist/wrap into a candy cane shape.
- Garnish. This step is optional, but I like to brush the tops of the cookies with an egg wash and sprinkle with some coarse sugar for a pretty finish and presentation. You could also top with some finely crushed peppermint candies.
- Bake. Arrange cookies on a parchment or silicone mat-lined baking sheet and bake for 8-10 minutes in a 350℉ oven. Cool on a wire rack.
Storage Tips
How to Store Cookies
- Make ahead: Make the dough ahead of time. Wrap tightly with plastic wrap and chill in the fridge for up to 3 days. To freeze the dough, wrap in plastic and place in a freezer-safe bag. Freeze for up to 2 months.
- Room temperature: Store cookies in an airtight container or resealable plastic bag for up to 4-5 days.
- Freeze: Cool cookies completely, then place in a freezer-safe container or plastic bag and freeze for up to 2 months.
Recipe Tips
- Peppermint flavor: If you don’t like peppermint, feel free to omit the peppermint extract. In its place, add 1 teaspoon of vanilla extract or almond extract to give the cookies a delicious, buttery sugar cookie flavor.
- Food coloring: I highly recommend using gel food coloring because it packs a bigger punch of color. Start with a few drops and then add more as needed.
- Allow time for chilling. Chilling the dough is absolutely mandatory – otherwise, the cookie dough will be too sticky to work with.
- Flour hands and surface. The dough can be a little sticky, so I recommend patting a little flour on the work surface and on your hands.

More Christmas Cookies
- Ricotta Cookies
- Iced Thumbprint Grinch Cookies
- Red Velvet Cookies
- Chocolate Crinkle Cookies
- Butter Cookies
- Cranberry Chocolate Chip Cookies

Candy Cane Cookies
Ingredients
Candy Cane Cookie Dough
- 2 1/2 cups All-purpose flour
- 1/2 teaspoon Baking powder
- 1/4 teaspoon Salt
- 1 cup Unsalted butter softened to room temperature
- 1/2 cup White sugar
- 1/2 cup Powdered sugar
- 2 large Egg yolks
- 1 teaspoon Peppermint extract* or more to taste
- Red food coloring
Optional Egg Wash & Topping
- 1 large Egg white
- 2 teaspoons Milk
- Coarse sugar or crushed candy canes
Instructions
- In a large bowl whisk together the flour, baking powder, and salt.
- In a separate large bowl, beat the butter until soft. Beat in the sugars.
- Beat in the egg yolks and peppermint extract.
- With the mixer starting on low speed, beat in the flour mixture.
- Divide the dough into 2 equal pieces. Wrap the first piece in plastic wrap.
- With the remaining half of the dough, beat in the red food coloring – starting with just a few drops until the desired color is reached.
- Wrap the red dough in plastic wrap. Place both in the fridge for at least 4 hours to chill.
- Preheat the oven to 350F degrees and line cookie sheets with parchment paper.
- Take the dough out of the fridge. If it's rock hard, let it sit at room temperature for about 10 minutes so it's malleable.
- With lightly floured hands, break off sections of white dough about 2 teaspoons in size. Pinch and roll each section until it's shaped like a log about 4-5 inches long.
- Do the same with the red dough.
- Using one log of the red dough and one of the white dough, wrap the logs around each other and form into a candy cane shape. Place the candy canes 2 inches apart on the lined cookie sheet.
- For the optional egg wash – whisk together the egg white and teaspoon of milk, then brush the tops of each cookie and sprinkle the top with sugar or crushed candy canes.
- Bake in the preheated oven for 8-10 minutes, or until the tops look set. Cool fully on the tray.
Notes
Nutrition
Nutritional Disclaimer Kristin Maxwell of “Yellow Bliss Road” is not a dietician or nutritionist, and any nutritional information shared is an estimate. For accurate calorie counts and other nutritional values, we recommend running the ingredients through your preferred online nutritional calculator. Calories and other nutritional values can vary depending on which brands were used.


Great