This post may contain affiliate links. Please read our disclosure policy.
These Baked Italian Sub Sandwiches are hot, melty, and made for game day. Layered with genoa salami, capicola, banana peppers, and provolone on toasted rolls, they come together fast and disappear even faster. They’re easy to eat and easy to love.
More hot, melty sandwiches: Hot Italian Sliders | Italian Beef Sandwich | Ham and Cheese Sliders

Before You Get Started
A few small moves make the difference between a sturdy, melty sub and a soggy one. Keep these in mind before you start.
- Don’t slice the rolls all the way through. Leave the hinge intact so each roll cradles the fillings instead of falling apart.
- Toast the rolls first. A quick 5-minute bake before filling keeps the bread from going soggy under the hot meat and cheese.
- Add wet toppings after baking. Lettuce, tomato, mayo, and dressing go on after the oven so nothing wilts or turns the bread mushy.
recipe walk-through
How to Make Baked Italian Subs
See the recipe card below for full, detailed instructions
These come together in three easy steps. Here’s how to build them.
Step 1: Toast the Rolls
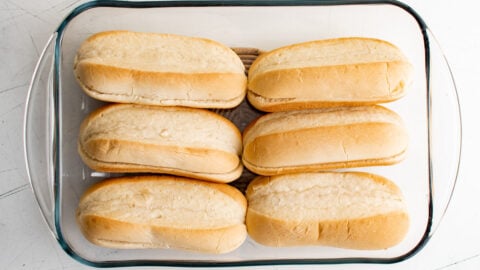
Preheat the oven to 350°F.
Slice 6 hoagie rolls lengthwise, leaving the hinge attached, and set them split-side up in a 9×13-inch baking pan.
Bake for 5 minutes to lightly toast the bread. This first toast is what keeps the rolls firm once the fillings go in.

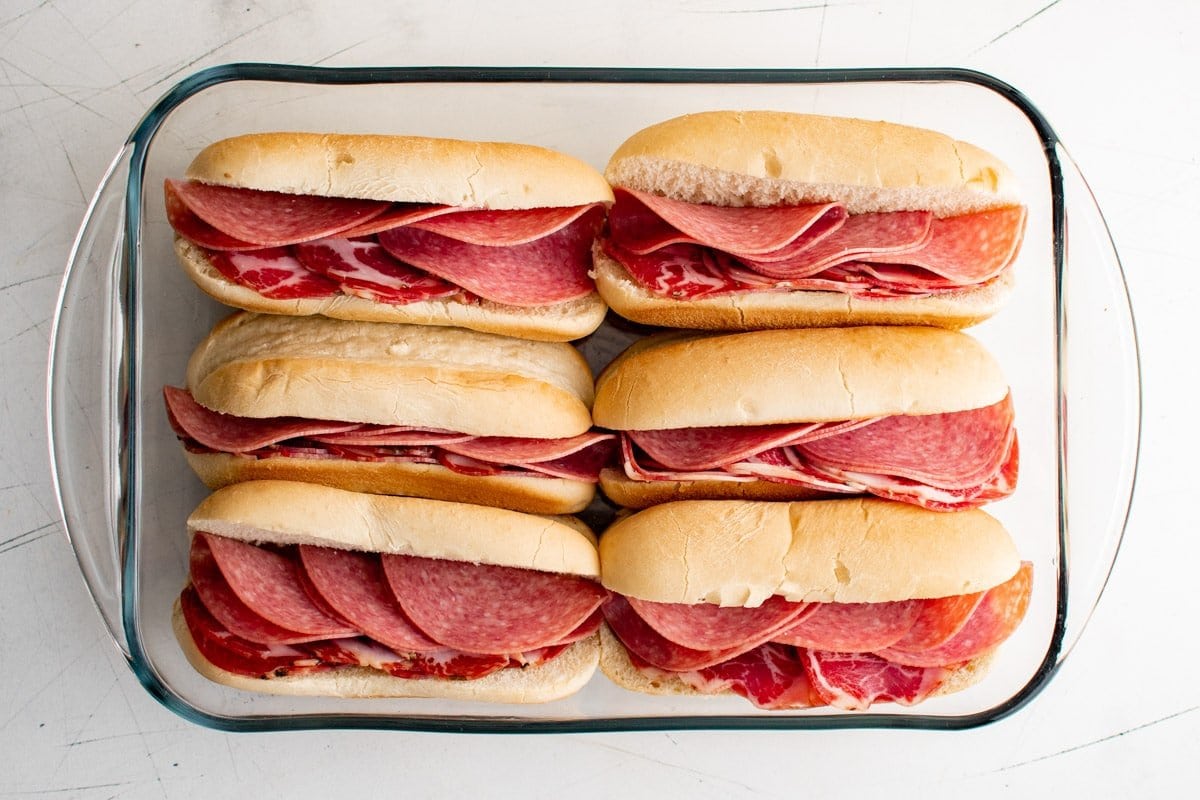
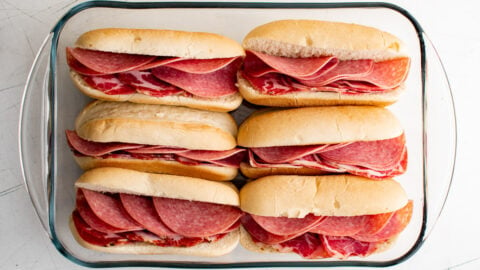
Step 2: Layer the Meats and Peppers
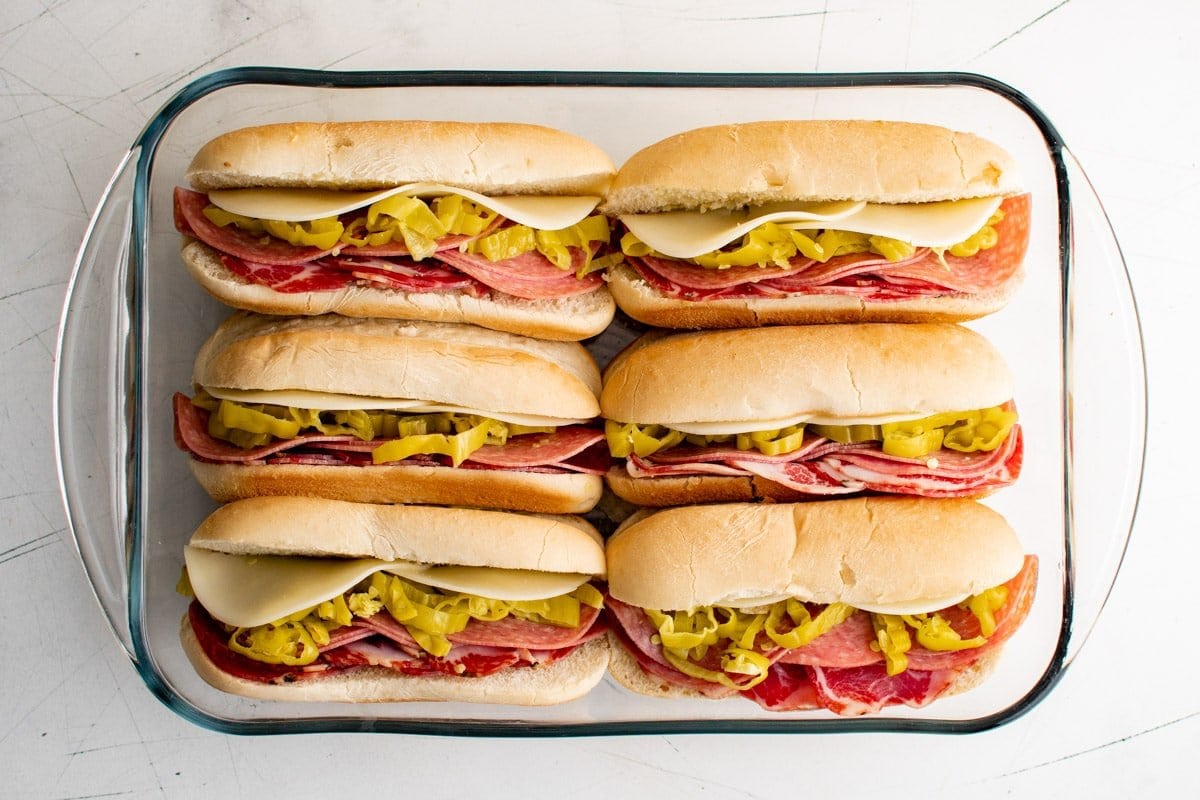
Pull the pan out and start building. Onto each bottom, layer 3 folded slices of capicola, then 3 folded slices of salami, then a spoonful of sliced banana peppers.
Folding the meat adds height and that satisfying deli-stacked look.
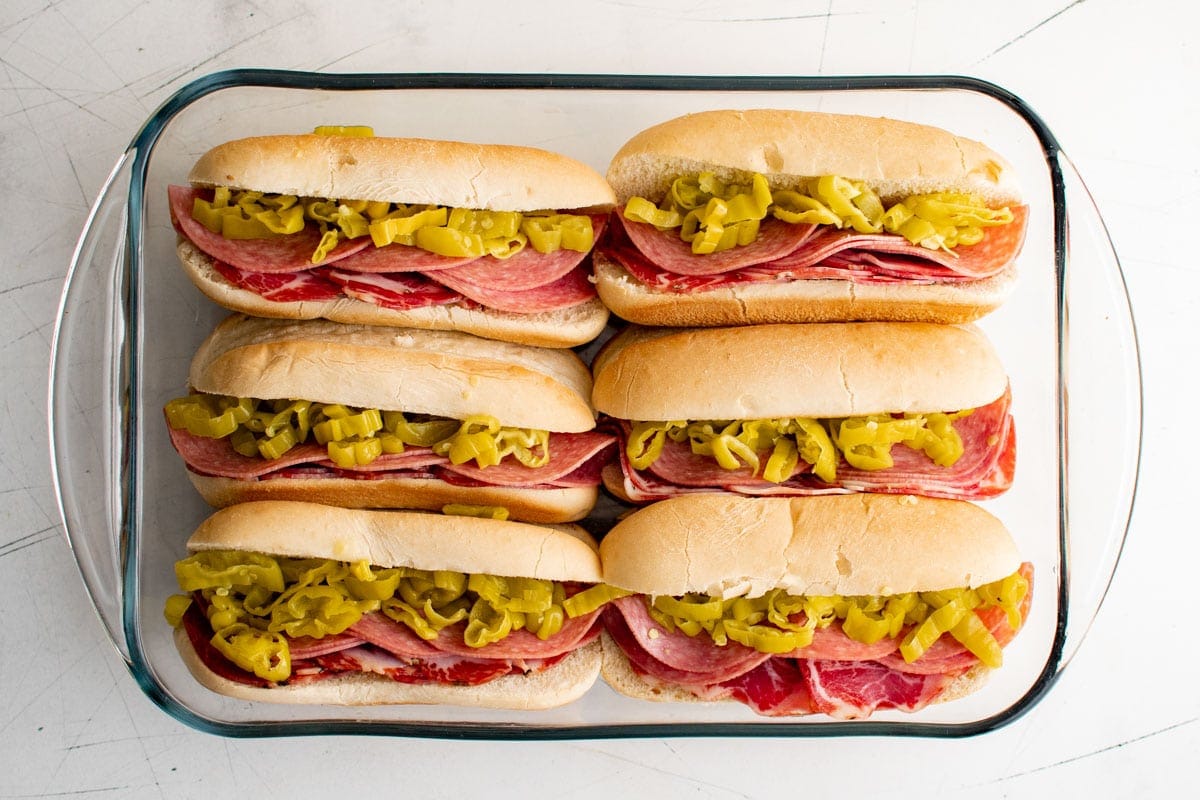
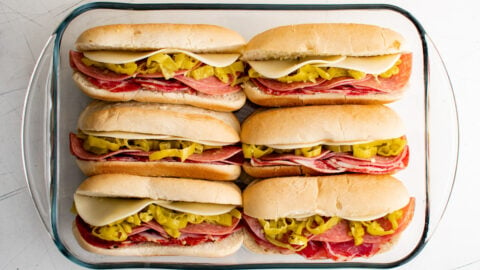
Step 3: Add the Cheese and Bake
Fold each slice of provolone in half and lay it over the peppers so it melts down over everything.
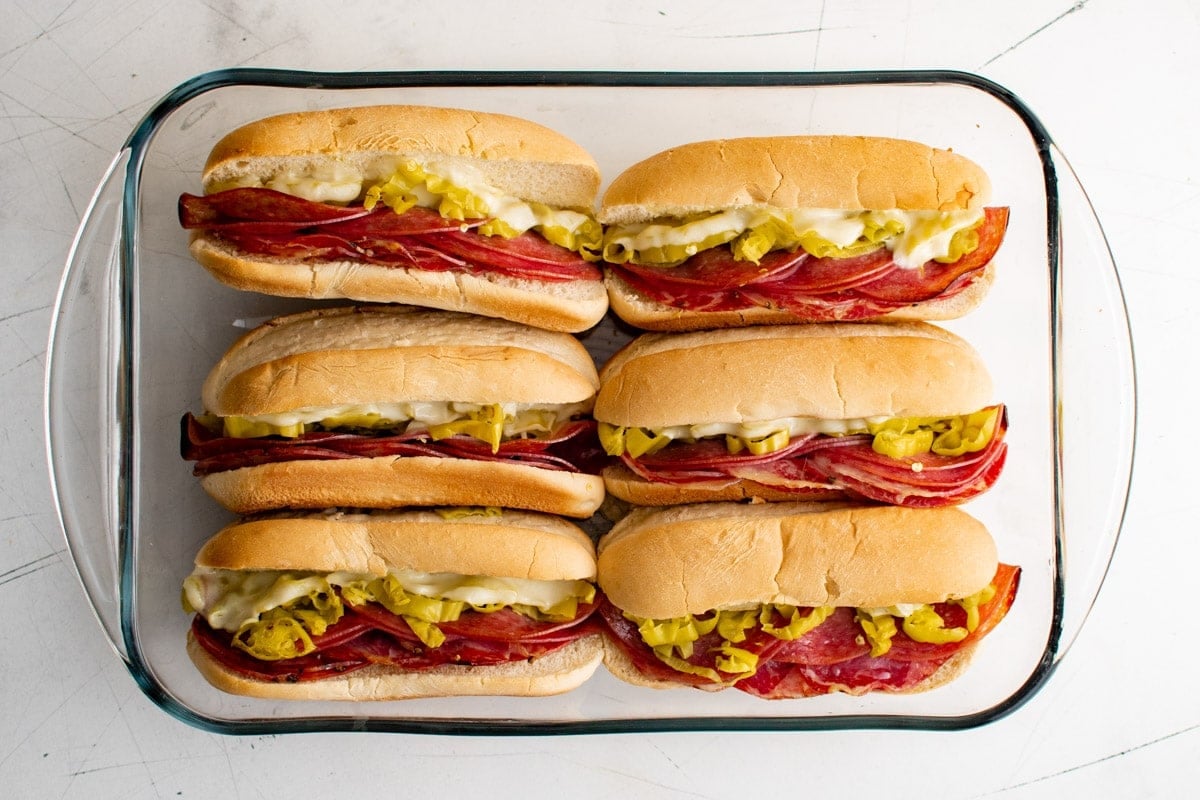
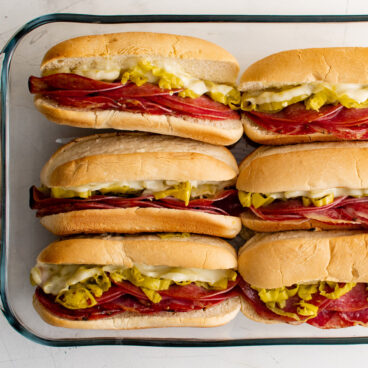
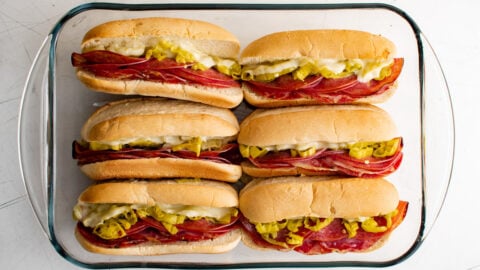
Return the pan to the oven and bake for 20 minutes, until the cheese is fully melted and the sandwiches are hot through.
Serve right away with Italian dressing for dipping. That dressing is the oil-and-vinegar style sauce you find on a classic sub, so don’t skip it.
- Want them cold instead? Skip the bake and build the subs straight on untoasted rolls for a classic cold-cut version.
Serving Ideas
These subs are hearty enough to anchor a meal, so I keep the sides simple and crowd-friendly. Here are a few recommendations from the site:
- Antipasto Pasta Salad (or Italian Spaghetti Salad)
- Sauteed Broccoli
- Baked French Fries (or Zucchini Fries)
- Roasted Fingerling Potatoes
A crisp Caesar Salad (or my Copycat Olive Garden Salad) rounds things out if you want something lighter on the table.
Feeding a crowd? Double or triple the batch across sheet pans and set out a toppings bar with shredded lettuce, tomato, red onion, mayo, and mustard so everyone can build their own.

Storage Tips
Storage and Reheating Leftovers
Best served fresh. These are at their best hot out of the oven, but leftovers keep well for a quick lunch.
To store, wrap each sub in plastic wrap or seal in a resealable bag and refrigerate for up to 4 days.
To reheat, wrap in foil and warm in a 350°F oven for 5 to 10 minutes, until heated through.
To make ahead, assemble the subs unbaked, cover, and refrigerate. Bake straight from the fridge when you’re ready to serve, adding a few extra minutes to the bake time.
Frequently Asked Questions
Can I add hot Italian sausage?
Yes, and it’s a great addition. Brown the sausage completely in a skillet first, since it won’t cook through during the short bake. Then crumble or slice it over the meats before adding the cheese.
What kind of rolls hold up best?
Sturdy hoagie or sub rolls are ideal. You want bread soft enough to bite easily but firm enough to hold the fillings without collapsing. Ciabatta or soft Italian rolls also work well.
Can I use different meats?
Absolutely. Pepperoni, mortadella, or sliced deli ham all fit right in. Stick with cured Italian-style deli meats for that classic sub flavor.

More Sandwiches and Sliders To Try
- Baked French Dip Sandwiches
- Cuban Sandwich
- Shrimp Po Boy Sandwich
- Monte Cristo Sliders
- Roast Beef Sliders
Baked Italian Sub Sandwiches
Ingredients
- 6 hoagie or sub rolls sliced lengthwise with the hinge attached
- 18 slices capicola hot ham
- 18 slices Genoa salami
- 1 cup banana peppers sliced
- 6 slices provolone cheese
- Italian dressing for serving
- Optional, for serving: shredded lettuce, sliced tomatoes, pepperoncini, sliced olives, red onions
Instructions
- Preheat the oven to 350°F. Slice each roll lengthwise without cutting all the way through, leaving the hinge attached so it can hold the fillings. Set the rolls split-side up in a 9×13-inch baking pan.
- Bake the rolls for 5 minutes, just until lightly toasted. This quick toast is what keeps them from going soggy once the fillings go in.
- Layer 3 folded slices of capicola onto the bottom of each roll, then top with 3 folded slices of salami. Folding the meat adds height and that satisfying deli-stacked look.
- Spoon the sliced banana peppers evenly over the meat on all 6 sandwiches.
- Fold each slice of provolone in half and lay it over the peppers, covering the fillings so the cheese can melt down over everything.
- Return the pan to the oven and bake for 20 minutes, until the provolone is fully melted and the subs are hot through. Serve right away with Italian dressing for dipping.
Notes
- Use sturdy rolls. Hoagie or sub rolls work best: soft enough to bite easily, firm enough that they won’t collapse under the fillings.
- Don’t slice all the way through. Leaving the hinge intact lets each roll cradle the meat, peppers, and cheese instead of falling apart.
- Toast before filling. The 5-minute pre-bake is the key to bread that stays firm instead of turning soggy.
- Add wet toppings after baking. Lettuce, tomato, mayo, and mustard go on once the subs come out of the oven, so nothing wilts.
- Don’t skip the dressing. Italian dressing for dipping is the oil-and-vinegar style sauce that gives a classic sub its flavor.
- Swap the meats freely. Pepperoni, mortadella, or deli ham all work. Stick with cured Italian-style meats for that classic taste.
- Make ahead: Assemble the subs unbaked, cover, and refrigerate. Bake straight from the fridge, adding a few minutes to the time.
- Storage: Wrap and refrigerate up to 4 days. Reheat wrapped in foil at 350°F for 5 to 10 minutes, until warmed through.
Nutrition
Nutritional Disclaimer Kristin Maxwell of “Yellow Bliss Road” is not a dietician or nutritionist, and any nutritional information shared is an estimate. For accurate calorie counts and other nutritional values, we recommend running the ingredients through your preferred online nutritional calculator. Calories and other nutritional values can vary depending on which brands were used.