This post may contain affiliate links. Please read our disclosure policy.


Breakfast Egg Muffins are protein-packed, totally customizable, and ready in just 30 minutes. Whisk together eggs and milk, add your favorite mix-ins (cheese, veggies, meats), and bake in a muffin pan for an easy grab-and-go breakfast the whole family will love. They’re perfect for meal prep and freeze beautifully.
For more make-ahead breakfast ideas, try these Egg & Sausage Breakfast Muffins, Freezer Breakfast Burritos, or Freezer Breakfast Sandwiches.

3 Tips That Make or Break This Recipe
These egg muffins are simple, but a few small details make a big difference in how they turn out.
- Spray your muffin pan generously. Eggs stick to everything, and a light spray won’t cut it here. Coat every cup well with nonstick cooking spray, or better yet, use silicone baking cups for the easiest release.
- Cook your fillings before adding them. The eggs only bake for about 20 minutes, which isn’t enough time to cook raw vegetables or meat. Saute veggies until softened and make sure any meat (bacon, sausage, ham) is fully cooked before it goes in the cups.
- Fill each cup about ¾ full. The eggs puff up as they bake, so leave some room at the top. Overfilling leads to overflow and uneven cooking.
RECIPE WALK-THROUGH
How to Make Breakfast Egg Muffins
See the recipe card below for full, detailed instructions
This recipe comes together fast. You’ll have a full batch of egg muffins ready in about 30 minutes, start to finish.
Step 1: Mix the Egg Base
Preheat your oven to 350°F. In a large bowl, whisk together 10 eggs, ¼ cup of milk, and a pinch of salt and pepper until the mixture is smooth and evenly combined.
You want it well blended so every muffin bakes consistently.
Use whole milk or 2% for the best texture. The milk keeps the eggs tender and prevents them from turning rubbery. You can also use unsweetened almond milk, oat milk, or any milk alternative if you need a dairy-free option.
Step 2: Add Your Fillings
Spray a 12-count muffin pan generously with nonstick cooking spray. Divide your cooked fillings (veggies, meats, cheese) evenly among the cups, filling each about halfway with mix-ins. Then pour the egg mixture over the top, filling each cup about ¾ full.
Layer cheese on both the bottom and top. Adding a little cheese under the egg mixture and more on top gives you melty cheese throughout instead of just on the surface.
Step 3: Bake Until Set
Bake for about 20 minutes at 350°F. The egg muffins are done when the tops are lightly puffed and set. If you insert a toothpick into the center, it should come out clean, and the eggs will start pulling away slightly from the sides of the pan.
Let them cool in the pan for a couple of minutes, then gently slide a thin knife around the edges to pop them out.
Don’t overbake. Pull them out as soon as the centers are set. They’ll continue to firm up slightly as they cool, and overbaking can make them dry or rubbery.
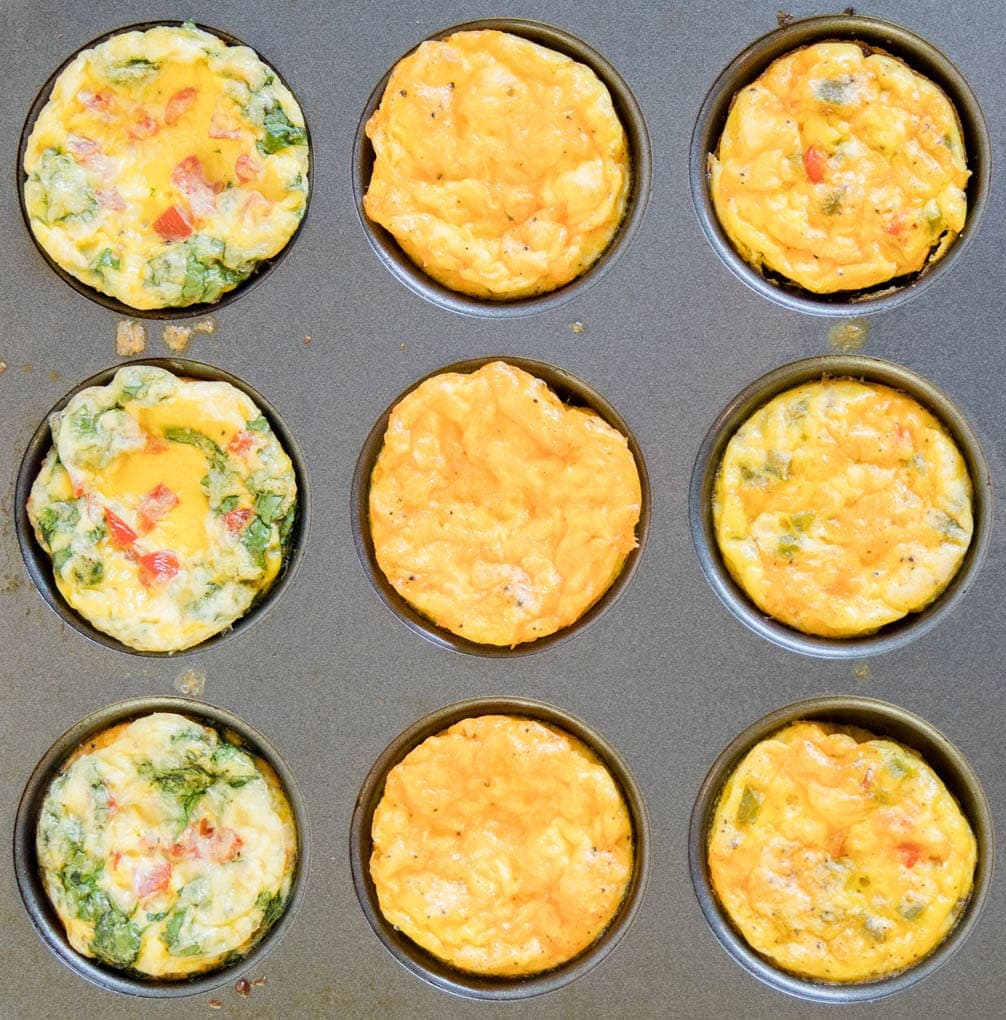
Favorite Mix-In Combinations
The best part about egg muffins is how easy they are to customize. You can prep the egg base, then let everyone pick their own fillings, making them different for every person in the family.
Here are some of our favorite combinations:
- Classic: Diced Canadian bacon and shredded cheddar
- Denver Omelet: Diced ham, onions, bell peppers, mushrooms, and cheese (love this combo? Try our Baked Denver Omelet for a full-size version)
- Spinach and Tomato: Baby spinach, diced tomatoes, and shredded mozzarella
- Veggie Loaded: Bell peppers, onions, mushrooms, and your favorite cheese
- Meat Lover’s: Crumbled bacon, diced ham, and cooked sausage with cheddar
Keep fillings small and uniform. Dice everything into small, similar-sized pieces so the muffins bake evenly and hold together well.
You can also make a simple batch with just eggs, cheese, and salt and pepper if you want to keep things minimal. Each plain egg muffin (before add-ins) is only about 50 calories, so they’re a great base to build on depending on what your family likes.

Serving Ideas
Egg muffins are great on their own, but if you want to round out the meal, serve them alongside Breakfast Potatoes, Breakfast Hash, or Homemade Hash Browns.
A Peach Banana Smoothie or Apple Smoothie makes a great pairing, too.
For weekend brunch, check out our list of Brunch Recipes for more ideas.
Storage Tips
Storage, Freezing & Reheating
Egg muffins are one of the best make-ahead breakfasts you can keep on hand. Make a full batch on the weekend and you’ll have easy grab-and-go breakfasts ready for the week.
Refrigerator: Store in an airtight container in the fridge for 3 to 4 days. Layer parchment paper between the muffins to prevent sticking.
Freezer: Let the egg muffins cool completely, then wrap each one individually in wax paper or parchment paper and place in a freezer-safe bag or airtight container. They’ll keep for up to 3 months.
Reheating from the fridge: Wrap in a damp paper towel and microwave on 50% power for about 1 minute, or until heated through.
Reheating from frozen: No need to thaw first. Wrap in a damp paper towel and microwave on 50% power for about 2 minutes. Times may vary depending on your microwave.
- For a crowd, reheat in the oven. Place egg muffins on a baking sheet and warm at 325°F for 10 to 15 minutes. This works great when you need to reheat a batch at once.
Frequently Asked Questions
Can I make egg muffins in a mini muffin pan?
Yes! Mini egg muffins work great for smaller portions or as a snack. Cut the bake time roughly in half and start checking around 8 to 10 minutes. They’re done when the centers are set and a toothpick comes out clean.
How do I keep egg muffins from sticking to the pan?
A generous coating of nonstick cooking spray is essential. Don’t go light here. For the easiest release, use silicone baking cups instead of a metal pan. You can also try lining standard muffin cups with parchment paper liners, but silicone works best.
Can I use a milk alternative instead of regular milk?
Absolutely. Almond milk, oat milk, and other dairy-free alternatives all work well in this recipe. The amount is small enough that it won’t change the flavor or texture noticeably. Make sure to use a plain, unsweetened variety.
Why did my egg muffins turn out rubbery or watery?
Rubbery egg muffins usually means they were overbaked. Pull them from the oven as soon as the centers are set. Watery muffins can happen if your veggies released too much moisture during baking. Make sure to saute vegetables first and drain any excess liquid before adding them to the cups.
More Easy Breakfast Ideas
- Egg & Sausage Breakfast Muffins
- Microwave Scrambled Eggs
- Hash Brown Waffles
- Freezer Breakfast Burritos
- Freezer Breakfast Sandwiches

Breakfast Egg Muffins
Equipment
- 12-count muffin pan
- Silicone baking cups (optional, recommended)
Ingredients
Egg Base:
- 10 eggs
- 1/4 cup milk (whole or 2% recommended)
- Salt and pepper to taste
Optional Add-Ins (mix and match):
- Shredded cheese (cheddar, mozzarella, pepper jack, or colby jack)
- Diced cooked ham or Canadian bacon
- Cooked and crumbled bacon
- Cooked and crumbled sausage
- Diced bell peppers (sauteed)
- Diced onions (sauteed)
- Chopped spinach
- Diced mushrooms (sauteed)
- Diced tomatoes
Instructions
- Preheat oven to 350°F.
- Spray a 12-count muffin pan generously with nonstick cooking spray, or line with silicone baking cups.
- Whisk together eggs, milk, and a pinch of salt and pepper in a large bowl until smooth and well combined.
- Divide your cooked fillings (veggies, meats, and/or cheese) evenly among the muffin cups as desired.
- Pour the egg mixture into each cup, filling about ¾ full.
- Bake for about 20 minutes, or until eggs are fully set and a toothpick inserted in the center comes out clean. The tops will be lightly puffed and the edges will start pulling away from the pan.
- Cool in the pan for 2 minutes. Gently slide a thin knife around the edges of each muffin and pop out.
Notes
- Pan prep is key. Eggs stick to standard muffin tins, so spray generously with nonstick cooking spray. Silicone baking cups give the cleanest release.
- Cook fillings first. The short bake time won’t cook raw vegetables or meats. Saute veggies until softened and use fully cooked meats.
- Don’t overfill. The eggs puff up during baking, so fill each cup only about ¾ full to prevent overflow.
- Don’t overbake. Remove from the oven as soon as centers are set. Overbaking makes egg muffins dry or rubbery.
- Dairy-free option. Substitute plain unsweetened almond milk, oat milk, or any milk alternative. The small amount won’t noticeably change flavor or texture. Skip the cheese or use a dairy-free shredded cheese.
- Mini muffin pan. These work in a mini muffin pan too. Reduce bake time to about 8 to 10 minutes and check early.
- Meal prep. Bake a full batch on the weekend for easy weekday breakfasts. Store in the fridge for up to 3 to 4 days.
- Freezing. Cool completely, wrap individually in wax paper or parchment, and store in a freezer bag for up to 3 months.
- Reheating from fridge. Wrap in a damp paper towel and microwave on 50% power for about 1 minute.
- Reheating from frozen. No need to thaw. Wrap in a damp paper towel and microwave on 50% power for about 2 minutes. For a batch, reheat on a baking sheet at 325°F for 10 to 15 minutes.
- Nutrition note. Nutritional information is for the egg base only (eggs and milk), since fillings will vary. Each plain muffin is approximately 50 calories.
Nutrition
Nutritional Disclaimer Kristin Maxwell of “Yellow Bliss Road” is not a dietician or nutritionist, and any nutritional information shared is an estimate. For accurate calorie counts and other nutritional values, we recommend running the ingredients through your preferred online nutritional calculator. Calories and other nutritional values can vary depending on which brands were used.


I made these today for a 3 day trip (doubled). They came out good, although they didn’t rise much. Maybe because I used silicone muffin pans? I used paper baking cup liners too, which made it hard to peel the paper off. Won’t do that next time.
I love this recipe and can not wait to try it.
Thanks for stopping by Rebecca!
Can these be made in mini muffin pan?
Sure, you would need to probably cut the bake time in half. I haven’t tried them in a mini muffin pan, so watch closely to know when they’re done.
I am making these for a gender reveal breakfast. Can I reheat them together (for a group) in the oven? If so what temp? How long and should they just go on a cookie sheet? Help!
You can reheat in the oven, but do it at a lower temperature and just until warm. Should be fine on either a cookie sheet or muffin tin.
Made these for my middle school daughter who is always in a hurry in the early am for school! She loves them! I love you can change them up anyway you want!
Nice! Thanks for stopping by Linda.
Made these for my weekly breakfast. I’m on a weight-gain diet, so lots of calories and protein in mine.
This is such a great idea! My husband has a sensitivity to dairy. Do you know if this would work using almond milk?
I don’t see why not. 🙂
Thanks! I’ll try it out!