• Skip to primary navigation
  • Skip to header navigation
  • Skip to footer navigation
  • Skip to main content
  • Skip to primary sidebar
  • Skip to footer

Yellow Bliss Road

Easy, approachable and family friendly recipes for any home cook.

  • About Me
    • Meet the Team
    • My Favorite Tools
  • Contact
    • FAQs
    • Disclosure
    • Sharing Policy
    • Privacy Policy
    • Accessibility
  • Collaborate
  • Signup >
Display Search Bar
  • Recipes
    • View ALL Recipes
    • Appetizers and Snacks
    • Asian
    • Beverages
    • Bread
    • Breakfast Recipes
      • Casseroles
      • Egg Recipes
      • Muffins
      • Pancakes
    • Desserts
      • Brownies and Bars
      • Cake and Cupcakes
      • Cookies
      • Fruit Desserts
      • No Bake Desserts
    • Dinner
      • Casseroles
      • Easy Weeknight Dinners
      • One Pot Meals
      • Pasta
      • Pork
      • Chicken
      • Beef
      • Seafood
    • Lunch
      • Easy Weekday Lunches
      • School Lunches
    • Cooking Method
      • Air Fryer
      • On the Grill
      • Instant Pot/Pressure Cooker
      • Slow Cooker
    • Dips and Sauces
    • Mexican
    • Sandwiches
    • Salads
    • Side Dishes
      • Vegetables
    • Slow Cooker
    • Soups and Stews
  • Holiday Recipes
    • Valentine’s Day
    • Halloween
    • St. Patrick’s Day
    • Fourth of July
    • Seasonal Recipes
    • Easter
    • Thanksgiving
    • Christmas
    • Seasonal Recipes
      • Fall
      • Spring
      • Summer
  • Free Printables
    • Christmas
    • Thanksgiving
    • Halloween
    • Easter
    • Valentine’s Day
    • Fourth of July
    • School
    • Birthdays
  • Home/Crafts/DIY
    • Crafts and DIY
    • Gift Ideas
    • Home Decor
    • Photography Tips
  • Family
    • Adoption
      • My Adoption Story
    • Birthdays
    • Travel
Follow me on Facebook! Follow me on Pinterest! Follow me on Instagram!

Home » Recipes » Desserts » Cookies » Christmas Cheesecake Cookies

Christmas Cheesecake Cookies

Published on October 10, 2018, Updated September 2, 2020 by Sam | 152 Comments

101379shares
  • 5230
  • 96035
  • 114
Jump to Recipe Print Recipe

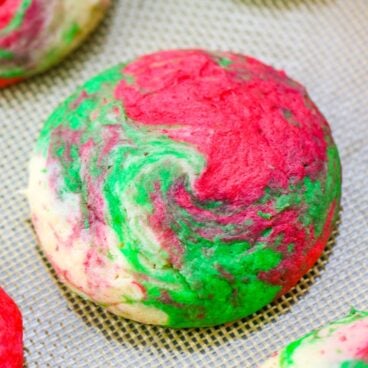
These Christmas Cheesecake Cookies are creamy and tender, with just a hint of peppermint. The red, white and green swirls are sure to make them Santa’s favorite cookie and the star of your Christmas cookie exchange!

Christmas Cheesecake Cookies are creamy and tender, with just a hint of peppermint. The red, white and green swirls make them Santa's favorite cookie, too!

Hey guys! Sam back from The Culinary Compass! I love a festive cookie and couldn’t resist to recreate these Patriotic Cheesecake Cookies with Christmas colors! It was a no-brainer to create these Christmas Cheesecake Cookies with red, white, and green! The best part is the hint of peppermint that really brings in the holiday season.

HOW TO MAKE CHEESECAKE CHRISTMAS COOKIES

The recipe is based off of the viral Cheesecake Cookies that Kristin made, and they’re SO easy to throw together and incredibly delicious. The cream cheese makes them light and fluffy. I’m always excited to make a batch of these yummy Christmas cookies, but never want to share!

The dough comes together quite easy, using just a few ingredients:

  • cream cheese
  • butter
  • sugar
  • eggs
  • vanilla extract
  • flour
  • baking powder

Once combined, I recommend refrigerating the dough for 30 minutes or so because it can get a bit sticky. Then comes the fun part – adding color to the Christmas cookies!

Christmas Cheesecake Cookies are creamy and tender, with just a hint of peppermint. The red, white and green swirls make them Santa's favorite cookie, too!

TIPS FOR MAKING CHEESECAKE CHRISTMAS COOKIES

  • The key to getting the dough to swirl easily without muddying the colors is to chill the dough. I can’t stress that enough! The dough will be sticky and turn brown as soon as you mix colors together if you allow it to come to room temperature. So if you find yourself getting frustrated with how sticky the dough is, throw the dough into the freezer for 5-10 minutes and it’ll be a lot easier to work with!
  • I also didn’t want to overwhelm the cookies with too much peppermint so I only included peppermint extract in the green dough. It’s enough to give a hint of peppermint while still allowing the cheesecake flavor to shine through.
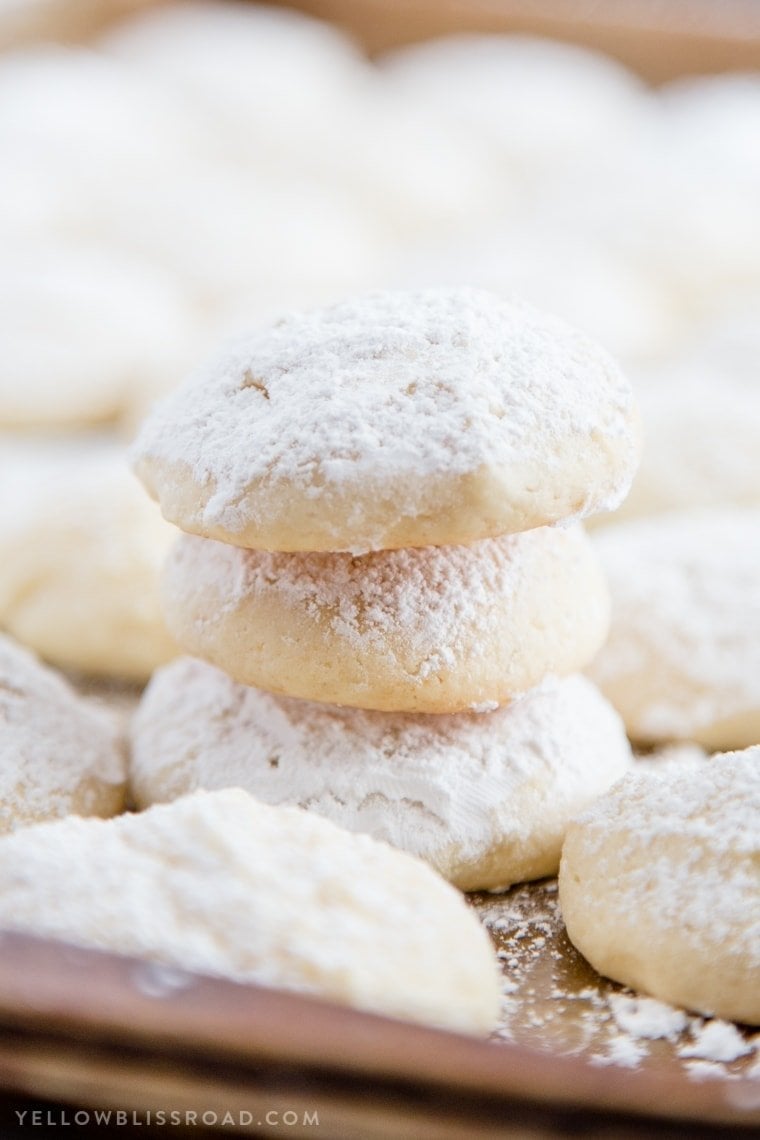
  • They would probably be delicious dipped in chocolate too if you like that combination! I wanted to leave the swirls showing so I didn’t powder them with powdered sugar, though, that is definitely an option too!

Christmas Cheesecake Cookies are creamy and tender, with just a hint of peppermint. The red, white and green swirls make them Santa's favorite cookie, too!

Christmas Cheesecake Cookies are creamy and tender, with just a hint of peppermint. The red, white and green swirls make them Santa's favorite cookie, too!

Christmas Cheesecake Cookies are creamy and tender, with just a hint of peppermint. The red, white and green swirls make them Santa's favorite cookie, too!

Here are some more festive Christmas cookies and other desserts to try:

  • Fruit Pizza
  • Chocolate Cheesecake Cookies
  • Christmas Cookie Pinwheels
  • 50+ Festive Christmas Cookies
  • Easy Snowball Cookies Recipe (no nuts)
  • Red Velvet Cookies
  • Chocolate Peppermint Slice and Bake Cookies
  • Peppermint Fudge
  • Peppermint Cheesecake Brownie Parfaits
  • Sugar Cookie Dough Dip

Tools used to make these Christmas cookies:

Silicone Spatula – Perfect for scraping the sides of the bowl.

AirBake Cookie Sheets – Air insulation prevents top sheet from overheating which prevents burning.

Silicone Baking Mat – Your cookies will slide right off of this perfect baking mat, no sticking!

These Christmas Cheesecake Cookies are the perfect, festive cookie to feed to Santa!

Christmas Cheesecake Cookies

Sam @ The Culinary Compass
These Christmas Cheesecake Cookies are the perfect, festive cookie to feed to Santa!
4 from 3 votes
Print Recipe Pin Recipe
Prep Time 10 mins
Cook Time 10 mins
Total Time 35 mins
Course Dessert
Servings 44 cookies

Ingredients
  

  • 8 oz cream cheese room temperature
  • 1/2 cup butter room temperature
  • 1 1/4 cup granulated sugar
  • 2 eggs
  • 1 teaspoon vanilla extract
  • 2 1/2 cups flour
  • 2 teaspoons baking powder
  • 1/2 teaspoon salt
  • Red and green food coloring
  • 1/2 teaspoon peppermint extract
  • Optional: powdered sugar

Instructions
 

  • Preheat oven to 350 degrees F. Line 2 baking sheets with parchment paper or silicone mats.
  • Beat cream cheese and butter together at high speed until fluffy and smooth; 1-2 minutes. Add sugar to the butter mixture and beat until fully incorporated and fluffy; 1-2 minutes. Beat in the eggs and vanilla; 1 minute.
  • In a separate, medium-sized bowl, whisk together the flour, baking powder and salt. Gradually add the dry ingredients to the butter mixture and stir just until incorporated. Do not over-mix.
  • Separate the dough into three small bowls. Refrigerate for 15 minutes. 
  • Once chilled, add in food coloring and incorporate into the dough until your desired color is reached. Add the peppermint extract to the dough you'll be adding the green food coloring to. Dough will still be sticky, but easier to work with! If you find it's hard to work with, put back in the refrigerator for a few minutes.
  • To create a cookie, take 1/2 tbsp of each color dough into your hands and roll together between the palms of your hands to create the marbling effect of your choice. Be careful to not over incorporate to avoid mixing the colors too much. Repeat for the rest of the dough and place on prepared baking sheets.
  • Bake at 350 degrees for 10-11 minutes. Cookies should be light in color, not browned, and just starting to brown on the bottom. *Length of baking time may vary from oven to oven.
  • Cool cookies on the baking sheet for a few minutes before transferring to a wire rack to cool completely. 
  • Optional: Dust with powdered sugar!

Notes

  • Store in a tightly sealed container for up to a week, or in the freezer for up to 3 months.
  • The vanilla smooths out the flavor, but for a more tart, cheesey flavor, add a teaspoon of lemon juice or no extracts at all. The peppermint can also be left out or replaced.
  • Do not overbake. This can cause the cookies to come out more dry and biscuit like. 
Tried this recipe?Let us know how it was!

Be sure to try our original Cheesecake Cookie recipe! They are light and fluffy, creamy and tender! Be sure to read through all the tips and tricks to make the perfect Cheesecake Cookie!

Christmas Cheesecake Cookies are creamy and tender, with just a hint of peppermint. The red, white and green swirls make them Santa's favorite cookie, too!

Previous Post
Next Post

5 Secrets to Dinnertime Sanity

free email bonus
Tested, Tasted & Terrific!

Reader Interactions

Join the Conversation

    Leave a Comment Cancel reply

    Recipe Rating


    This site uses Akismet to reduce spam. Learn how your comment data is processed.

  1. Emily Litvak says

    December 26, 2020 at 11:14 pm

    Seriously adorable cookies! Very festive, dough was a tad temperamental. I’m curious – our yield was a lot less than 44 by using 1/2 tbsp of each colour for each cookie, did we do something wrong?

    Reply
    • Kristin Maxwell says

      December 29, 2020 at 1:27 am

      Hi Emily, the amount really can vary based on how much dough you had to begin with, and the size you make them.

      Reply
  2. Kerri Egbert says

    December 10, 2020 at 5:16 pm

    I made a few batches of these last year after getting some at a Christmas cookie exchange. They were such a hit they are the number 1 request for this year! Even my mom asked for the recipe! They are delicious. Slightly finicky to make but not bad and worth it I think. If the dough gets sticky just pop it back into the fridge between batches. I made them both with and without the peppermint extra. Both great! And they are so pretty on a plate. Thank you for the great recipe!

    Reply
    • Kristin says

      December 12, 2020 at 4:08 pm

      You are so welcome Kerri! Thanks for stopping by.

      Reply
  3. Donna L Allie says

    September 17, 2020 at 2:38 pm

    Hi can I add a little bit more of cream cheese I made them once before came out good but just thought it needed more cream cheese.

    Reply
    • Kristin Maxwell says

      September 18, 2020 at 11:15 pm

      Add a little bit of lemon extract instead of vanilla if you’re looking for a more intense flavor. Adding more cream cheese would make the dough too sticky.

      Reply
  4. Pam Davis says

    December 23, 2019 at 9:00 pm

    I made these last night and they were a hit!! I’m making two more batches now. It wasn’t real easy to blend the colors by rolling in my palm but I could pull some from each color and just drop them on the cookie sheet and they came out fine. And we tasted the cream cheese unlike another post I saw. They were even better warm!! I left the peppermint out completely.

    Reply
    • Kristin Maxwell says

      December 26, 2019 at 11:10 am

      So glad you loved them! Thanks for taking the time to come back and share your positive experience.

      Reply
  5. Maria says

    December 18, 2019 at 6:55 pm

    Very dry, almost like sugar cookies without the frosting, which is a very sad cookie 🙁

    Reply
  6. Stephanie says

    December 18, 2019 at 5:46 pm

    Just made these! I’m not much of a baker but I think they were a success! Bringing them to an event tomorrow, hope everyone else likes them! 😀

    Reply
  7. sheila says

    December 18, 2019 at 12:43 pm

    Do they have to be stored in the fridge after baking because of the cream cheese?

    Reply
    • Kristin Maxwell says

      December 19, 2019 at 9:06 am

      Because they are baked, they can be stored at room temperature.

      Reply
  8. Betty Thorpe says

    December 14, 2019 at 9:46 am

    These cookies were pretty. But they were dry and bland. No cream cheese taste at all . I’m very disappointed

    Reply
  9. Dominique Wicke says

    December 11, 2019 at 2:15 pm

    What can I use if I do not have parchment paper

    Reply
    • Kristin Maxwell says

      December 13, 2019 at 9:46 am

      A silicone mat works. But a nonstick cookie sheet is fine on it’s own. The parchment paper just makes it easier for the cookies to slide off.

      Reply
  10. Mike says

    December 11, 2019 at 1:36 pm

    I might have missed it but are the different bowls reserved for the different colors of the cookies? I didn’t see it in the recipe.

    Reply
    • Kristin Maxwell says

      December 13, 2019 at 9:45 am

      Yes each bowl is for a different color – one red, one green and one left plain.

      Reply
  11. Korynn says

    December 10, 2019 at 10:09 am

    Do you leave the cookies in a ball when you place them in the oven? or do you flatten them like a sugar cookie?

    Reply
    • Kristin Maxwell says

      December 10, 2019 at 9:46 pm

      The dough is sticky so you can’t flatten. They will bake like puffed up balls.

      Reply
  12. Jennifer says

    December 8, 2019 at 4:20 pm

    What other things could be added instead of peppermint?

    Reply
    • Sarah J Atchison says

      December 12, 2019 at 9:05 am

      I’m making them with almond extract. The dough is delicious. I’ll let you know how they are once I get them finished.

      Reply
  13. Rose says

    December 4, 2019 at 3:31 pm

    I made them and they are very sticky you can’t even roll them let me know what to do I did put back in frig I was going to add more flour but wasn’t sure

    Reply
    • Kristin Maxwell says

      December 5, 2019 at 8:25 am

      The batter is very sticky but they will bake up just fine.

      Reply
  14. Samantha says

    December 4, 2019 at 10:51 am

    Can this dough be made a few days ahead of time and stored in the fridge?? Looking forward to baking this weekend!

    Reply
    • Kristin Maxwell says

      December 4, 2019 at 11:31 am

      You could store for a day or two in the fridge. Beyond that I would wrap tightly and refrigerate.

      Reply
  15. Kim says

    December 3, 2019 at 5:55 pm

    I want to make these!! How many cookies per batch?!?

    Reply
    • Kristin Maxwell says

      December 4, 2019 at 11:34 am

      Depending on the size of each cookie, this recipe will make 3-4 dozen.

      Reply
  16. Pamela Mamona says

    November 26, 2019 at 11:06 am

    I just waned to say GREAT recipe!!! One extra touch that you may or may not want to try is to dip just shy of 1/2 the cookie in melted chocolate and the sprinkle with crushed candy canes. Gives a bit of a crunch to those who like that and if not then always have some just beautiful on their own. Either way I love love love both. Thanks again and now I shall brows around and look at other recipes you have!!

    Reply
  17. April says

    December 23, 2018 at 12:16 pm

    Can you make this with Almond Flour?

    Reply
    • Kristin says

      December 23, 2018 at 12:53 pm

      I haven’t tried it so I can’t say whether it will work or not. Sorry!

      Reply
  18. Teri says

    December 22, 2018 at 4:00 pm

    They turned out great! We rolled each color into balls and placed them into paper plates. We then placed them into the freezer for a few minutes. Then, we sprayed our hands with non-stick cooking spray and rolled the cookies in our hands. Worked great! We also adjusted the temperature to 375 for 15 minutes as they were not cooking as well at 350. They are so pretty and puffy!

    Reply
    • Kristin says

      December 23, 2018 at 1:00 pm

      Thank you so much for sharing your experience, Teri! Glad you enjoyed the cookies.

      Reply
  19. Becca says

    December 19, 2018 at 5:16 am

    Are you suppose to use unsalted or salted butter?

    Reply
    • Kristin says

      December 20, 2018 at 4:36 pm

      I use regular salted butter, but you could use either.

      Reply
  20. Leah says

    December 18, 2018 at 12:08 pm

    Just finished my first batch… Pros & Cons:

    Pros:
    Fun Christmas cookie
    Hint of mint is awesome
    soft and actually taste good

    Cons:
    My hands hurt from manipulating the dough
    I had to keep putting the dough in the freezer for about 7-10 min every 6 cookies just so it wouldn’t be a muddled mess

    Would I make them again? Yes
    Would I make them with kids? No

    I left them in the oven for about 15 min and they came out perfect.

    Thanks for an awesome cookie recipe that I will keep in my Christmas Cookie rotation.

    Reply
    • Kristin says

      December 18, 2018 at 2:06 pm

      Thank you Leah! and Thank you for the great feedback.

      Reply
« Older Comments

Primary Sidebar

Hi, I’m KRISTIN!

I'm a busy wife and mom who loves to cook, bake and create. All of the recipes and tips you will find here are created with your busy family (and mine!) in mind.

Read More »
Follow me on Facebook! Follow me on Pinterest! Follow me on Twitter! Follow me on Instagram! Email me!

5 Secrets to Dinnertime Sanity

free email bonus
Tested, Tasted & Terrific!

Trending Today

  • Healthy Ground Turkey Teriyaki Rice Bowl
  • Oven Baked Chicken Breasts
  • Creamy Chicken Pesto Pasta
  • Ground Beef Enchiladas
  • Tortellini Soup with Italian Sausage & Spinach
  • Crispy Baked Chicken Wings
  • One Pot Cheesy Smoked Sausage Pasta Skillet
  • Egg Fried Rice

All-Time Favorites

  • Oven Baked Chicken Breasts
  • Cheesy Scalloped Potatoes (Au Gratin)
  • How to Make Authentic Mexican Rice
  • Cheesecake Cookies
  • All-Natural Mattress Cleaner – How to Clean Odors and Stains from Your Mattress
  • Healthy Ground Turkey Teriyaki Rice Bowl
  • Crispy Baked Chicken Wings
  • How to Cook a Thanksgiving Turkey

Yellow Bliss Road, Inc. is a participant in the Amazon Services LLC Associates Program, an affiliate advertising program designed to provide a means for us to earn fees by linking to Amazon.com and affiliated sites.

Browse Around

  • Chicken
  • On the Grill
  • Pasta
  • Dinner
  • Soups
  • Sides
  • Salads
  • Desserts
Follow me on Facebook! Follow me on Pinterest! Follow me on Instagram!
  • About Me
  • Contact
  • Collaborate
  • Privacy & Copyright
  • Recipes by Category
Copyright © 2021 Yellow Bliss RoadTheme by Once Coupled