This post may contain affiliate links. Please read our disclosure policy.


Creamy homemade refried beans that taste just like your favorite Mexican restaurant. A handful of simple ingredients and a splash of milk at the end make these so much better than anything from a can.
More favorite sides around here are my Slow Cooker Mexican Beans, Mexican Black Beans, and Mexican Rice.

3 Tips That Make or Break This Recipe
These beans are simple to make, but a few small choices make a big difference. Keep these in mind before you start.
- Salt the water well. Beans absorb salt as they simmer, so underseasoning the water means flat-tasting beans no matter how much salt you add at the end.
- Mash with milk. Milk gives the beans a creamier texture and richer flavor than water. Any unsweetened milk works, or swap in broth for dairy-free.
- Leave the lid alone. Dried pinto beans need uninterrupted simmering time to soften properly. Peeking slows things down and cools the pot.
RECIPE WALK-THROUGH
How to Make Refried Beans
See the recipe card below for full, detailed instructions
Homemade refried beans take some time on the stove, but most of it is hands-off. Here’s exactly how I make them.
Step 1: Rinse and sort the beans
Pour the dried pinto beans into a colander and rinse them under cool water. Pick through and pull out any small stones, debris, or shriveled beans.
Step 2: Cook the beans
Add the beans to a large pot along with 3 quarts of water, a generous pinch of salt, a chopped onion, and 2 whole garlic cloves.
Bring to a boil, then lower the heat, cover, and simmer for about 2½ hours. The beans are ready when they’re very soft and just starting to break open.
Dice the onion small to skip the fishing step. The onion and garlic are there for flavor and usually get discarded before mashing. If you dice the onion finely, it dissolves right into the beans so there’s nothing to pull out later (this was a tip from one of our readers).
Step 3: Drain and save a little liquid
Once the beans are tender, drain them in a colander set over a bowl so you can save about a cup of the cooking liquid. Fish out the onion chunks and garlic cloves, then return the beans to the pot over low heat.
Hang onto that cooking liquid. It’s the easiest way to loosen up beans that turn out too thick, and it adds more flavor than plain water.
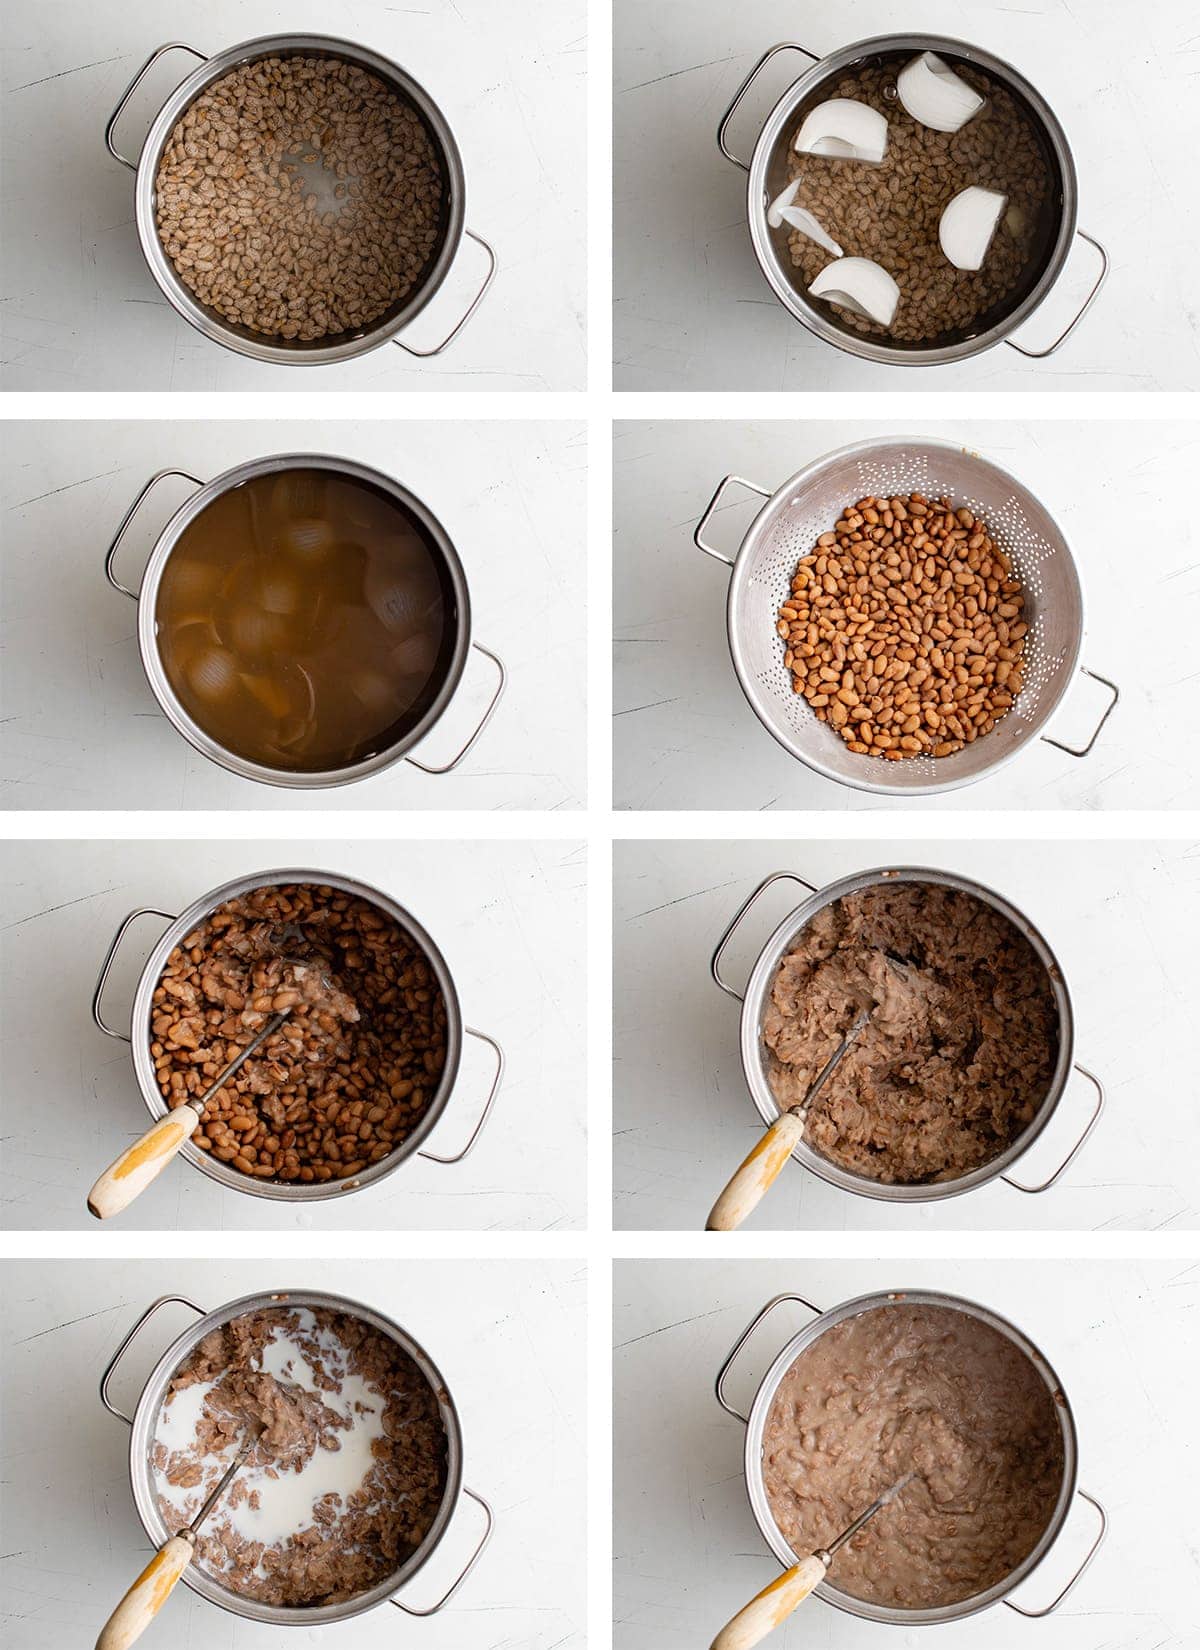
Step 4: Mash with milk and salt
Add ¼ cup of water and another generous pinch of salt to the pot. Start mashing with a potato masher, slowly pouring in the milk a little at a time until the texture looks right to you.
Chunky vs Creamy Beans: Stick with the masher (or a fork) for chunkier beans. For smooth and creamy, use an immersion blender for a few seconds.
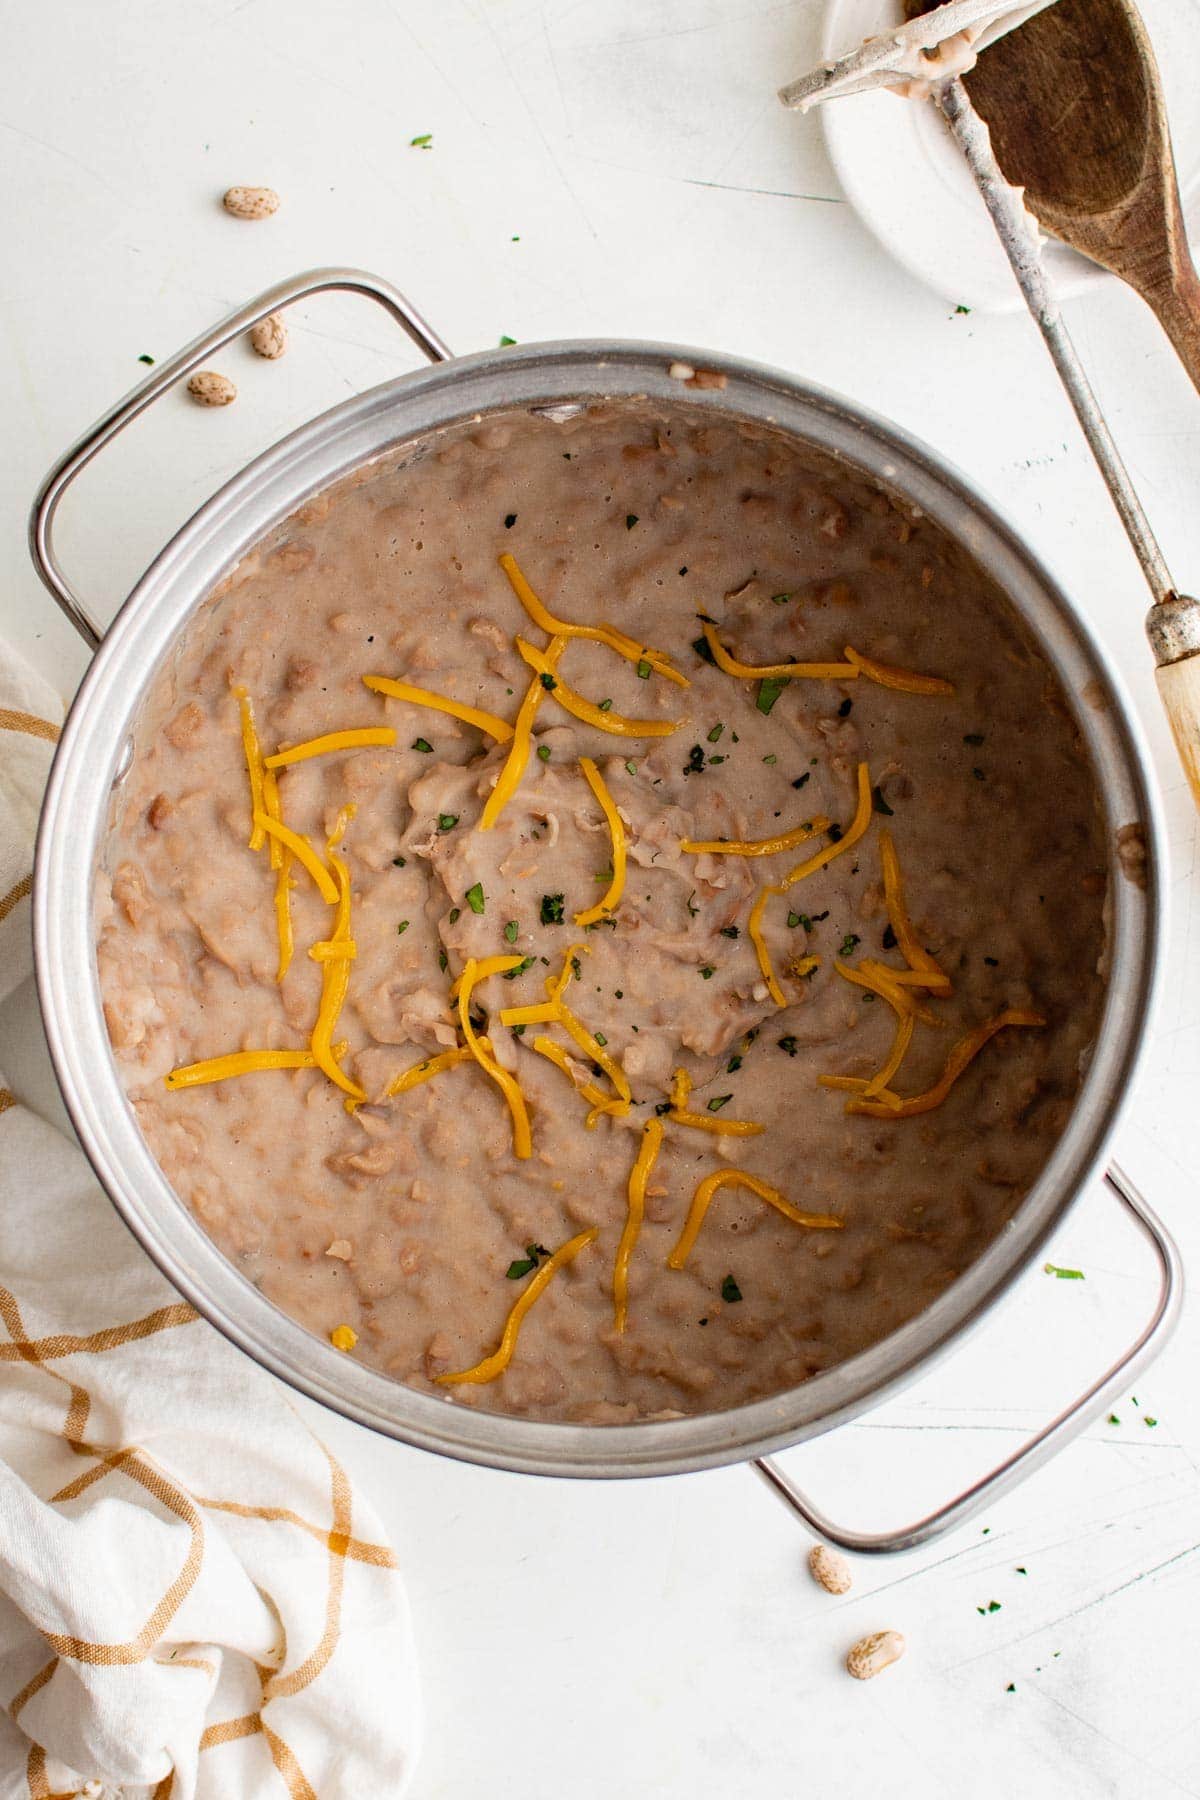
Taste before serving. Beans need a surprising amount of salt to really shine, so don’t be shy here. If they’ve cooled down, warm them back up over low heat, stirring often, for a few minutes.
Want them to taste even more like the restaurant? Stir in a splash of the reserved cooking liquid along with a small pat of butter and a pinch of cumin right before serving. It’s a tiny step that makes a big difference.
Other Methods
No stovetop time? Both the slow cooker and Instant Pot deliver great results, and there’s a quick shortcut using canned beans if you’re really pressed. All three finish the same way: discard the onion and garlic, then mash with milk and salt exactly like step 4 above.
- Slow cooker: Add the rinsed beans, chopped onion, garlic cloves, salt, and 8 cups of water (less than the stovetop) to the slow cooker. Cover and cook on LOW for 10-12 hours or HIGH for 7-8 hours, until the beans are very soft and most of the water is absorbed.
- Instant Pot: Add the rinsed beans, chopped onion, garlic cloves, salt, and 8 cups of water to the Instant Pot. Lock the lid, set to sealing, and cook on high pressure for 25 minutes. Let the pressure release naturally (about 30-35 minutes). If the beans need more time, lock the lid back on and cook for another 5-10 minutes.
- Canned bean shortcut: Use 2-3 cans of pinto beans, drained and rinsed, in place of the dried. Warm them in a pot over medium-low heat, then go straight to mashing. Total time is 10-15 minutes. The flavor isn’t quite as deep as starting from dried, but it’s a solid shortcut when dinner is close.
How to Serve
Refried beans are one of the most classic Mexican sides, and they pair with just about every main dish on the table. A few favorites from the site:
Ways to Use Refried Beans
Refried beans are one of the most classic Mexican sides and pair with just about any main on the table. Some of my family’s favorites from the site:
Beyond serving them on the side, refried beans are the base or filling for a lot of our Mexican dinners too. Spread them onto baked tostadas, tuck them inside wet burritos, or roll them into baked chimichangas with your favorite filling.
For more taco night inspiration, try my Taco Pie, Chicken Taco Salad, or Turkey Taco Soup.

Storage Tips
Storage and Reheating
Refrigerate: Store cooled beans in an airtight container for 3-4 days.
Freeze: Portion into freezer-safe containers or bags and freeze for up to 8 months. Thaw overnight in the fridge before reheating.
Reheat: Warm on the stovetop over low heat, stirring often, adding a splash of milk or water to bring them back to a creamy consistency. The microwave works too, in 30-second intervals with a stir between each.
Frequently Asked Questions
Can I use canned beans instead of dried?
Yes. Use 2-3 cans of pinto beans, drained and rinsed, in place of the dried beans and follow the mashing instructions. The flavor isn’t as deep, but it’s a great shortcut when you’re short on time.
Do I need to soak the beans overnight?
Not for this recipe. The beans simmer long enough on the stovetop to soften without soaking. That said, an overnight soak will shave about an hour off the cook time if you want to speed things up.
Can I make refried beans without lard?
Absolutely. This recipe doesn’t use any. The name “refried” traditionally refers to beans cooked in fat, but a splash of milk gives these the same creamy richness without the lard or oil, and it keeps them lighter too.
More of Our Favorite Mexican Sides
- Restaurant Style Salsa
- Guacamole
- Black Bean and Corn Salsa
- Pico de Gallo
- Cilantro Lime Rice
- Homemade Flour Tortillas

Homemade Refried Beans
Ingredients
- 1 pound dry pinto beans
- 3 quarts water
- 1 small onion chopped into chunks
- 2 garlic cloves peeled and left whole
- 2 teaspoons salt plus more to taste
- 1/2 cup milk
Instructions
- Rinse the beans under cool water and pick through to remove any small stones or shriveled beans.
- Place the beans in a large pot with the water, onion, garlic, and a generous pinch of salt. Bring to a boil, then lower the heat to a simmer. Cover and cook for about 2½ hours, until the beans are very soft and just starting to break open. Cooking time may vary.
- Drain the beans, reserving about 1 cup of cooking liquid. Discard the onion and garlic, then return the beans to the pot over low heat.
- Add ¼ cup of water and another pinch of salt. Mash with a potato masher, slowly pouring in the milk as you go, until the beans reach your preferred consistency. For a smoother texture, use an immersion blender.
- Taste and add more salt as needed. Serve warm with your favorite toppings.
Notes
- Season the water generously. Beans absorb salt as they simmer, so don’t hold back on salting the cooking water. This is the single biggest thing that makes them taste great.
- For chunky or smooth beans. Stick with a potato masher or fork for chunky. Use a handheld mixer or immersion blender for smooth and creamy. Add a splash of the reserved cooking liquid or more milk if they thicken up too much.
- Restaurant-style finish. Right before serving, stir in a splash of reserved cooking liquid, a pat of butter, and a pinch of cumin for extra flavor.
- Dairy-free swap. Use water, the reserved bean cooking liquid, or vegetable broth in place of the milk.
- Canned bean shortcut. Use 2-3 cans of pinto beans, drained and rinsed, in place of the dried. Skip the long simmer and go straight to mashing.
- Storage. Store cooled beans in an airtight container in the fridge for 3-4 days, or freeze for up to 8 months. Reheat on the stovetop over low heat with a splash of milk, stirring often.
Nutrition
Nutritional Disclaimer Kristin Maxwell of “Yellow Bliss Road” is not a dietician or nutritionist, and any nutritional information shared is an estimate. For accurate calorie counts and other nutritional values, we recommend running the ingredients through your preferred online nutritional calculator. Calories and other nutritional values can vary depending on which brands were used.


Love this recipe! Very healthy I may add. Instead of removing the onion at the end, I just dice up an onion and garlic at the beginning and they dissolve with the beans. Excellent flavor!
Nice! Thanks for stopping by Julie.
In all of my years and experiences of cooking dried beans, they won’t ever get soft if you add salt while they are cooking, I always salt mine, after they cook.
Funny because it’s always worked great for me.
Do you feel the beans taste better when you refry them with water and milk versus just the broth from the beans?
I like the creaminess the milk adds, but that’s just a personal preference.
Presoak the beans overnight and beans in an instant pot or pressure cookerand you can cut the cooking time to 1 hour
You actually don’t have to preload the beans when cooking in an instant pot
I believe it is still vegetarian if you use milk. ….wouldnt be vegan though
I think you will find that the pinto beans will be nicer if you salt them AFTER cooking. You never add salt to legumes while they’re being cooked as it m,akes them tougher.
The bit about adding salt to beans while cooking will make them tough was shown to be nonsense by A. Test Kitchen and myself. Only difference they and I found in the multiple ways to cook pinto beans was 15 minutes longer cooking on beans not presoaked. Salt making them tough is a specious statement. Throw the beans (after sorting and washing if needed) in a pot with water and salt and what ever and cook away!
My father used to use evaporated milk in his refried beans and a sprinkling of garlic salt. They were wonderful! I’m so glad to see this recipe, it takes me back to my youth. 🙂
How do you store the leftovers safely?
Store them in a sealed container for a few days or freeze for a few months.
Next time, you Must try this way! Make the beans the way you would normally. But, add a large onion quartered and a pkg of think cut bacon or regular. Just cut in half and add . ?
Cooked or raw bacon?
How many servings does this make? I can not wait to make these!
It makes a nice big pot of beans…I’d say 6-8 side servings at least. Depends on what you’re using them for. 🙂
What does, “add the 1/4 cup water” refer to? Is it an extra 1/4 cup or a reserved 1/4 cup of the cooking liquid?
Hi Joan, That should said ” a 1/4 cup of water,” not “the.” Sorry for the confusion!
These are DELICIOUS!!! I just finished making them for a couple different recipes I found (one being your tostadas!)… I couldn’t wait and had to try them right away! I sprinkled a little cheese and salsa on top. BETTER than any canned version I’ve ever had! Healthy, low-cal, high-protein snack! Thank you for posting this!
I like the addition of milk! First time I’ve seen that in a refried bean recipe. I will give it a try! 🙂
It gives them a nice, creamy texture! Enjoy!
If you want to cut cooking time for the beans in half, you can leave them sitting in water the night before! They cook really fast!
EASY! I need to do this, but I have some inexperienced questions: This sounds like it makes a lot, I only use about a half a can of refried beans in a given week, can I freeze it? If so, what would be the best way to thaw beans? I am terrible at thawing things (okay, meat in particular) could you post about good foods to freeze and the best way to thaw them? I love your recipes and am excited to try them! Thank you!