This post may contain affiliate links. Please read our disclosure policy.
The juiciest backyard burgers come down to three small things: the right beef, a thumbprint in the center, and a grill you don’t fuss with. Get those right and you’ll have tender, charred-just-enough patties every time.
Cooking inside? My Stovetop Burgers come together fast on a cast iron skillet. For more grilling ideas, try my Grilled BBQ Burger or smaller Grilled Hamburger Sliders for a crowd.
3 Tips That Really Matter for Grilling Burgers
A juicy grilled burger comes down to a handful of choices you make before the patties hit the grate. Get these three right and the rest is easy.
- Use 80/20 ground beef. Higher fat content is the single biggest factor in a juicy burger. Leaner blends like 90/10 will dry out on a hot grill no matter what else you do. For more on choosing the right beef, see my guide to ground beef.
- Press a dimple in the center. Patties plump up as they cook. A shallow thumbprint indent keeps them flat instead of domed, so they cook evenly and sit right on the bun.
- Don’t press, don’t flip too soon. Pressing squeezes the juices out. Let the patty release naturally from the grates before flipping, which usually takes around 4 minutes.
RECIPE WALK-THROUGH
How to Make Juicy Grilled Hamburgers
See the recipe card below for full, detailed instructions
A great grilled burger doesn’t need a long ingredient list. Quality ground beef, a little salt and pepper, and the right technique on the grill do all the work.
Step 1: Mix the meat
In a large bowl, gently combine 1.5 pounds of 80/20 ground beef with salt, pepper, and a couple teaspoons of olive oil. Mix with clean hands just until combined.
- Don’t Overmix: Overworking the meat is what turns a juicy burger into a tough one, so stop the moment everything looks evenly seasoned.
Step 2: Portion and shape the patties
Divide the meat into 4 equal portions. A kitchen scale helps if you want them uniform (6 ounces each is my standard).
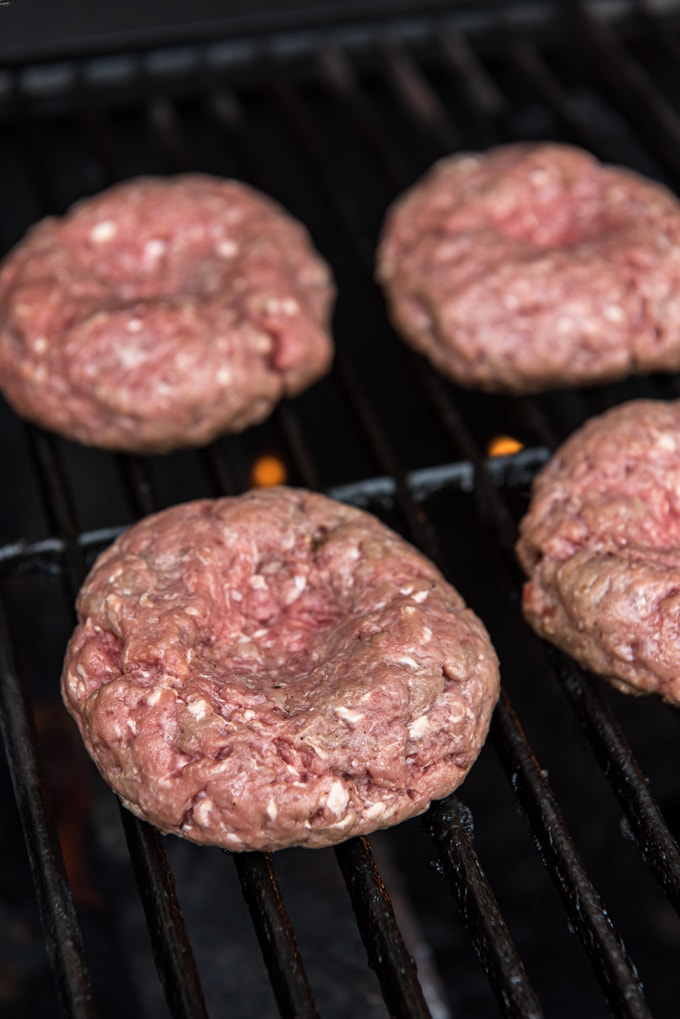
Shape each portion into a round patty about 5 inches across and less than an inch thick. Press your thumb gently into the center to make a shallow indent.
Step 3: Preheat the grill
Heat your outdoor grill to medium-high, around 400 to 450°F. Clean the grates with a grill brush.
A hot, clean grate is what gives you a good sear and keeps the patties from sticking.
Step 4: Grill the patties
Place the patties directly over the heat, indent side up. Close the lid and grill for about 4 minutes.
When the patty releases easily from the grates, it’s ready to flip. Flip once, close the lid, and cook another 4 minutes.
- Resist the urge to press down with your spatula. All you’re doing is pushing juice out.

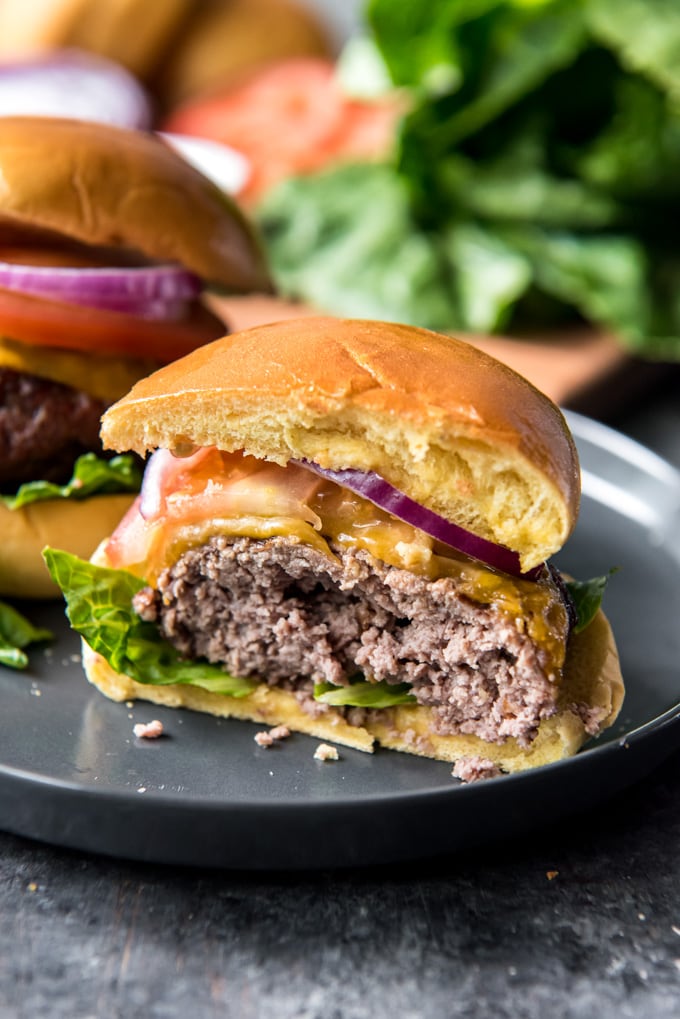
Step 5: Add cheese and rest
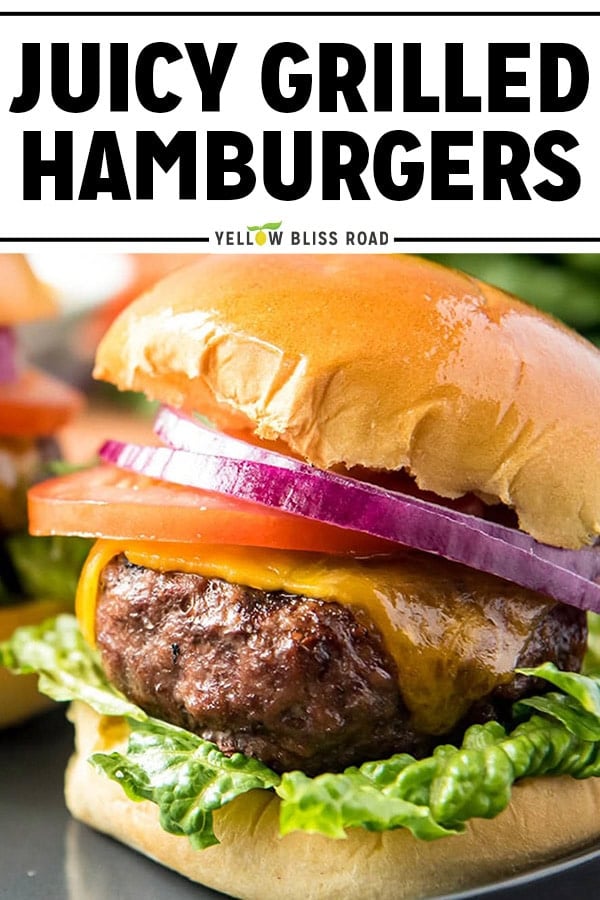
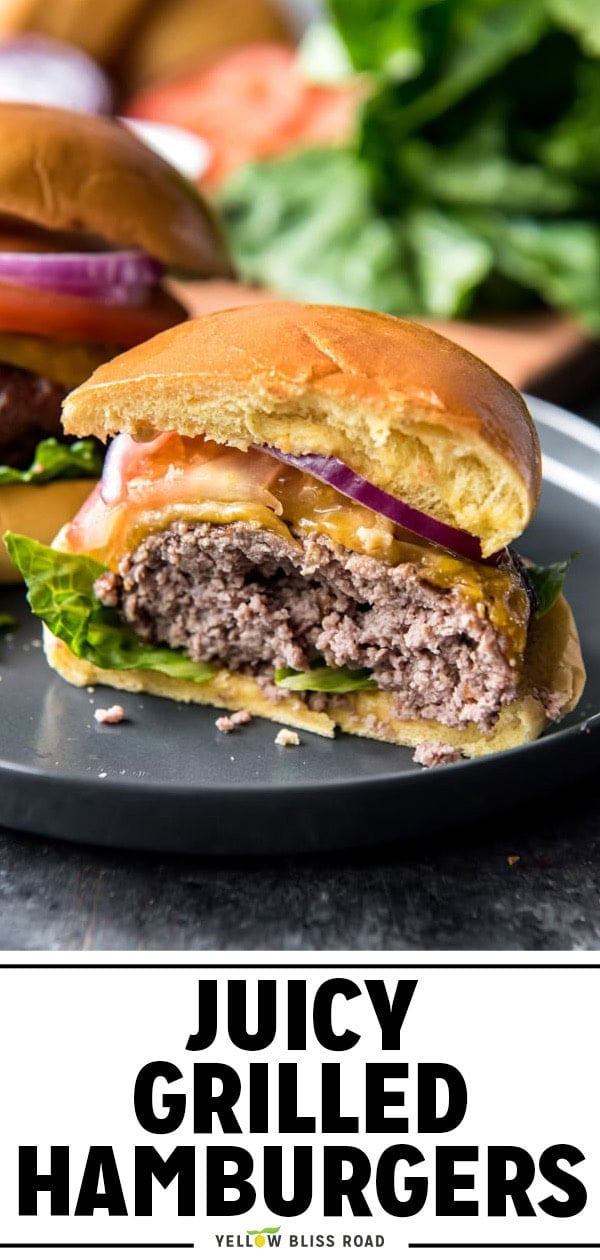
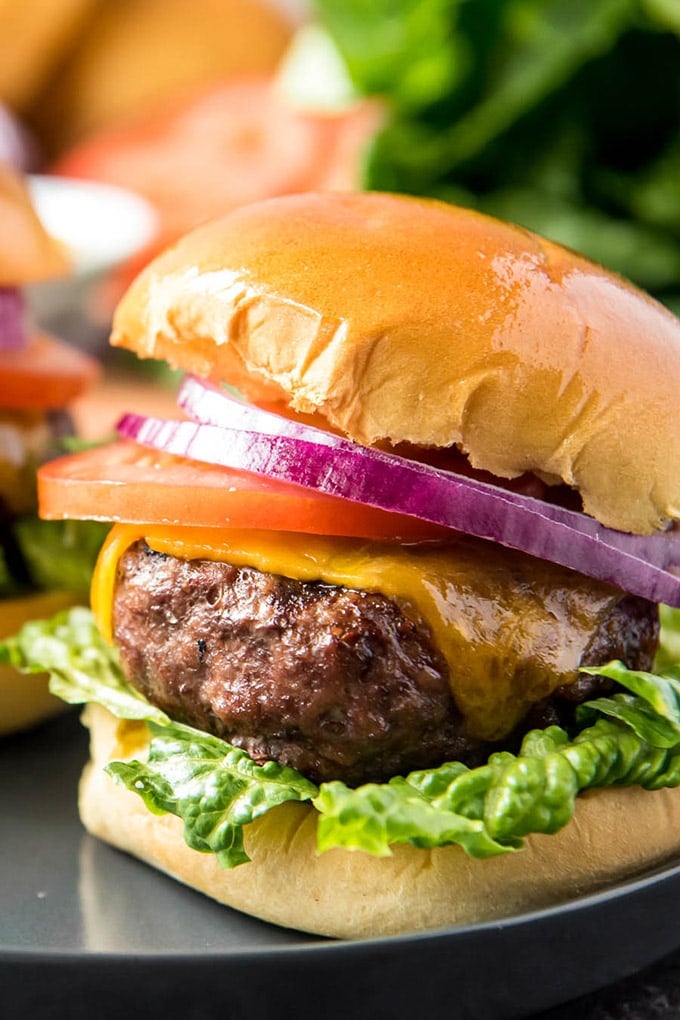
In the last minute, lay a slice of cheese on each patty and close the lid until it melts. Transfer the burgers to a clean plate, tent with foil, and let them rest for at least 5 minutes before serving.
That rest matters. It gives the juices time to redistribute so they stay in the meat instead of running out on the first bite.
For internal temperature, 160°F is medium and what the FDA recommends for ground beef. Use an instant-read thermometer through the side of the patty for an accurate read.
Don’t have a grill? My Stovetop Burgers cook up in a cast iron skillet in about 15 minutes, and my Air Fryer Hamburgers are ready even faster with just 3 ingredients.
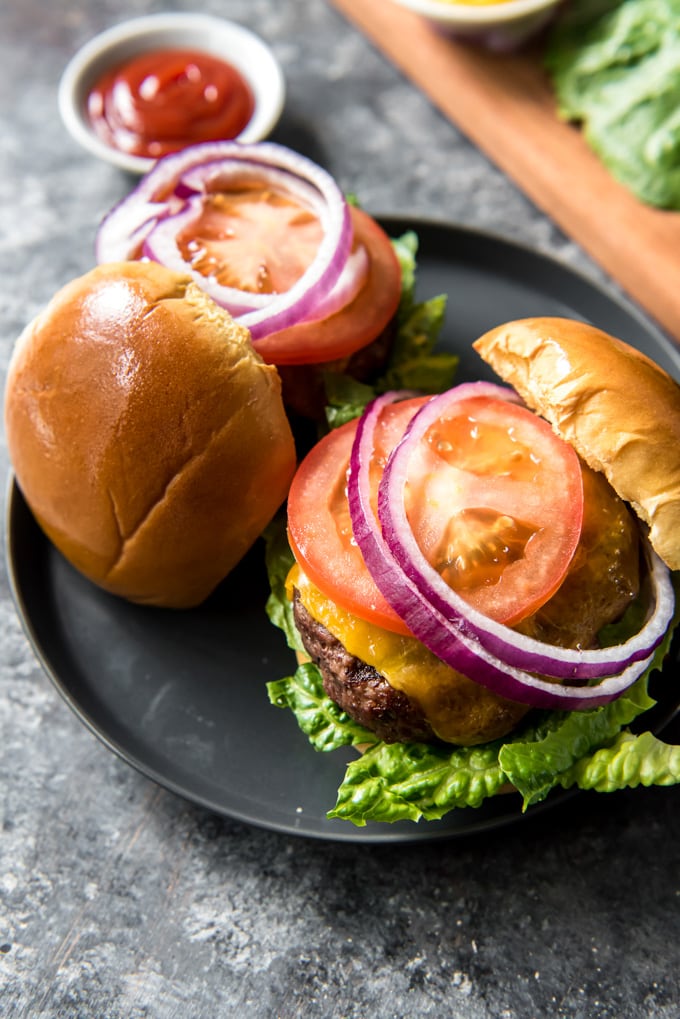
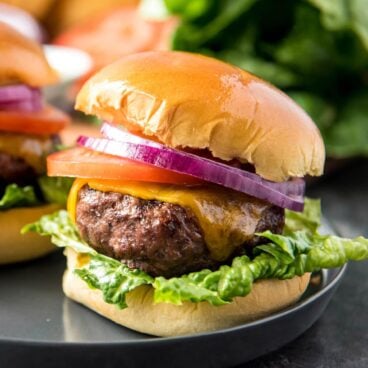
Toppings and Sauces
A great burger deserves great toppings. Here’s what I usually put out:
- The classics: lettuce, sliced tomato, red onion, pickles, and a slice of cheese (American, cheddar, or pepper jack are my go-tos).
- Condiments: ketchup, mustard, and mayo cover the basics. For something more interesting, try Big Mac Sauce, Homemade BBQ Sauce, or Root Beer BBQ Sauce for a sweeter, smokier finish.
- Make it extra: avocado, bacon, fried egg, jalapeños, grilled onions, or pineapple.
A good bun matters too. Brioche or potato buns hold up well to a juicy patty without falling apart, so splurge a little.
What to Serve With Grilled Hamburgers
A juicy burger calls for sides that can keep up. Here are my go-tos for a backyard cookout:
- Coleslaw — creamy and tangy, the classic burger companion
- Classic Macaroni Salad — make-ahead friendly and always a crowd favorite
- Grilled Corn on the Cob — cooks right alongside the burgers on the grill
- Beer Battered Onion Rings — crispy enough to double as a topping
- Watermelon Salad with Feta — fresh and light for hot summer cookouts
For even more ideas, my 82 Cookout Side Dishes roundup has plenty to choose from.
Storage Tips
Storage and Make Ahead
Raw patties: Shape the patties up to 24 hours in advance and refrigerate them in a single layer, separated by parchment paper.
Freezing raw patties: Wrap each patty individually in plastic wrap or parchment, then place them in a freezer bag. They’ll keep for up to 6 months. Thaw in the fridge overnight before grilling.
Cooked leftovers: Store cooled patties in an airtight container in the fridge for up to 3 days. Reheat gently in a skillet over medium-low heat to avoid drying them out.
Frequently Asked Questions
What’s the best ground beef for grilled hamburgers?
80/20 ground beef is the sweet spot for juicy grilled burgers. The fat keeps the patty moist on a hot grill and adds flavor. Leaner blends like 90/10 work in a pinch, but you’ll want to add a couple teaspoons of olive oil to make up for the lower fat content.
How long do you grill burgers?
About 4 minutes per side on a grill preheated to 400 to 450°F, for a total of around 8 minutes. Cook time depends on patty thickness and grill heat, so use an instant-read thermometer and pull them off at 160°F for medium.
Can hamburgers be pink in the middle?
Yes, a grilled burger can be slightly pink in the center as long as it has reached 160°F internally. The color isn’t the test, the temperature is.
Why did my hamburgers fall apart on the grill?
The two most common causes are too much liquid in the mix (which is why I only season with salt and pepper) or pressing the patty together too tightly when shaping. Mix gently, shape gently, and don’t flip more than once on the grill.
What is the 5-6-7 rule for grilling burgers?
The 5-6-7 rule is a simple cook-time guideline for hamburgers: 5 minutes per side for medium-rare, 6 for medium, and 7 for medium-well, on a grill preheated to around 400°F. It’s a handy starting point, but always confirm doneness with a meat thermometer since patty thickness and grill heat vary.
Does putting an ice cube on a burger really keep it juicy?
The idea is that the ice cube melts slowly and adds moisture as the burger cooks. It works to a small degree, but it’s not necessary. Starting with 80/20 beef, leaving the patty alone on the grill, and resting it before serving will get you a juicier burger without the gimmick.
More Grilled Favorites
Juicy Grilled Hamburgers
Ingredients
- 1.5 pounds 80/20 ground beef
- 1/2 teaspoon salt
- 1/2 teaspoon black pepper
- 2 teaspoons olive oil
- Hamburger buns brioche or potato buns recommended
- Sliced cheese American, cheddar, or pepper jack
- Optional toppings: lettuce, sliced tomato, red onion, pickles, ketchup, mustard, mayo
Instructions
- Preheat an outdoor grill to medium-high heat, around 400 to 450°F. Clean the grates with a grill brush.
- In a large bowl, gently combine the ground beef, salt, pepper, and olive oil with clean hands. Mix just until combined.
- Divide the meat into 4 equal portions. Shape each into a round patty about 5 inches across and less than an inch thick. Press a shallow thumbprint into the center of each.
- Place the patties on the grill, indent side up. Close the lid and grill for about 4 minutes. When the patty releases easily, flip once, close the lid, and grill another 4 minutes.
- In the last minute, add a slice of cheese to each patty and close the lid until melted. Internal temperature should reach 160°F.
- Transfer to a clean plate, tent with foil, and rest for at least 5 minutes before serving on buns with your favorite toppings.
Notes
- Fat ratio matters. 80/20 ground beef gives you the juiciest result. If using leaner beef, add 2 teaspoons of olive oil to the mix.
- Don’t overmix. Combine the meat just until evenly seasoned. Overworking it makes patties tough.
- Thumbprint trick. A shallow indent in the center keeps patties from doming as they cook.
- Hands off. Resist the urge to press down with a spatula. You’re just squeezing juice out.
- Doneness. 160°F internal temperature is medium and the FDA-recommended minimum for ground beef. Use an instant-read thermometer for accuracy.
- Rest before serving. Letting the patties rest for 5 minutes keeps the juices in the meat instead of on the plate.
- Make ahead. Shape patties up to 24 hours in advance and refrigerate. To freeze, wrap individually and freeze up to 6 months. Thaw in the fridge before grilling.
- Bun matters. A sturdy brioche or potato bun holds up to a juicy patty without falling apart.
Nutrition
Nutritional Disclaimer Kristin Maxwell of “Yellow Bliss Road” is not a dietician or nutritionist, and any nutritional information shared is an estimate. For accurate calorie counts and other nutritional values, we recommend running the ingredients through your preferred online nutritional calculator. Calories and other nutritional values can vary depending on which brands were used.