This post may contain affiliate links. Please read our disclosure policy.
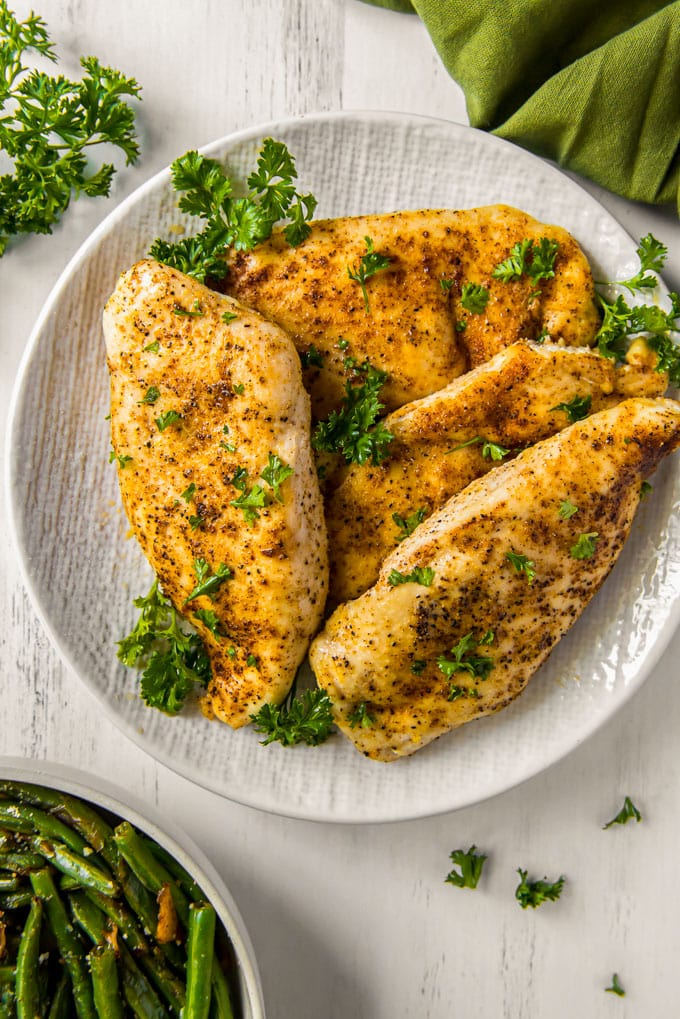
This simple method will teach you how to make perfectly tender, juicy, and great-tasting baked chicken breasts. A perfectly seasoned chicken dinner is just 3 quick steps away!
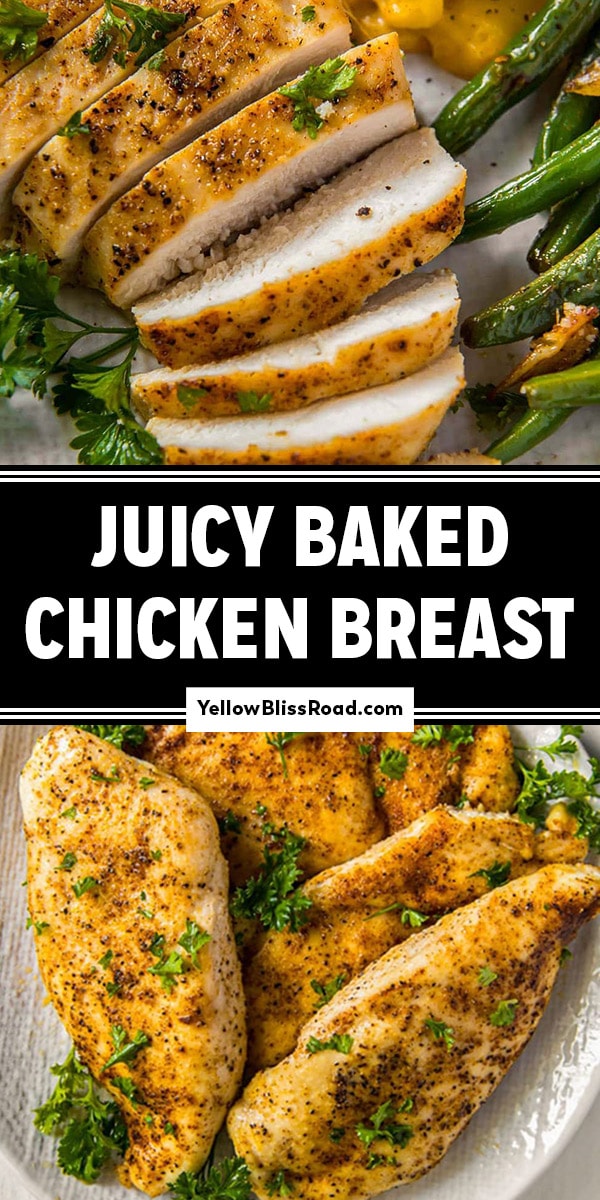
Ready in less than 30 minutes, these perfectly seasoned chicken breasts will have dinner on the table fast. Serve with your favorite easy side dishes, like Instant Pot Baked Potatoes, Spaghetti Mac and Cheese or Seasoned Rice and a simple green veggie.
Baked Chicken Breast Recipe Highlights
- Simple and Delicious Seasoning: My easy chicken seasoning is the best for chicken, pork, or even fish!
- Fast and Easy: With this recipe, you can have an easy baked chicken breast dinner in less than 30 minutes!
- Simple and Full of Flavor: No need to add complicated sides, just serve with some Garlic Bread and your favorite vegetables or salad for a fast dinner your family will absolutely love.
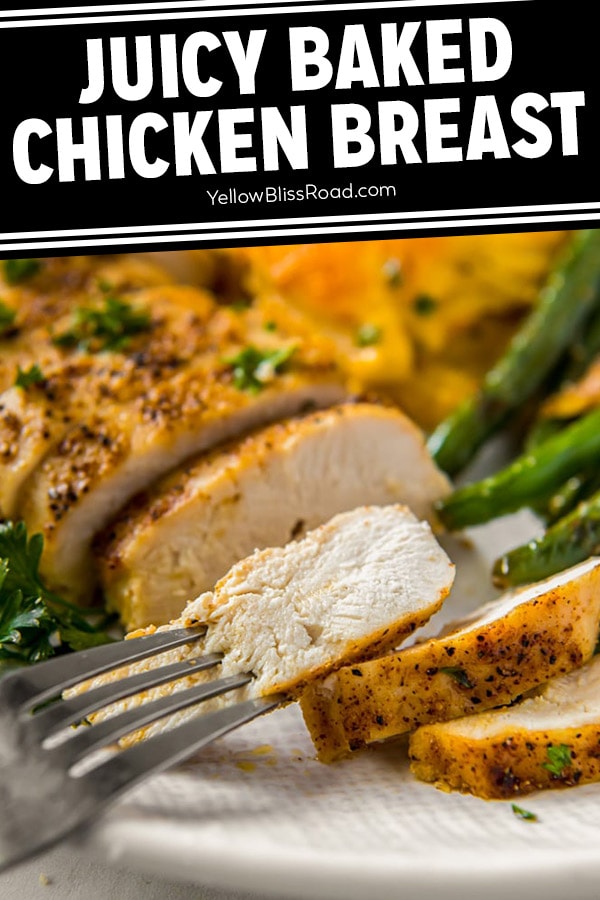
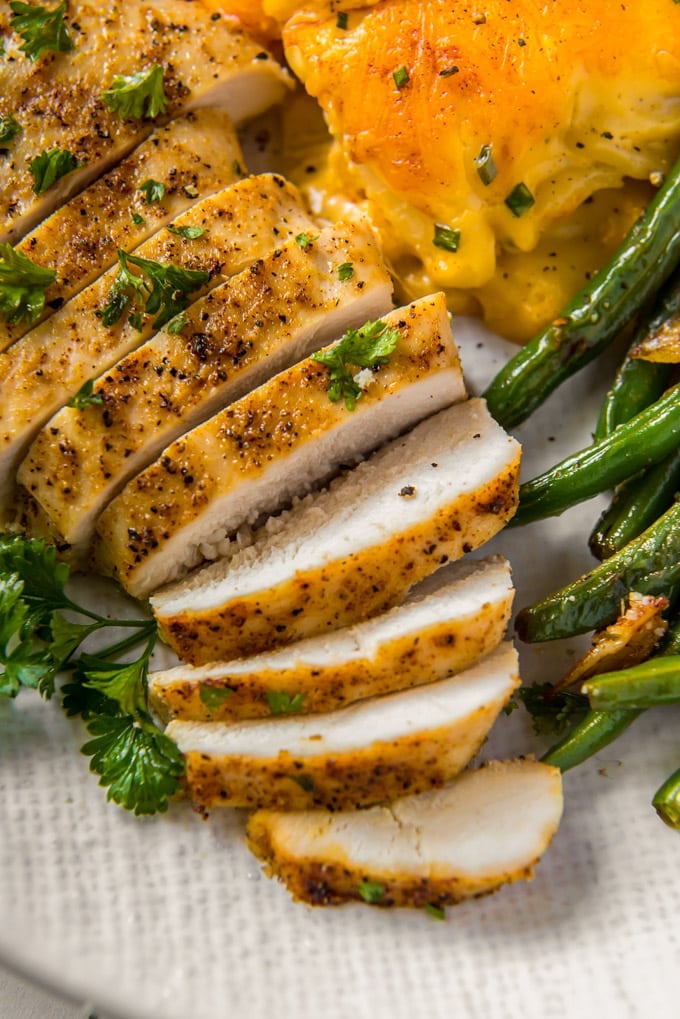
- Tender and Juicy: White meat often gets a bad rap for being dry and flavorless. But this baked chicken recipe is so tender, juicy, and has so much flavor you can hardly tell the difference. Plus it’s a much healthier protein than dark meat.
- Tested and True Method: This has been my go-to method for years for this quick and easy chicken dinner.
- Makes Great Leftovers! I always cook a couple of extra for adding soup, casseroles, chicken salads, or my favorite Chicken Caesar Wraps. Keep it in a sealed bag in the fridge for a few days, or pop it in the freezer if you’re not using it right away for juicy chicken breast anytime. So great for meal prep!
What you need
Ingredients for Baked Chicken
- Boneless, Skinless Chicken Breasts – I prefer to buy these fresh and then freeze them, but a bag of frozen is fine too. Keep in mind that in the frozen bags, they often include rib meat and have added salt and moisture.
- Olive Oil – Rub this on the meat to lock in moisture and help the seasoning to stick.
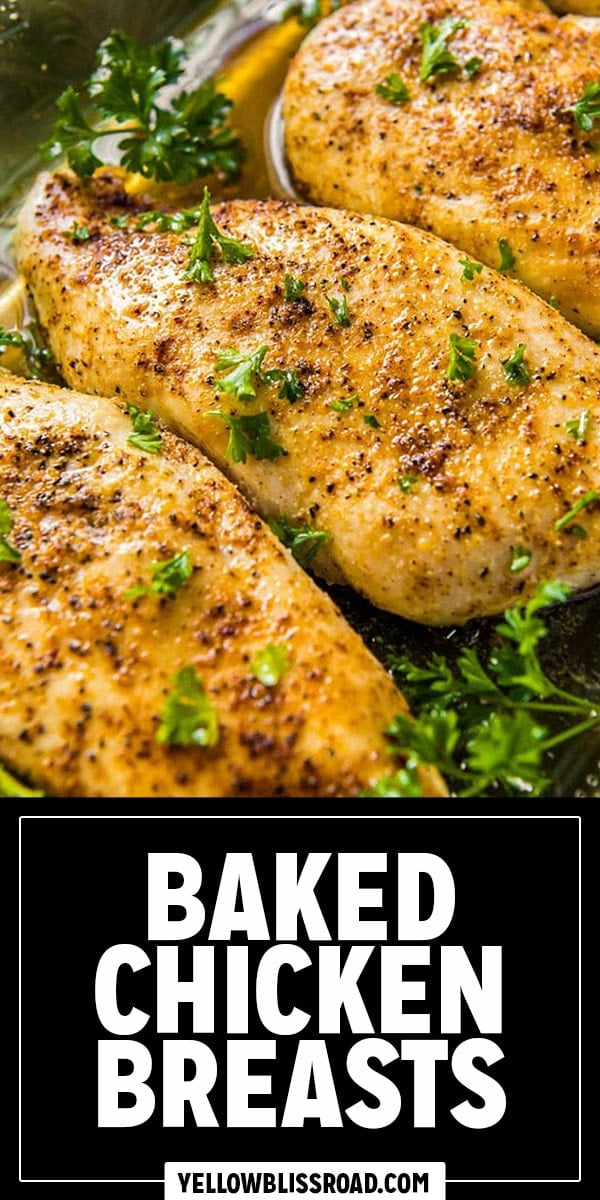
- Chicken Seasoning – This is my tried and true all-purpose seasoning blend of garlic powder, onion powder, smoked paprika or chili powder, salt and pepper. It’s simple, and in the right blend it’s a powerful flavor enhancer.
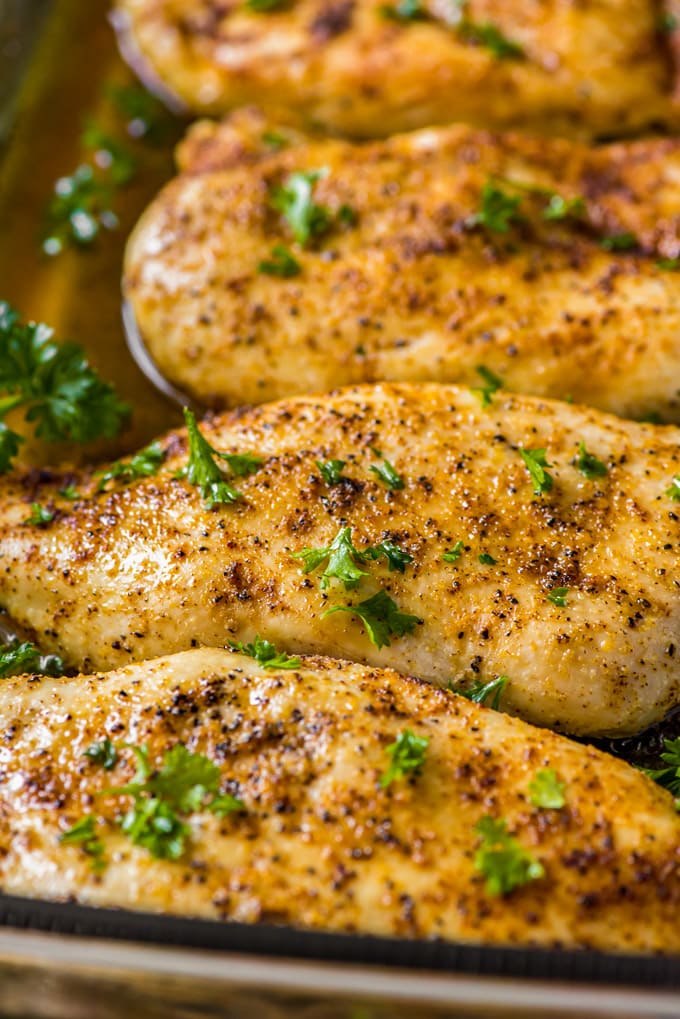
- Garnish – This is, of course, totally optional, but a garnish of fresh parsley for a little vibrant color makes everything look and taste just a little better.
How To Bake Chicken Breasts
See the recipe card below for full, detailed instructions
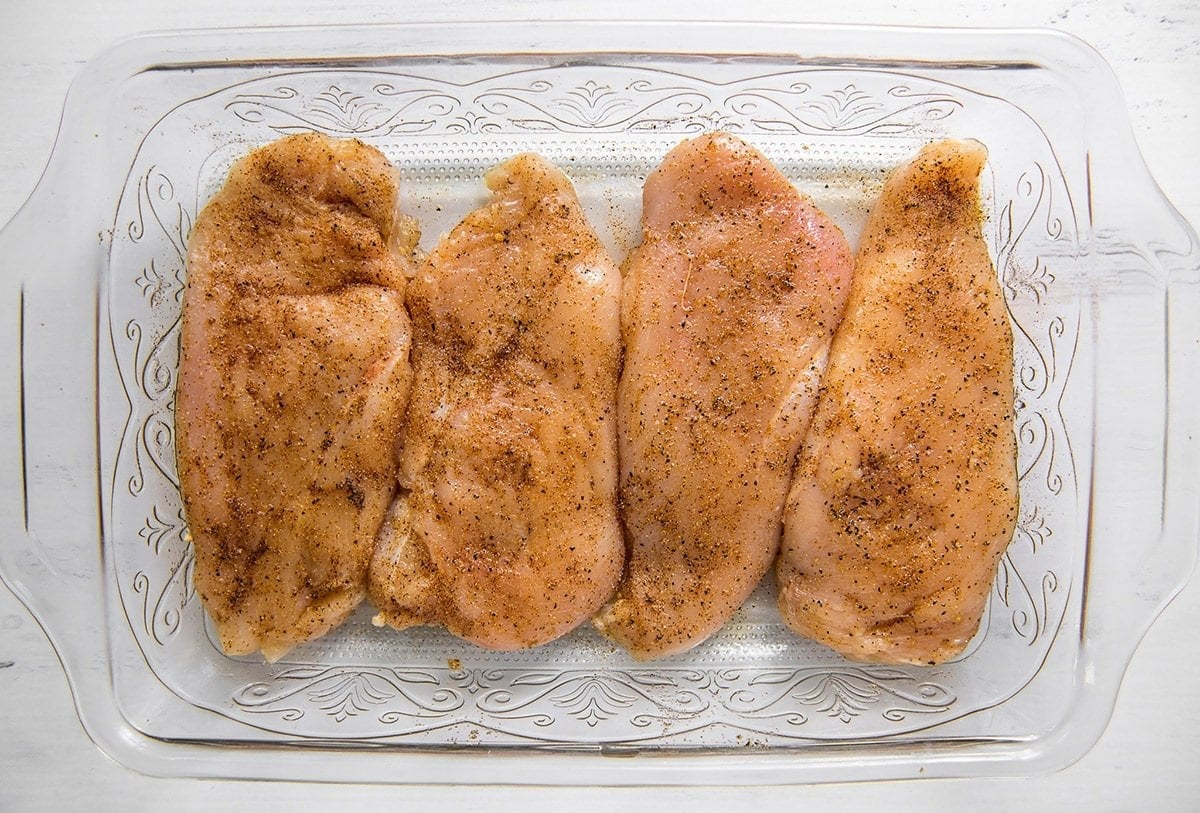
- Pound chicken to an even thickness. Pat the chicken dry with paper towels. Place chicken between two pieces of parchment paper or in a sealed plastic bag and lightly pound with a meat mallet. This will tenderize the meat and also help the chicken to cook faster and more evenly.
- Rub all over with olive oil. You could also use melted butter, or a variety of different types of oil, like avocado or corn oil.
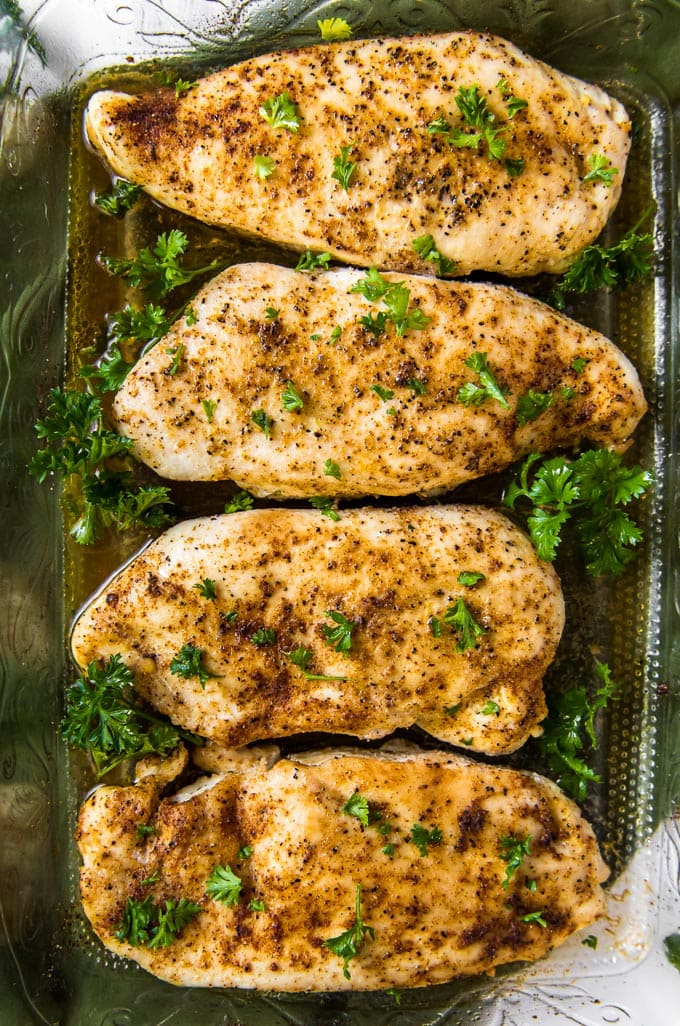
- Season the chicken well. Rub salt, pepper, garlic powder, paprika and onion powder all over the chicken. I like to add a sprinkling of salt over the top just to make sure it’s properly seasoned. Sometimes I’ll use chili powder instead of paprika.
- Place the chicken side by side in a glass baking dish. Arrange each piece of chicken in the opposite direction and you should be able to fit 4 pieces in a 13×9-inch dish. For best results, they can be close together but not on top of each other. They will shrink slightly as they cook.
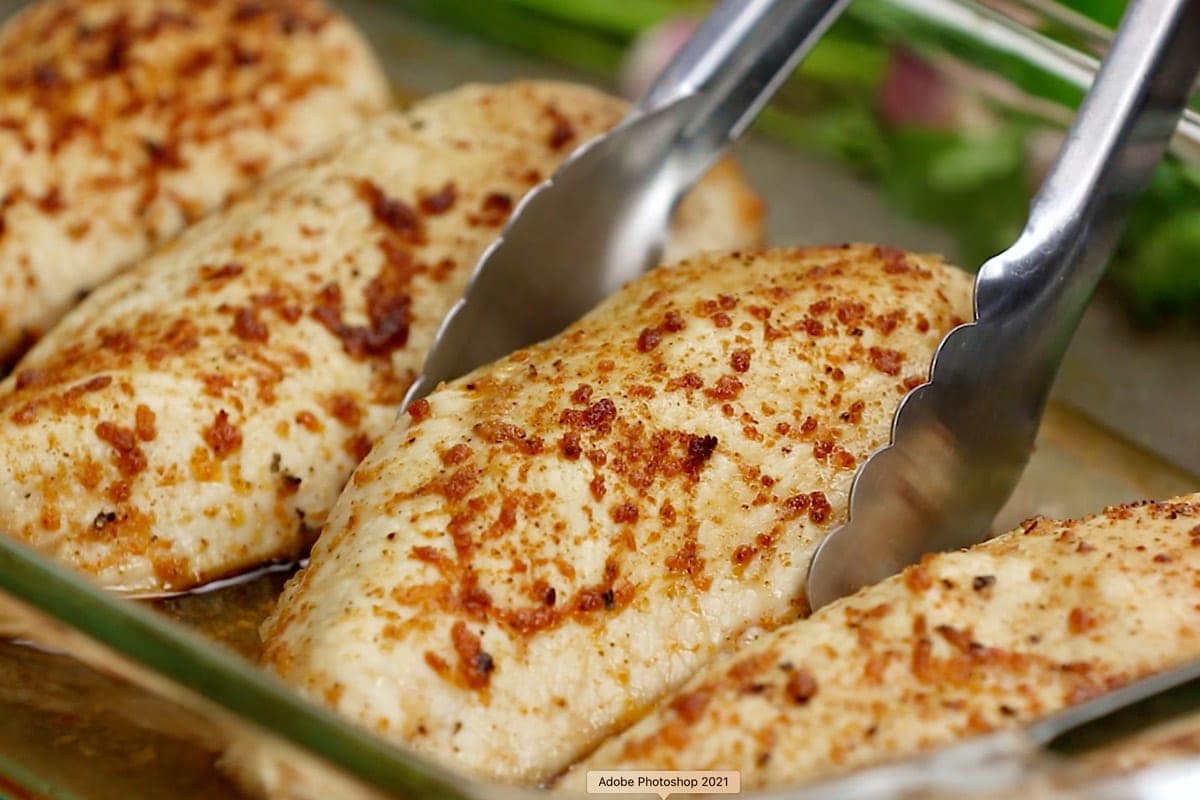
- Roast in the oven at 450°F for about 15-20 minutes. It doesn’t sound like a long time, but at the higher temperature the chicken will cook fast.
- Cook chicken to 165°F. Once the chicken reaches the optimal temperature, remove the pan from the oven and tent with foil to allow the chicken time to rest. Check out my free downloadable Meat Temperature Chart for more information on proper temperatures.
Pro Tip: Patting the chicken dry with paper towels will help the seasonings to stick. Don’t skip this step.
How Long Does it Take to Bake Chicken Breasts?
Boneless skinless chicken breasts are very lean, so it’s easy to overcook them. I always set my oven to 450℉, but maybe you want to cook something else at the same time and need the oven at a lower temperature. You can still get good results using this guide.
Here’s how long to bake chicken breasts at each temperature:
- 350℉: 30-35 minutes
- 375℉: 25-30 minutes
- 400℉: 22-25 minutes
- 425℉: 18-22 minutes
- 450℉: 15-18 minutes
Keep in mind that the exact time needed will depend on the size and thickness of the meat. It’s super handy to keep a digital instant-read thermometer in your kitchen to get the temp just right.
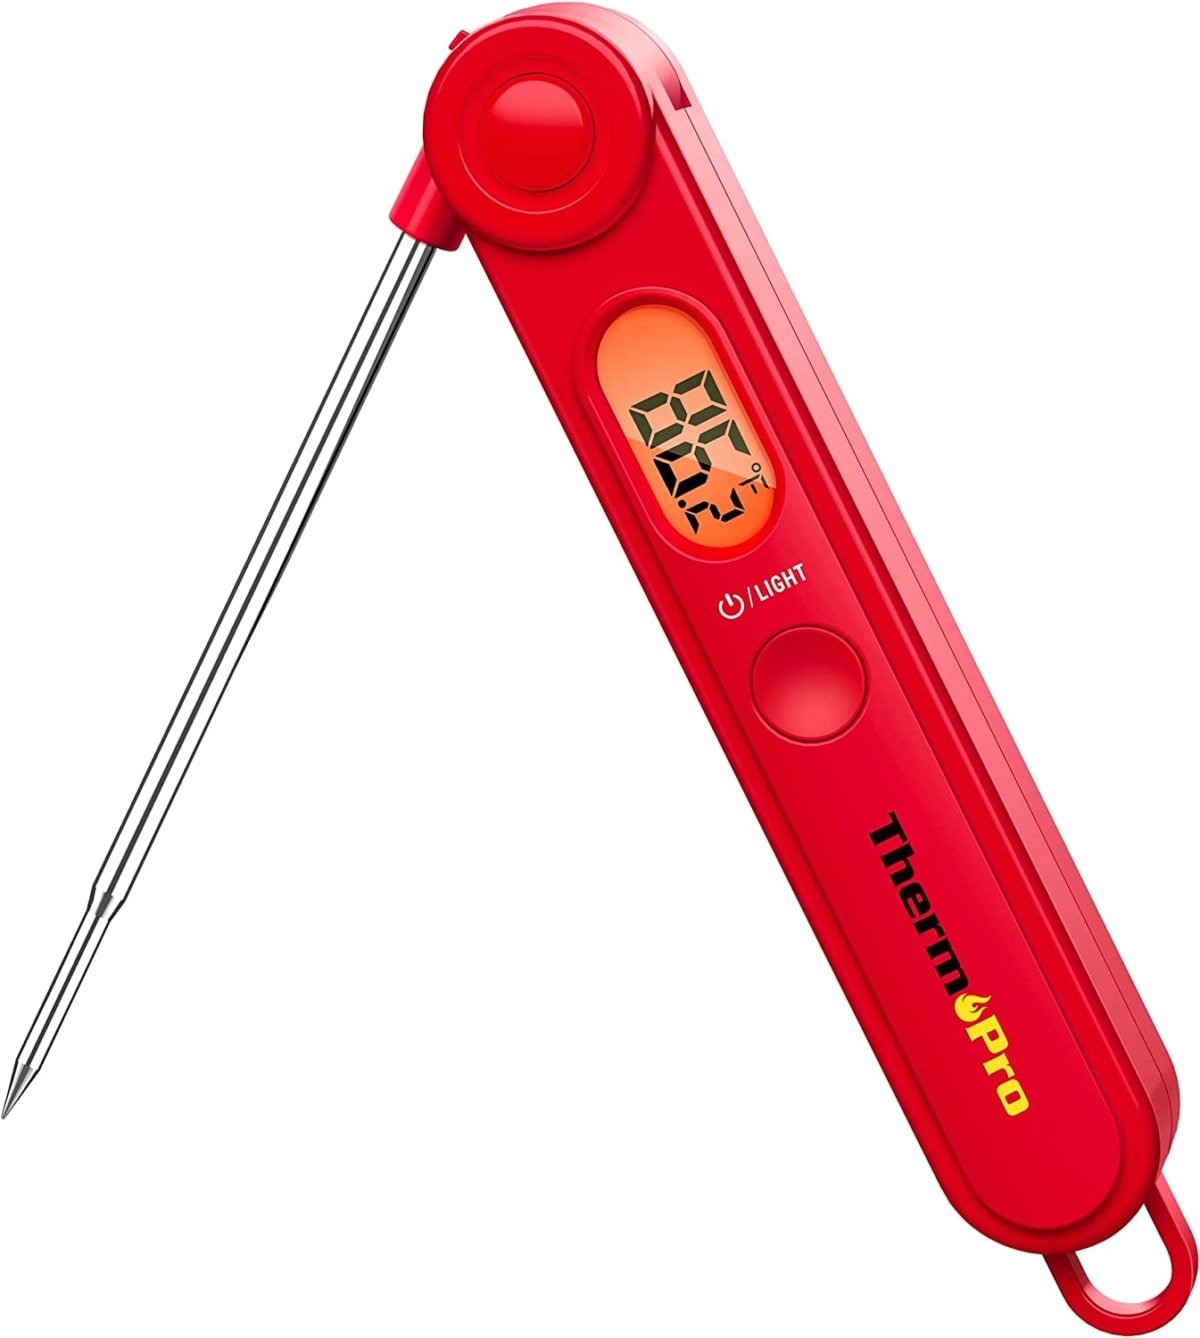
Thermopro Digital Instant Read Meat Thermometer
I highly recommend investing in a meat thermometer for your kitchen. It’s very affordable and often on sale! This is the one I’ve used for years and it has a hundred thousand positive reviews.
Know the Proper Internal Temperature for Chicken
No matter what part of the bird, all chicken should be cooked to 165℉. Use a digital meat thermometer and stick the pointy end into the center of the thickest part of the meat, or for bone-in chicken, the thickest part near the bone. Once the internal temperature registers at least 160-165℉ you know it’s time to tent and rest.
The time it takes to reach the proper temperature can vary by size. These times are based on 450℉ in my recipe:
- 6-ounce breasts: 13-16 minutes.
- 8-ounce breasts: 16-19 minutes.
- 12-ounce breasts: 22-26 minutes.
FAQs
I have tested boneless skinless chicken breasts at a variety of oven temperatures and have found that the higher temperatures seal in the juices and produce the juiciest baked chicken. In my opinion, 450℉ is the best temperature to bake chicken at, but going as low as 425℉ would work fine.
It really depends on the recipe. Typically, I cook chicken uncovered to give it a chance to brown evenly. But for a recipe like Chicken and Rice Bake, covering the pan with foil is crucial to seal in the moistrure.
The seasoning blend I use for this chicken recipe is simple and easy, using spices that are usually readily available. It is my favorite blend and I use it with a variety of recipes. It works great with boneless or bone-in breasts, chicken thighs and drumsticks, and in the oven, on the stovetop or even on the grill! Just rub the seasoning into the chicken and cook accordingly.
Boneless, skinless chicken thighs can be cooked at the same temperature as this recipe but may need an extra 5-10 minutes depending on size. Bone-in chicken will always take much longer; at least an extra 20 minutes. Chicken tenders work wonderfully as well and should just take about 10 minutes.
You can prep the chicken up to 24 hours in advance and keep it tightly covered in the refrigerator. Remove from the fridge while the oven preheats and bake as directed.
Absolutely! It’s easy to double as long as you have the oven space. Double the amount of chicken and seasoning but cook for the same amount of time.
Serving Suggestions
The beauty of this recipe is that it is incredibly versatile. You could serve it with just about anything from pasta to salad and have a delicious meal. My go-to meal is serving with roasted red potatoes and salad. But here are some favorite sides to serve with chicken:
Storage Tips
How to Store Leftover Chicken
Refrigerator: Store leftover cooked chicken up to 4 days in the fridge in an airtight container. Perfect for meal prepping for the week and for using in a variety of recipes from salads to soups.
Freezer: Cool completely and store cooked chicken in a freezer safe container for up to 6 months. I recommend wrapping each breast in parchment paper before freezing for easy portioning.
Recipe Tips
White meat can be tough to get just right. It’s all too easy to overcook and end up with dry, rubbery chicken. I’ve got lots of expert tips to share when it comes to my favorite chicken breast recipes.
- Add healthy fat with olive oil. Rubbing the chicken with a little olive oil before baking helps add moisture to the chicken and also helps the seasonings stick to the breast.
- Keep the seasoning simple. I use a very simple seasoning of salt and pepper, garlic powder, onion powder and chili powder or paprika. Oregano, thyme, Italian seasoning or even taco seasoning are also great to use. Pick the spices, herbs and flavors you enjoy.
- Chicken breasts do best at a high temperature (roasting) around 425-450℉. This allows the meat to cook quickly and retain a lot of moisture. Lower temps result in a longer cooking time and a higher chance of dry chicken, which is not something anyone wants!
- Make sure to let the chicken rest. When cooked at a high temperature the juices in the chicken quickly rush to the center, so when you cut into it right away, all those juices come pouring out and boom – dry chicken. Resting allows the juices to redistribute through the breast and gives you a tender, juicy piece of meat every time.
- Serve with the juices. Adding a drizzle of the juices from the pan with add extra flavor and moisture to the meat.
- Slice against the grain. This will result in the most tender, easy to chew chicken.
- Use a deep baking dish. I use this baking dish (or one similar) for making my baking chicken. You could also use a foil or parchment lined rimmed baking sheet, but a high sided baking dish seems to do better at keeping the meat juicy.
- Add a topping. Try topping with some Homemade Garlic Butter to mix with the juices for extra flavor.
More Chicken Recipes You’ll Love
If your family loves this recipe as much as mine does, try some of our other favorite chicken dinners, like Creamy Baked Chicken, Easy Oven Baked Chicken Drumsticks and Juicy Baked Lemon Pepper Chicken.
Or try one of these chicken recipes next:
- Roasted Lemon Chicken Drumsticks
- Bacon Wrapped Chicken Thighs
- Mexican Chicken Casserole
- Chicken Thigh Marinade
- Crispy Baked Chicken Wings
- Easy Baked Barbecue Chicken
Baked Chicken Breasts
Ingredients
- 2 pounds Boneless, skinless chicken breasts about 4 medium size breasts
- 2 tablespoons Extra virgin olive oil
- 1 teaspoon Kosher salt
- 1/2 teaspoon Black pepper
- 1/2 teaspoon Garlic powder
- 1/2 teaspoon Onion powder
- 1/2 teaspoon Smoked paprika
Instructions
- Preheat oven to 450℉. Pound chicken breasts lightly so they are even in thickness.
- Pour olive oil in a 13" x 9" baking dish. Lightly coat the chicken with the oil, then place chicken breasts side by side in the dish. *Make sure to use a baking dish that can withstand high temperatures.
- In a small bowl, whisk together salt, pepper, garlic powder, onion powder and chili powder (or paprika). Sprinkle the seasoning mixture over both sides of the chicken and rub it in with your hands.
- Bake in a preheated oven for 15-20 minutes, until juices are clear or a meat thermometer reads 160-170℉. *Note – depending on the size of your chicken breasts, it could take longer. Mine were pounded to less than an inch thick.
- Cover with foil and allow to rest for 5-10 minutes while the juices settle before slicing and serving.
Notes
Nutrition
Nutritional Disclaimer Kristin Maxwell of “Yellow Bliss Road” is not a dietician or nutritionist, and any nutritional information shared is an estimate. For accurate calorie counts and other nutritional values, we recommend running the ingredients through your preferred online nutritional calculator. Calories and other nutritional values can vary depending on which brands were used.

If this recipe were a song, it would be an instant number one hit! I needed a quick chicken recipe for my weeknight “I don’t know what to cook” night. I wanted a recipe where I could use ingredients I had on hand and I decided to try this on. I made it as is. It was…how does one say in very few words…DELICIOUS!!! It was flavorful, juicy, easy to follow, and quick to prepare. Dinner was on the table in an hour. I already know that I’ll be using this recipe on a weekly basis. Kristin, thank you for sharing this beautiful recipe with us!
Absolutely FANTASTIC! My husband and I loved it. Easy and delicious! Definitely will make again soon, also I’m gonig to try some of your other recipes. Very impressed ?! Thank you ?
Just wanted to make sure before I try this recipe that I do it correctly. You don’t cover your dish while it is cooking? Wait until afterwards when sitting?
Yes, that is correct.
BEST. BAKED. CHICKEN. EVER.
I made a jar of the chicken rub. (Just multiplied the spices a bunch) and I bake a family pack of chicken with it every week and use it on salads, in rice, eat it plain with a side of veggies… this chicken keeps moist in the refrigerator and reheats well! Literally this is the most versatile, delicious, perfectly seasoned chicken ever! Love love love it!! Thank you!
It’s a great, versatile rub!
I don’t know about all of you, but this is the best chicken breast I’ve made ! Family and friends say it all the time! Thank you!!
The flavors were awesome. I brined my chicken before putting it in the oven. Very juicy and extremely flavorful.
Delicious, moist chicken just as advertised. My new go to recipe. Thanks so much for this posting!
I have used this recipe more than one time. I can’t believe how tender And juicy these breast are.
EVOO is for use on/in salads. Grape Seed Oil or Extra light Olive Oil (I use a 50/50 mixture of each) is what you should be using for high temperature baking, saute and frying. All the low saturated fat goodness without the burnt carcinogens.
Thanks for the suggestion Bryan!
This was delish! I subbed blackening seasoning b/c I did not have chili powder but still wanted the little kick. And did 425 for about 20 due to the size and amt of chicken i used. Other than that I am totally satisfied.. My son (9) LOVED it. He doesn’t clear his plate often but he did this time 🙂 Thanks!
Delicious recipe! I’ve been looking for an easy chicken recipe like this for years! I’ve made it 3 times and know this willl be a new staple. Thanks so much for sharing!
Delicious!! I had about given up on chicken breasts as dry and flavorless. I have renewed hope!!
Followed recipe exactly ~ quick and moist.
I LOVE YOU! For the first time EVER I cooked juicy tender chicken! Breaking from my usual MO, I actually followed the recipe exactly. Well, sort of. I didn’t pound the chicken but cut large breast in half so they weren’t to thick. I was sparing with the spice rub and it had plenty of flavor!
Thank you soooooo much!
Blessings and Peace to you and yours 😀
That works too! Glad you enjoyed the recipe!
Love this chicken. I have already made it 5 times this summer!
This is probably the best chicken recipe I’ve ever made! Thanks for posting. I used the olive oil and had no issues. I also brine my chicken in salt water for 3 hours before baking which also helps make it moist and juicy if you ever get a chance to try it. 🙂
Sounds yummy! Thanks for sharing!
In the notes you state that you yourself changed from olive oil to corn or canola oil, then you tell us to decide for ourselves as to what to do about the oil. This does not say much regarding a recipe that you want for people to try, at least in my opinion.
You’re entitled to your opinion. Personally I think people should have a choice. There’s nothing wrong with using olive oil, it’s a personal choice.
Kristin I made this tonight using some leftover seasoning mix from some pork tacos I made. The other thing I did was I added a small carton of sliced fresh mushrooms and half a container of cherry tomatoes. After seasoning the chicken I put the veggies under the breasts and baked per your instructions. The veggies released more juices. This was FANTASTIC. And on weight Watchers only 2 points!! Thank you for helping me tolerate chicken breasts. This recipe works!
Hi Kristin, I like your idea about rubbing oil on the chicken breasts. Olive oil is your better choice. It can go to a higher heat than canola, which has a good proportion of Omega3 oil, so it should never be heated and corn oil is very high in Omega 6, which most of us have too much of already. If you are buying canola oil you should only get expeller pressed because otherwise the heat extraction has already ruined the oil.
Delicious and so easy! I used olive oil and had no smoke issues.
This chicken breast is defiantly one of the best ways to make a chicken breast. Extremely moist and tasty!