This post may contain affiliate links. Please read our disclosure policy.
This Thanksgiving Turkey recipe is practically foolproof! It turns out tender, juicy, and golden every time using simple steps that even first-time cooks can follow with confidence. There’s no brining or basting needed, just clear instructions, step-by-step photos, and practical tips that show you exactly how to prep, season, roast, and carve a beautiful, flavorful turkey for a stress-free holiday meal.
If you’re planning your whole menu, check out our Thanksgiving Dinner Menu Ideas & Planning Guide and our Best Thanksgiving Side Dishes collection.
About This Recipe
This perfect Thanksgiving Turkey will be the star of your family’s holiday dinner. Of course, the best turkey recipe needs the best Thanksgiving side dishes, like my Make Ahead Mashed Potatoes, Homemade Stuffing, and classic Green Bean Casserole.
This juicy turkey recipe isn’t complicated at all. There’s no brining, no basting, no weird cooking techniques. Just simple instructions to give you great results every time while your bird roasts stress-free.
In this post, you’ll learn tons of tips and tricks, plus step-by-step instructions for the most perfectly tender, incredibly juicy, totally stress-free, best Thanksgiving turkey recipe, ever! Your holiday meal is about to get a whole lot easier.
Why This Thanksgiving Turkey Recipe Works
- It’s easy! Even a first-time cook can make a delicious turkey for Thanksgiving, or any day, by following this easy turkey recipe.
- Butter keeps it moist. Placing butter underneath the turkey skin adds extra flavor and keeps the meat moist and juicy.
- Foil keeps it from drying out. Covering the top with foil during the first few hours of cooking helps to keep the breast meat from drying out since the turkey legs take a little longer to cook.
- High heat crisps the skin. Turning up the heat during the last hour ensures golden, crispy skin without drying out the meat.
5 Make or Break Tips For Roasting A Turkey
These quick tips help ensure your turkey turns out juicy, evenly cooked, and full of flavor.
- Give yourself enough thawing time. A frozen turkey needs about 24 hours of fridge thaw time for every 4 pounds. Starting early prevents uneven cooking and keeps the center from staying too cold.
- Dry the skin really well. Moisture keeps the skin from crisping. Pat the turkey dry with plenty of paper towels — this is key for that golden, crispy finish.
- Loosen the skin gently. Sliding your hand under the skin helps the butter spread evenly. It also ensures the breast stays moist as it roasts
- Use foil during the first part of roasting. Covering just the breast with foil protects the white meat while the legs and thighs cook through.
- Use a thermometer! The most reliable way to avoid overcooking is to use an instant-read thermometer. Check the breast or thigh for 165°F.
Recipe walk-through
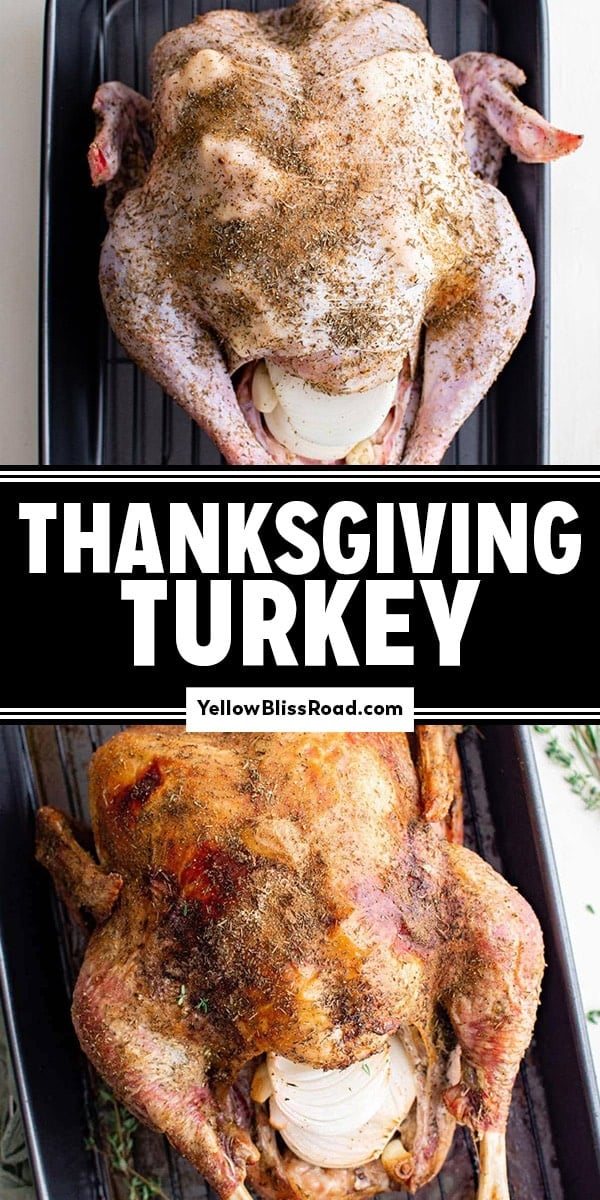
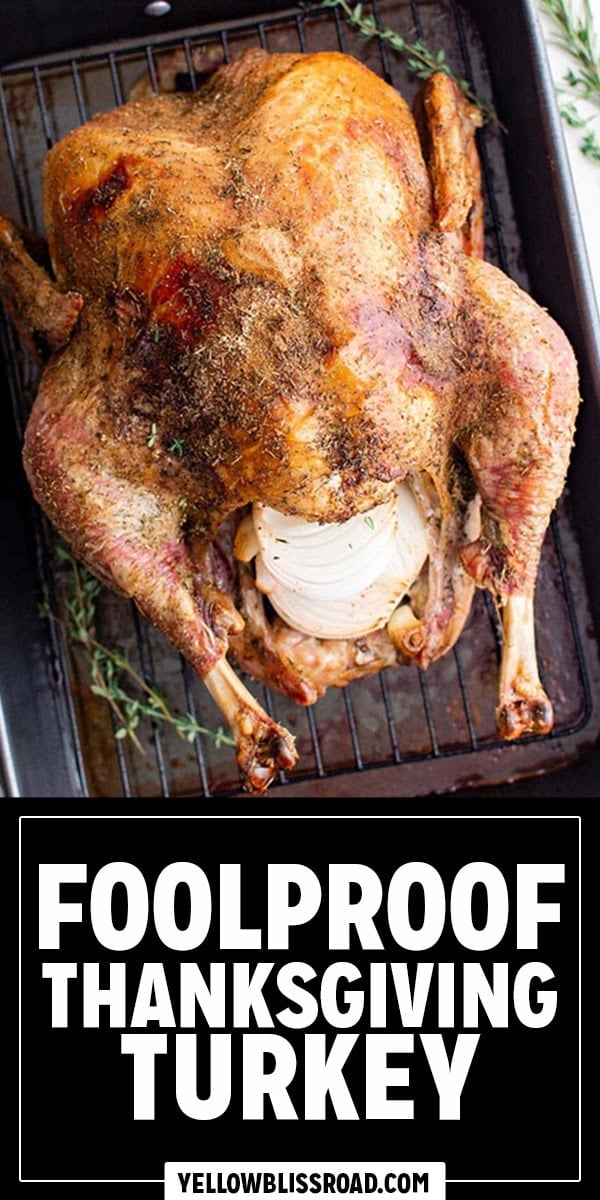
How to Make Thanksgiving Turkey (Simple + Foolproof)
No brining, no basting, just simple ingredients for an exceptionally flavorful Thanksgiving turkey! Be sure to scroll down to the recipe card for the complete list of ingredients and instructions.
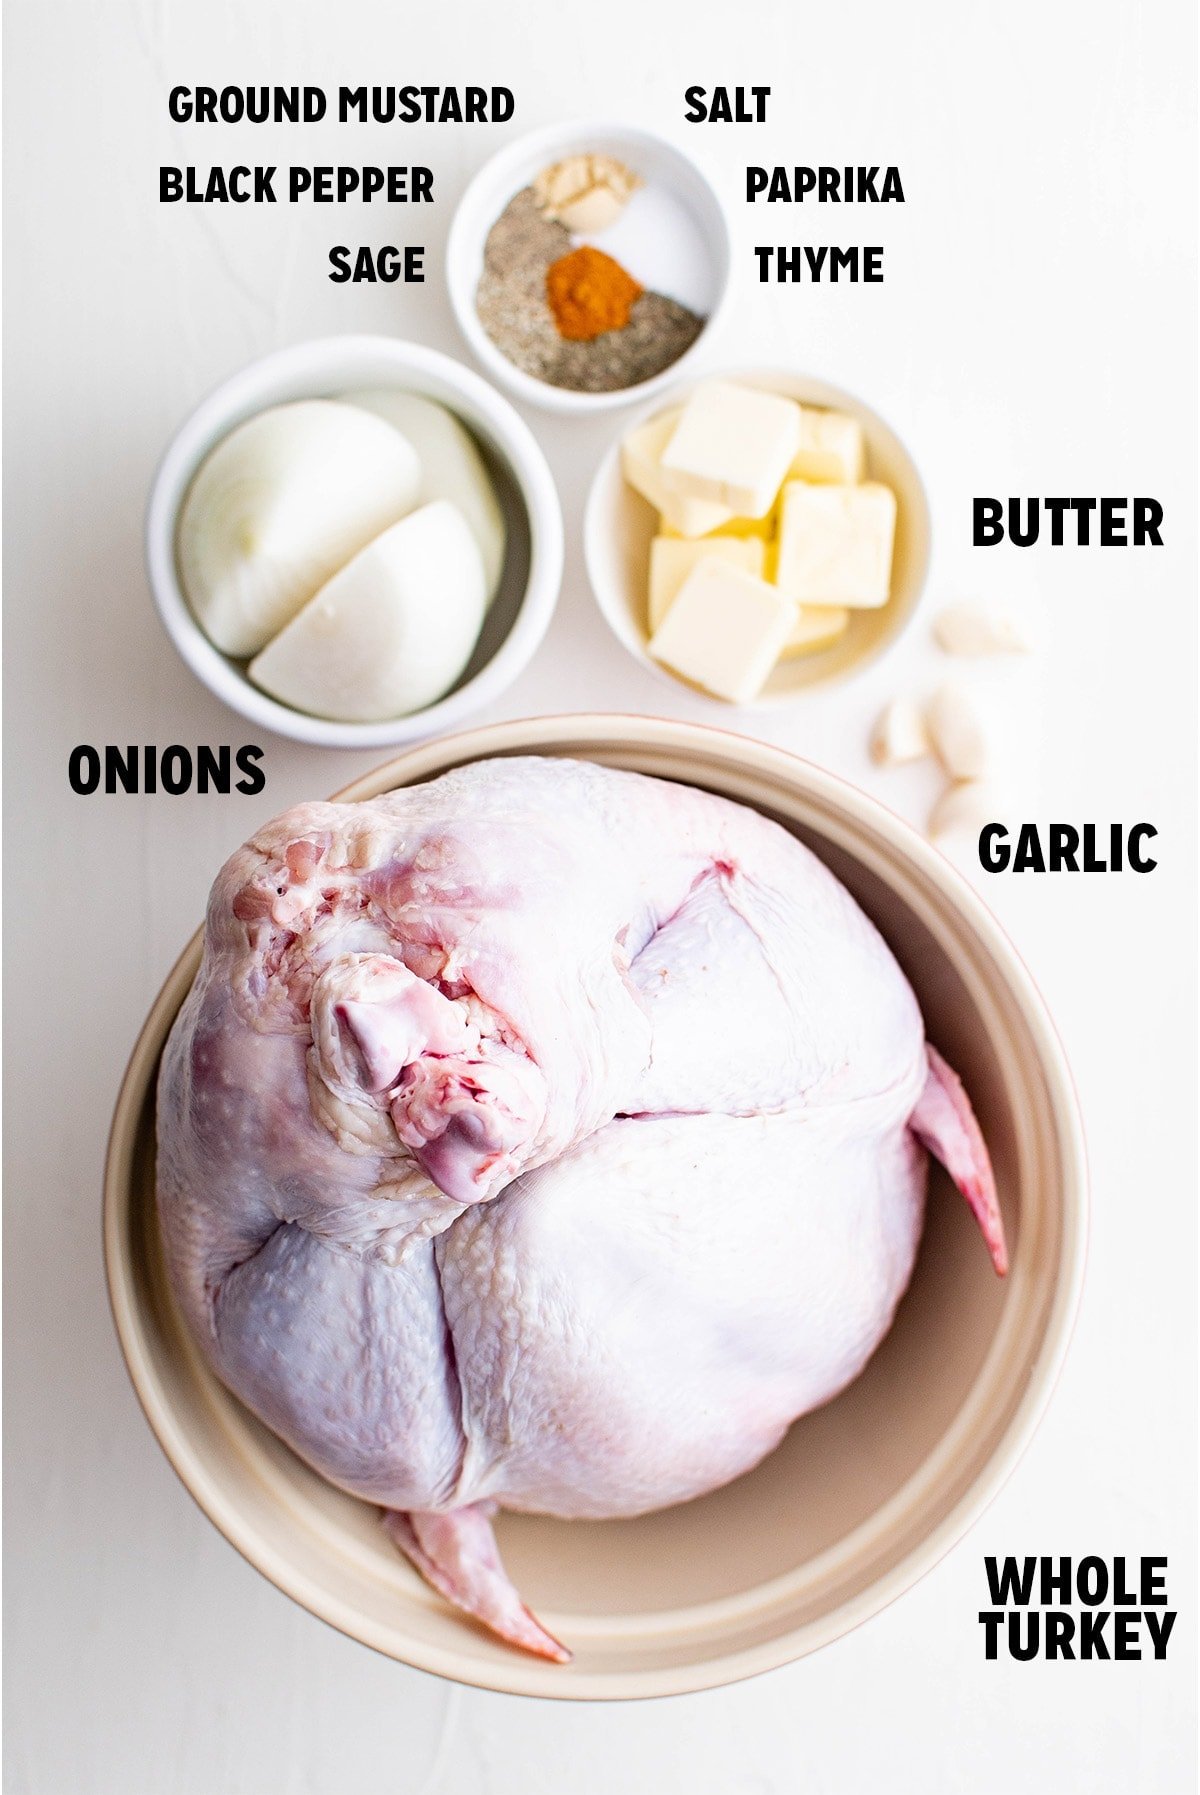
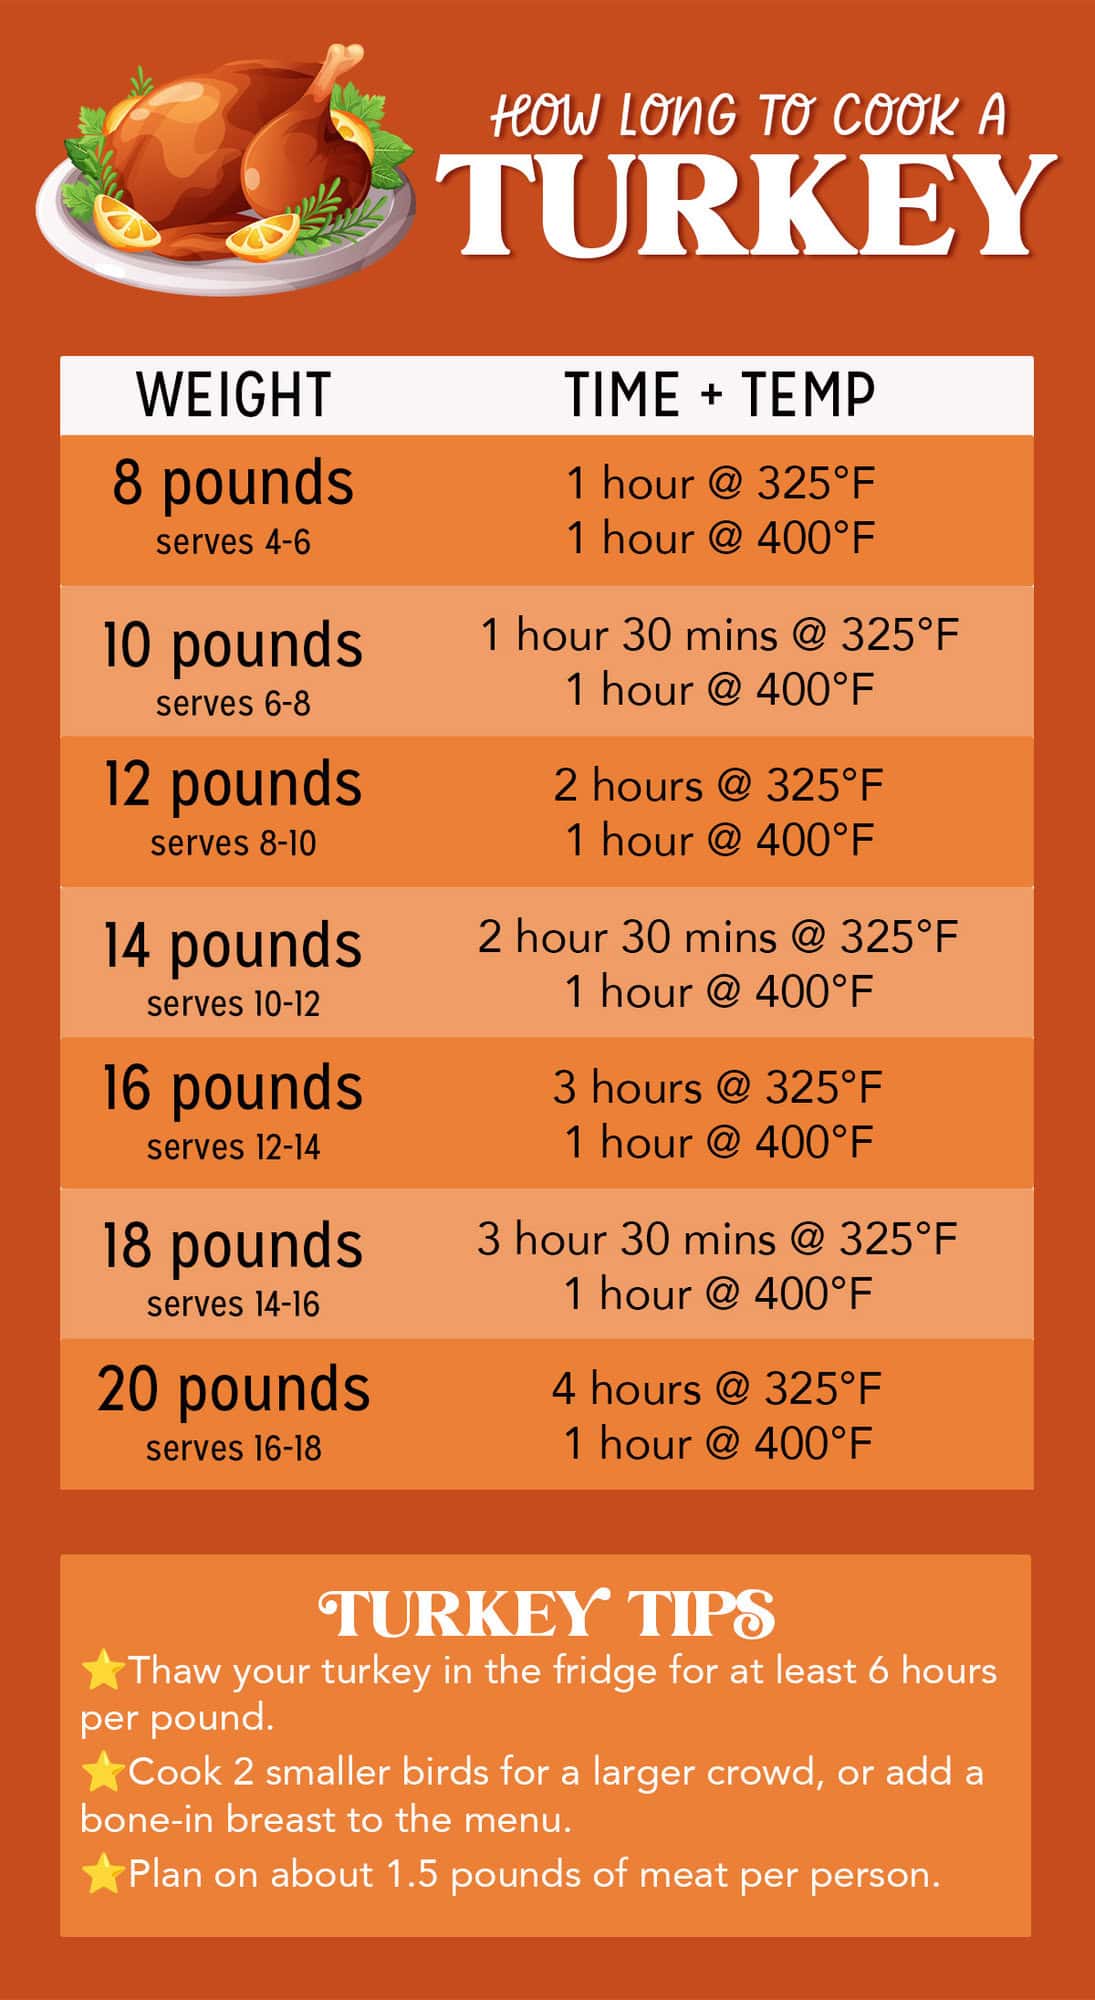
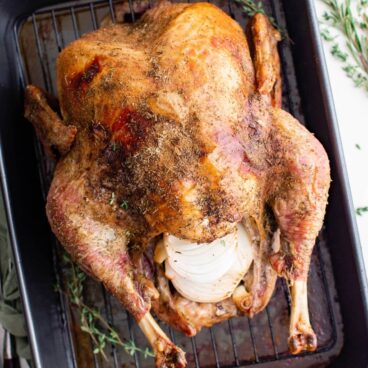
- The Bird – For this recipe and the cooking times that go with it, I used a 12-pound turkey. This is a fairly average size that will feed 8-10 people.
- Butter – Pats of butter are placed under the skin of each turkey breast.
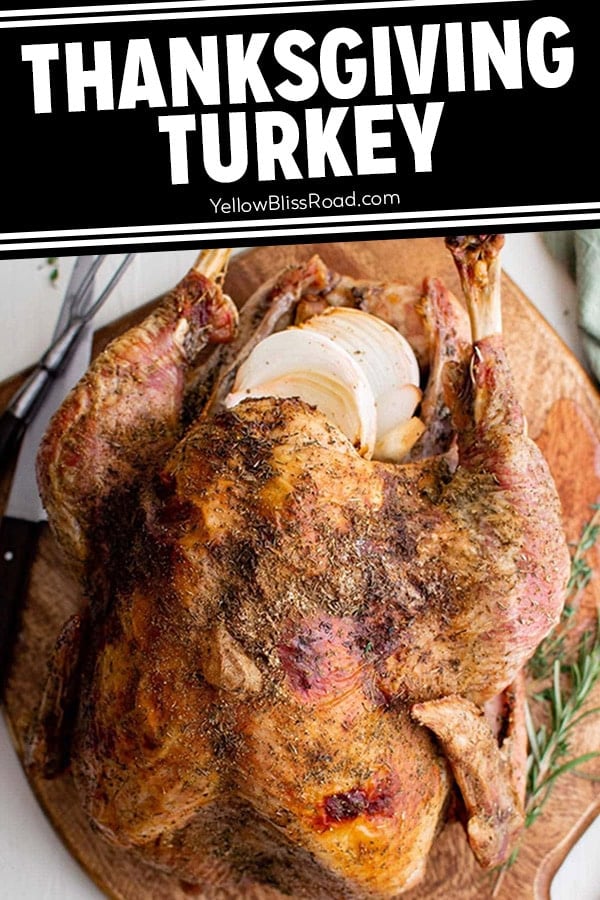
- Onion and Garlic – peel and stuff inside the cavity of the turkey. You can also add fresh herbs and citrus fruits, like lemon or orange, if you like.
- Dry Rub – Mix together kosher salt, dried thyme, dried sage, rosemary, paprika, black pepper, and ground mustard and rub into the skin. This is also a delicious seasoning for Roast Chicken.
- Equipment – A big roasting pan, preferably with a wire rack to hold the roast turkey up above the drippings.
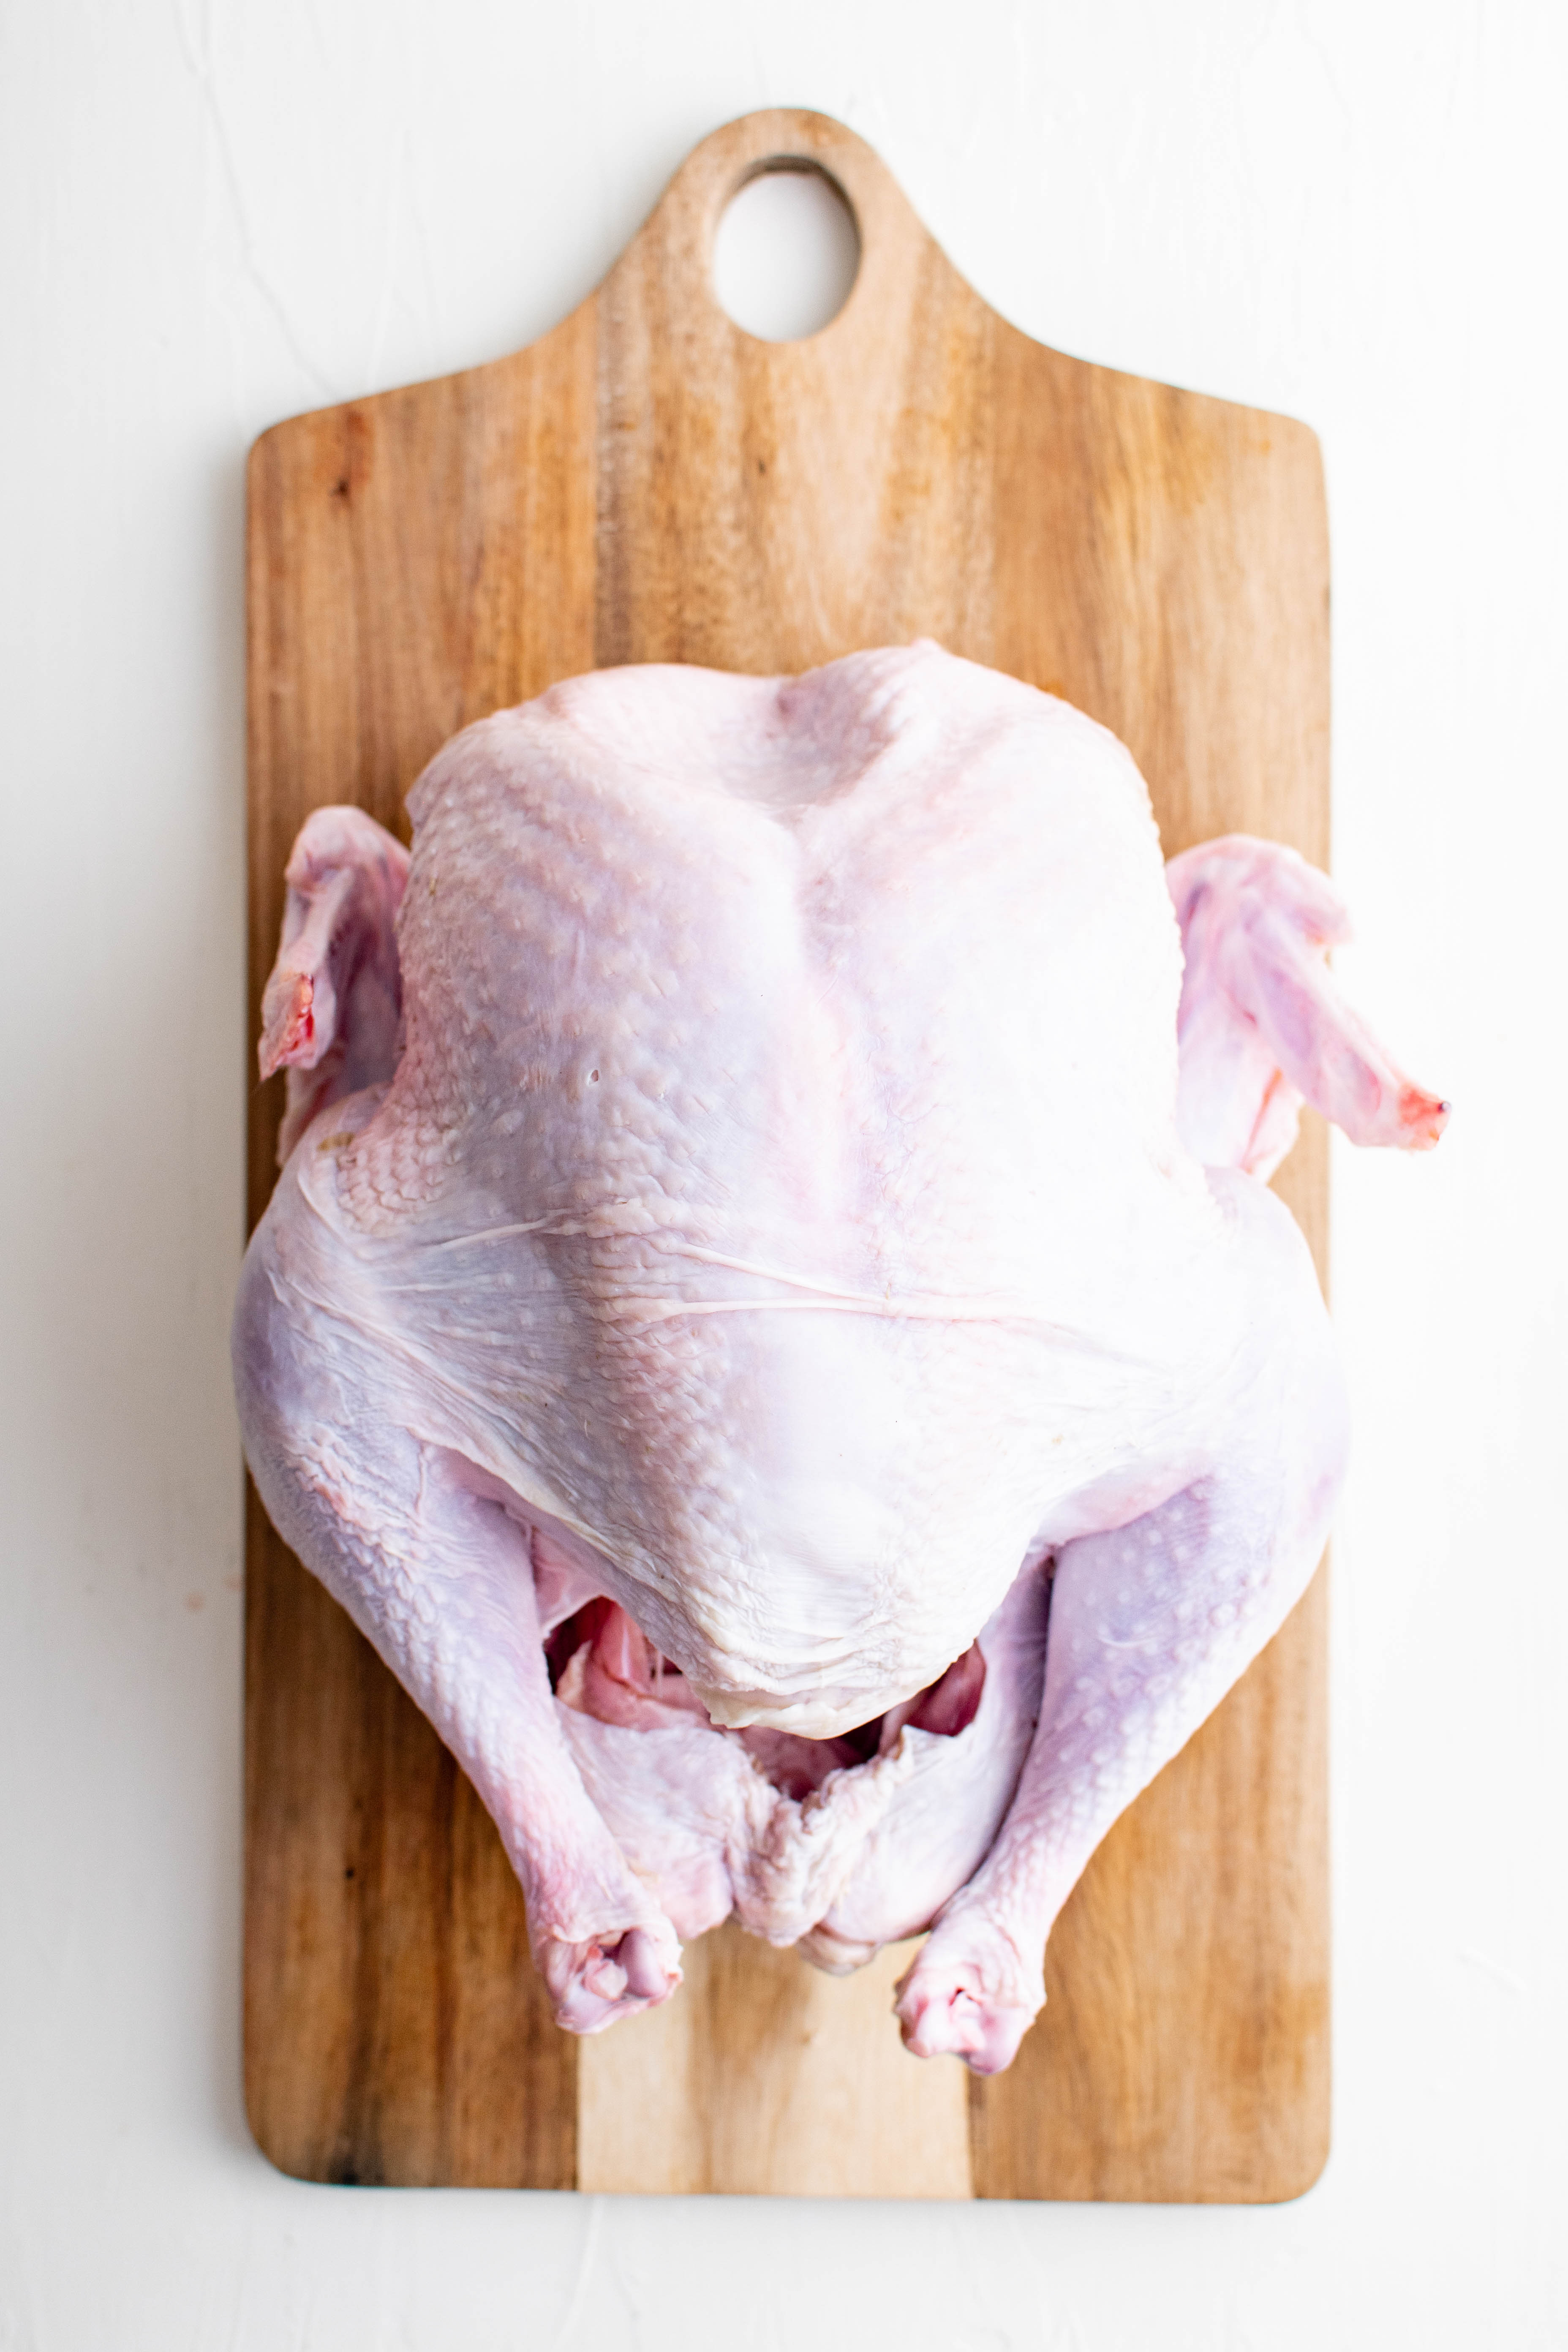
Defrost the Turkey
If your turkey is frozen, thaw it completely in the refrigerator before unwrapping it. Place it in a deep roasting pan to catch any juices. Be sure to start defrosting the turkey a few days before you need to cook it.
Plan on:
- 24 hours of thaw time per 4 pounds
- A little extra time if your fridge runs cold
- So for our 12-pound bird, at least 3-4 days. To be safe, I usually give it an extra 12-24 hours.
Avoid thawing in the sink; it can encourage bacteria. Once thawed, prep the turkey within 1–2 days.
Prep the Turkey
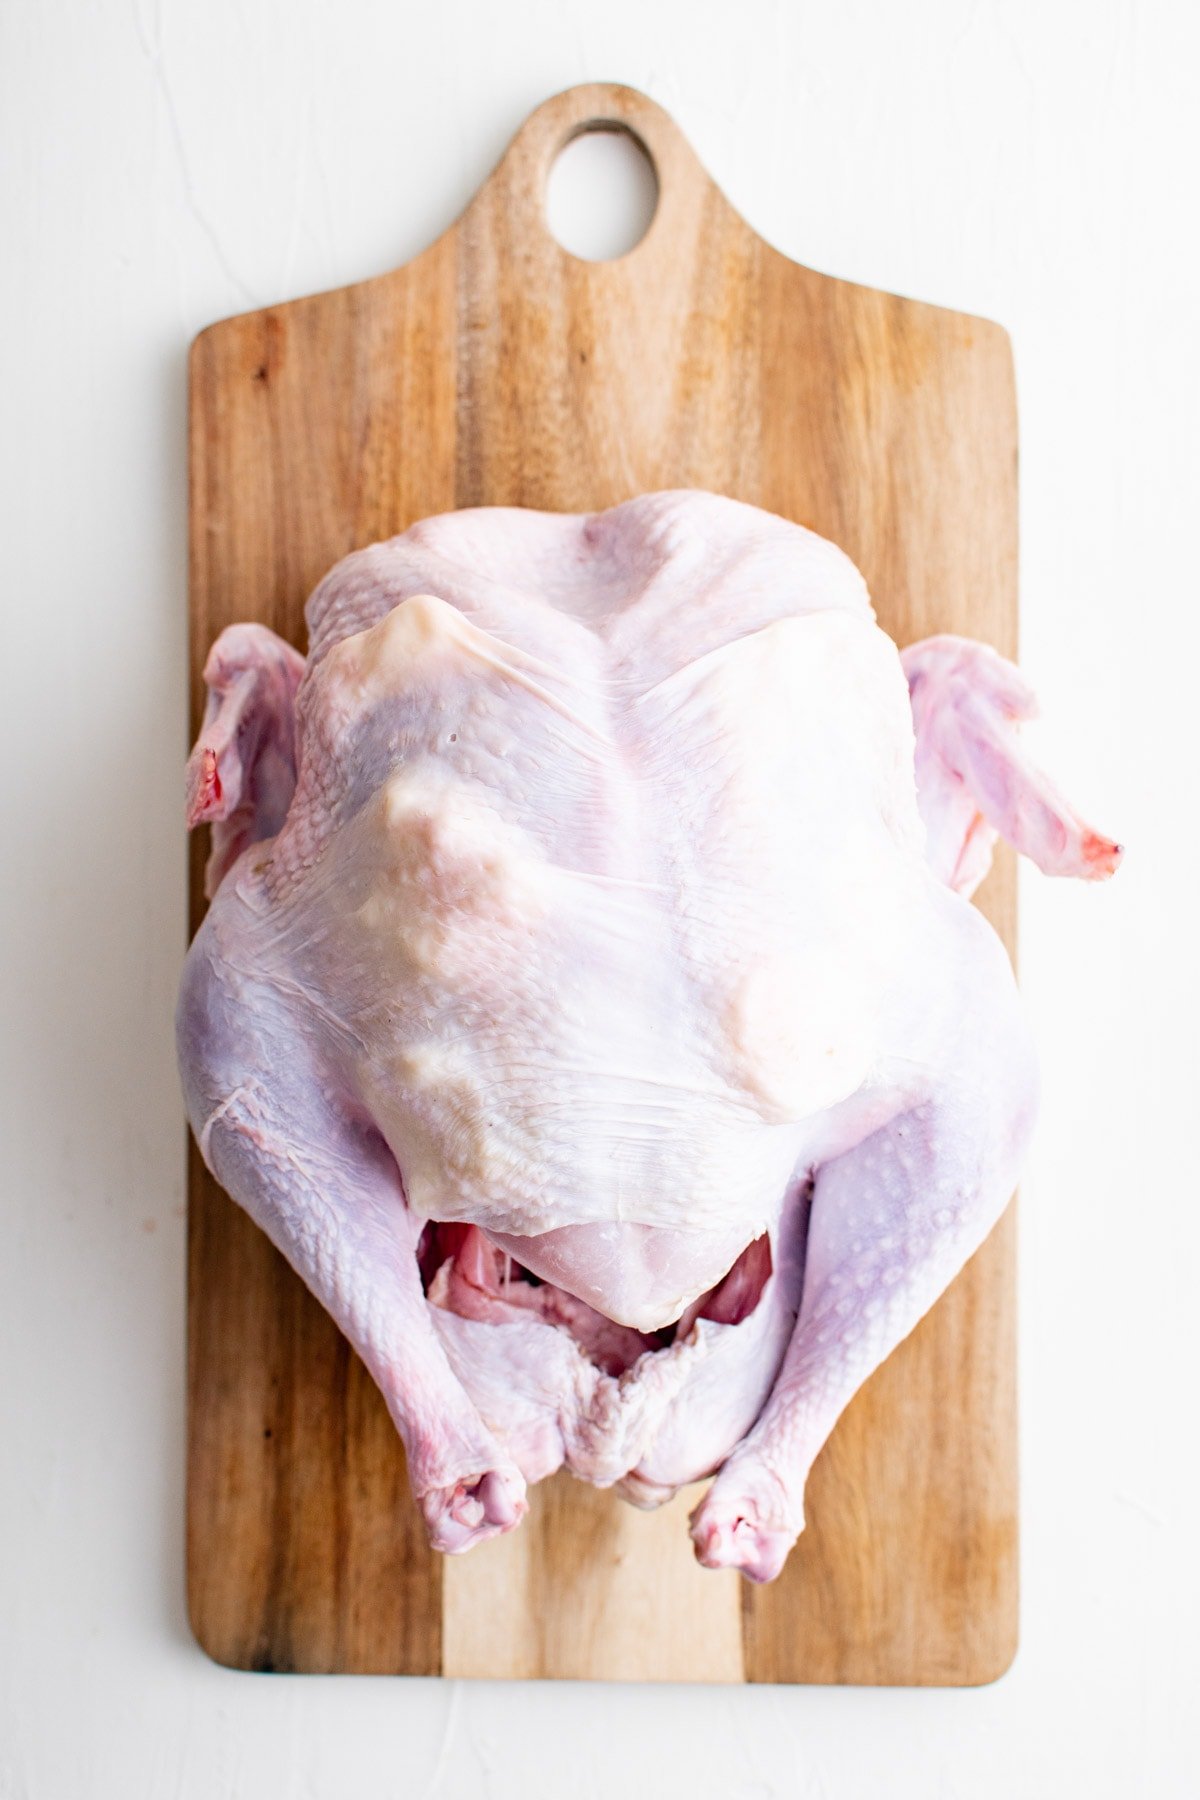
Remove the packaging and take out the neck and giblets – save them for turkey gravy if you like. (I usually do this in a large container in the kitchen sink.) Transfer the turkey to your roasting pan with a rack.
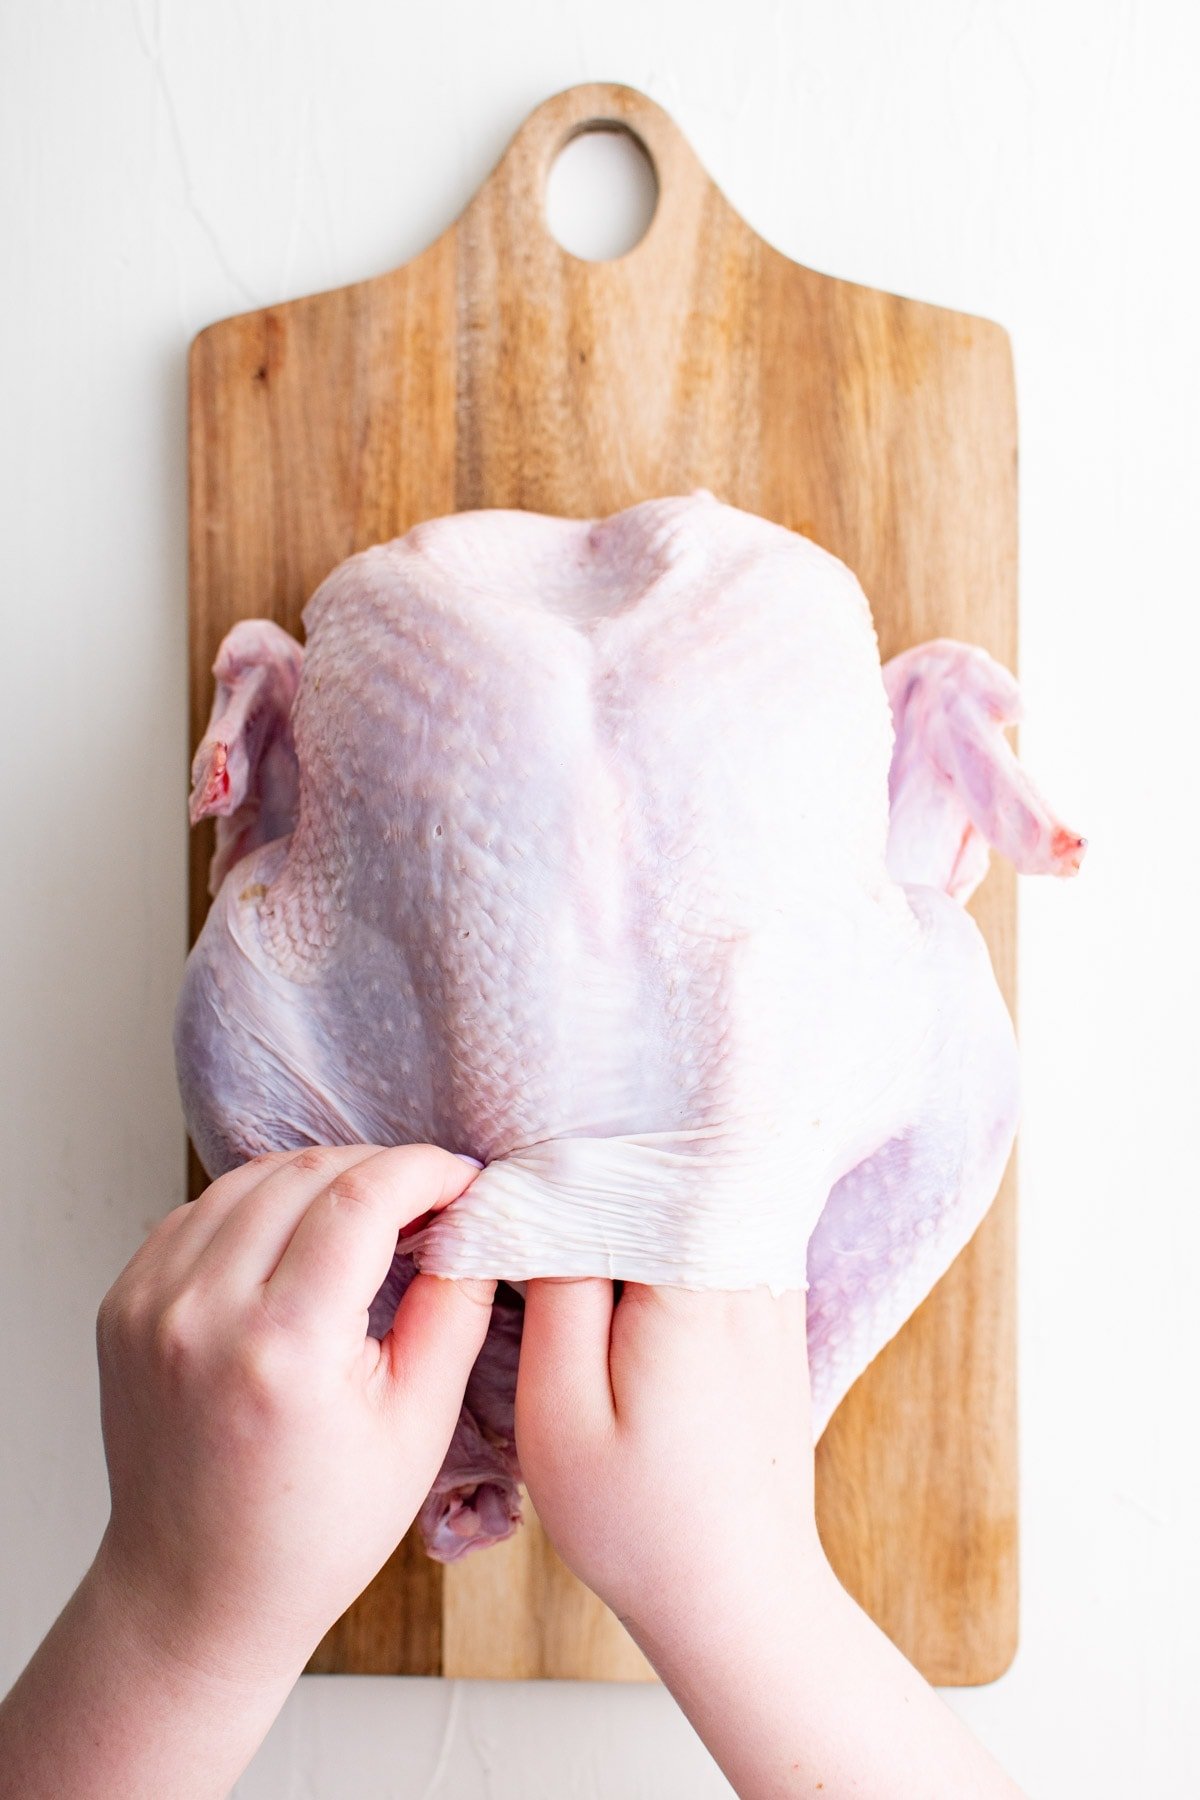
Pat the turkey dry all over, especially the breast and inside the cavity. Dry skin is one of the biggest keys to crispy skin.
Add Butter and Seasonings
- Carefully slide your hand under the skin of the turkey breast to separate it from the meat.
- Add three pats of butter under the skin on each side (1 pat = 1 tablespoon) and spread it around gently. You could also use my Garlic Butter here!
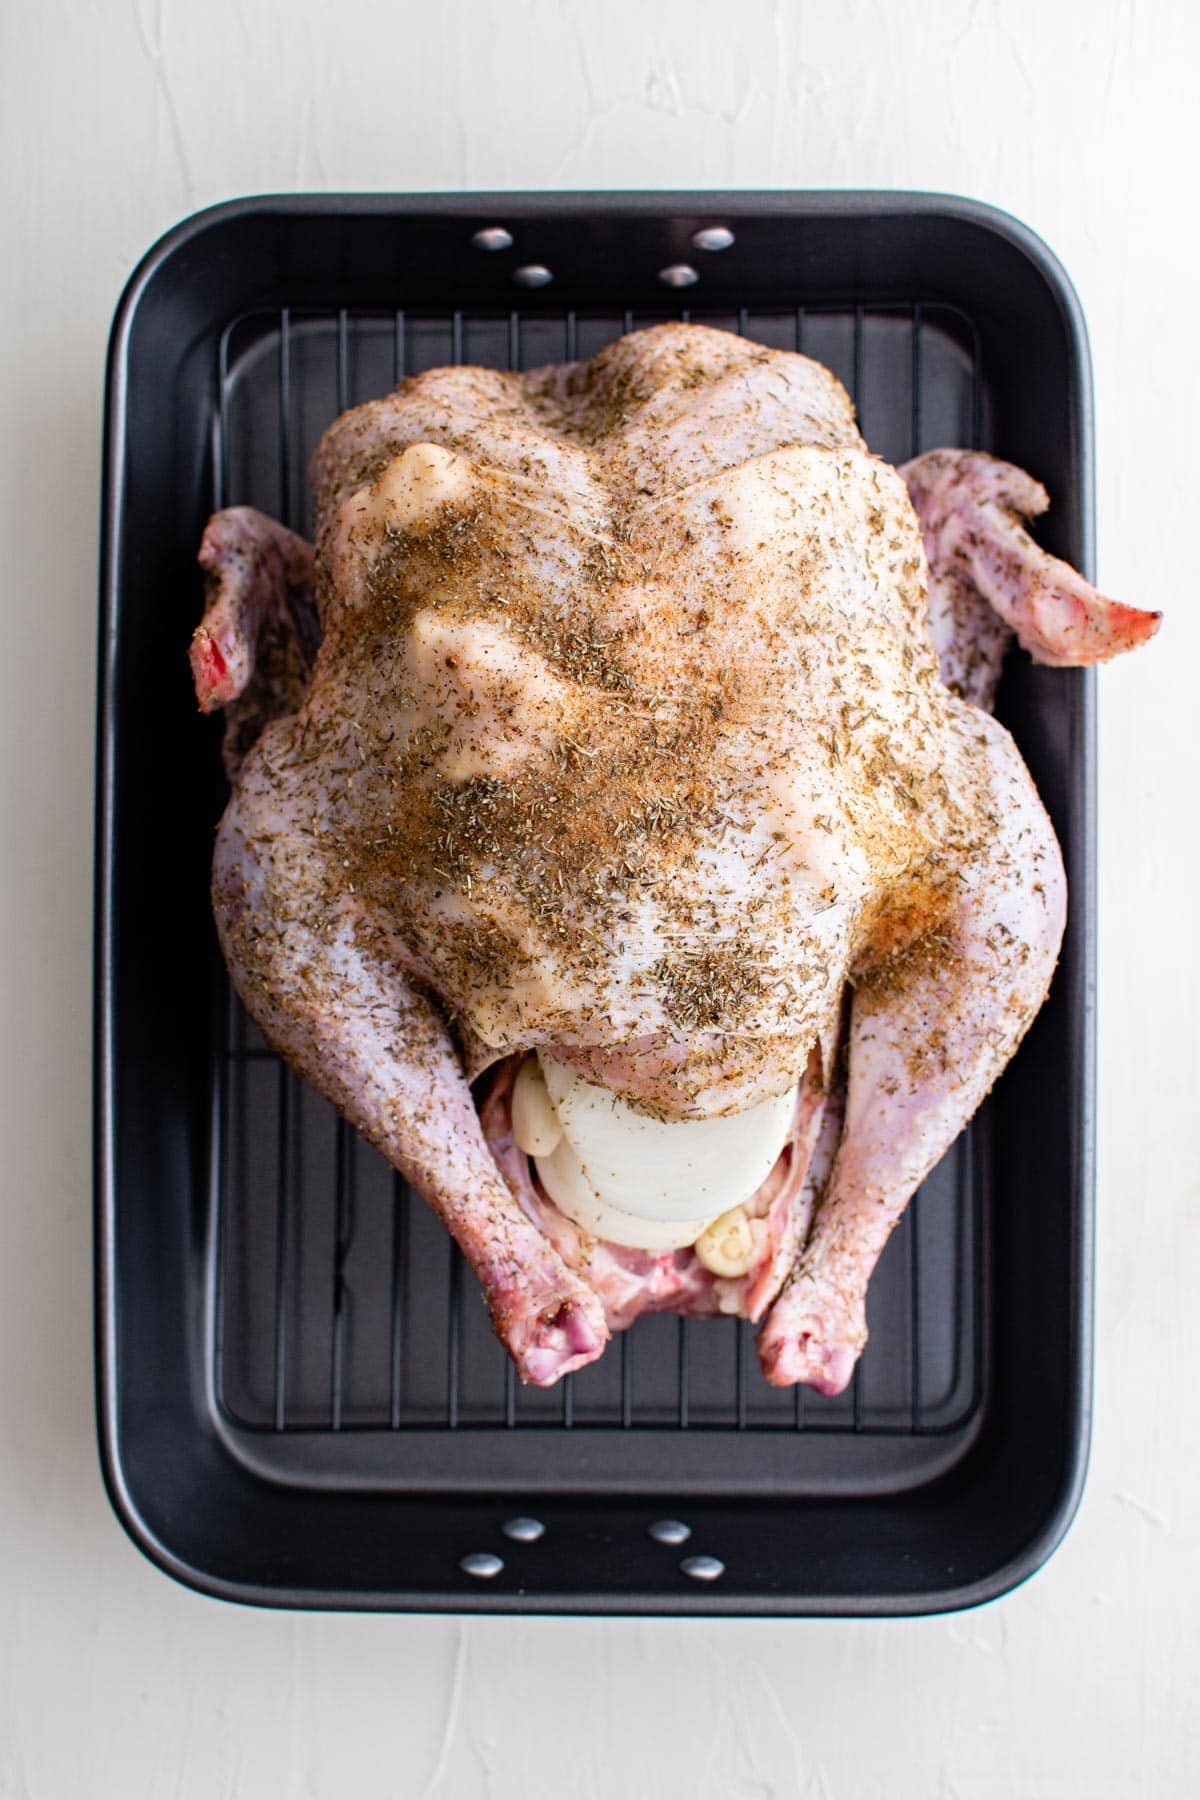
- Mix together the dry rub (salt, thyme, sage, rosemary, paprika, pepper, and ground mustard). Sprinkle it all over the outside of the turkey and press it gently into the skin. Add a little inside the cavity.
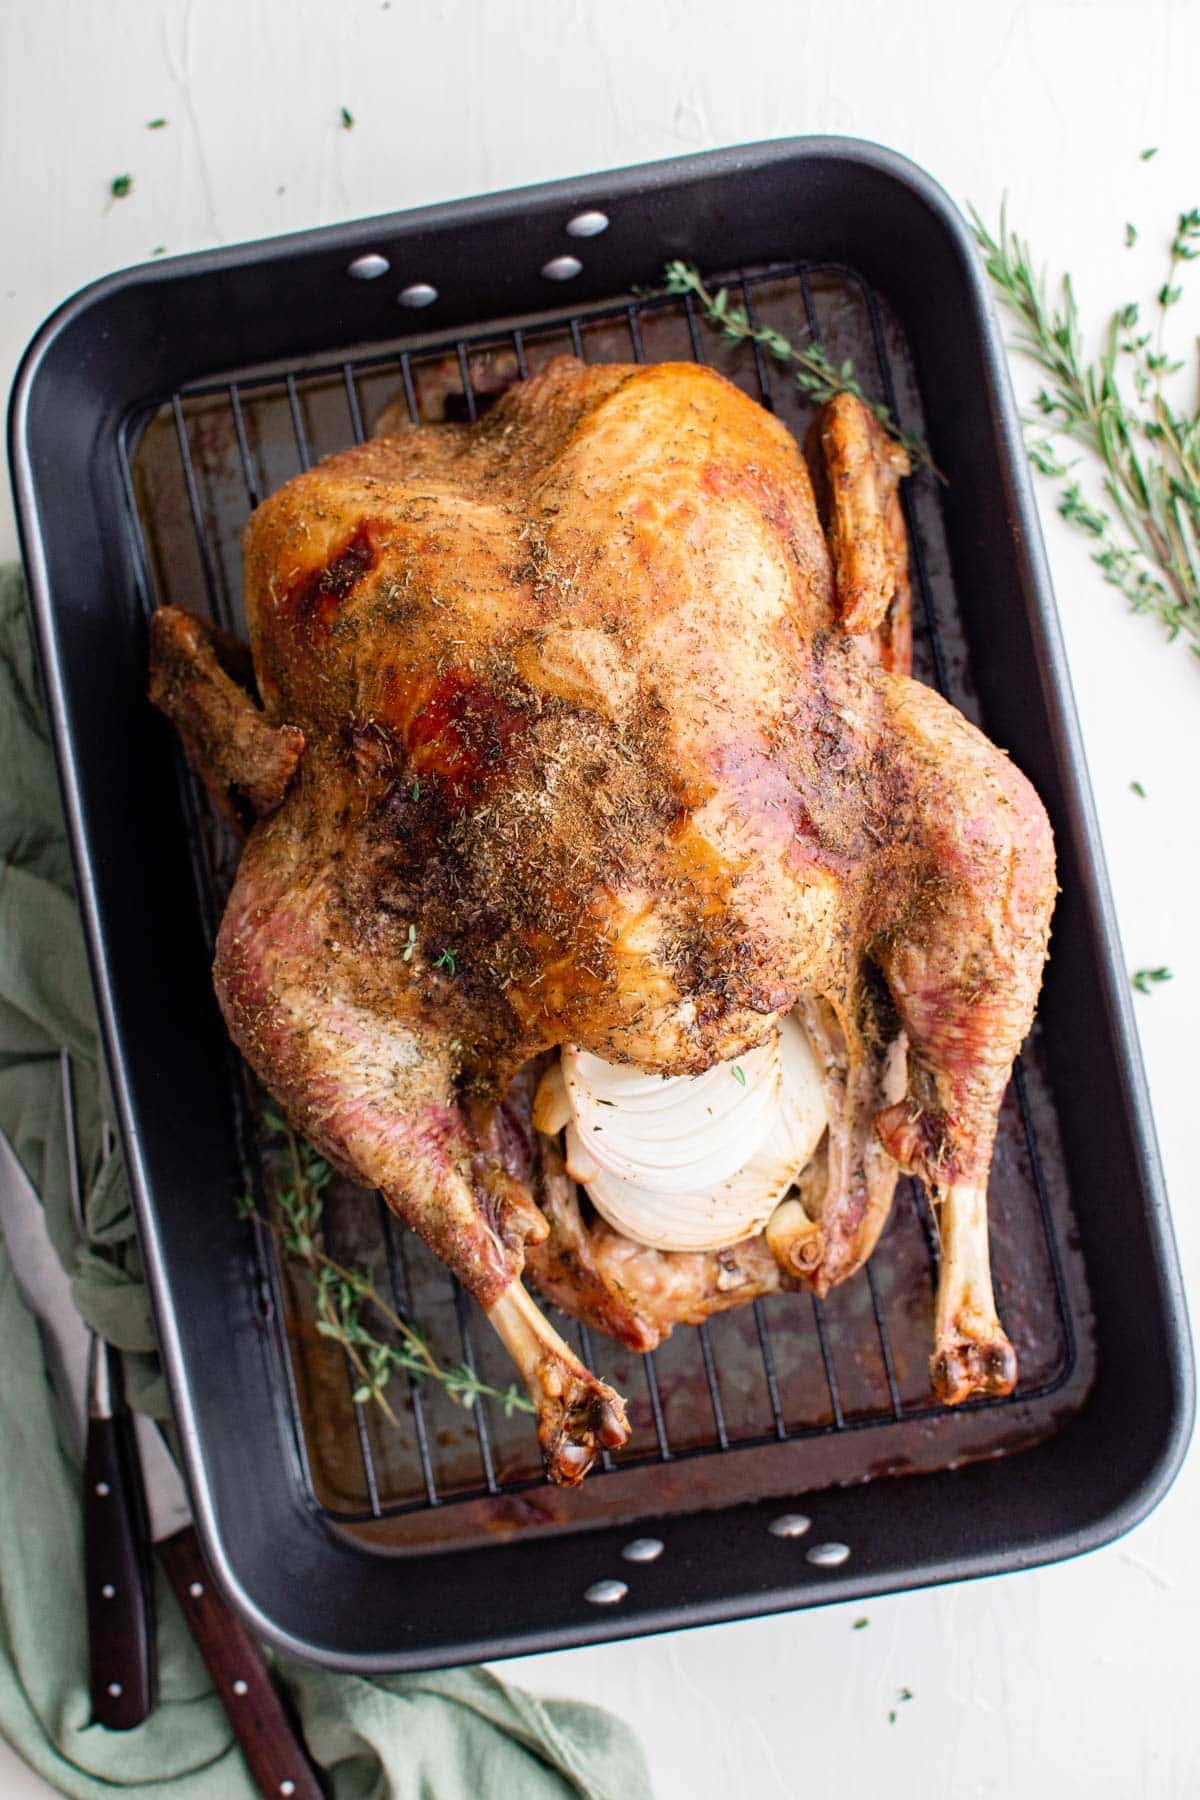
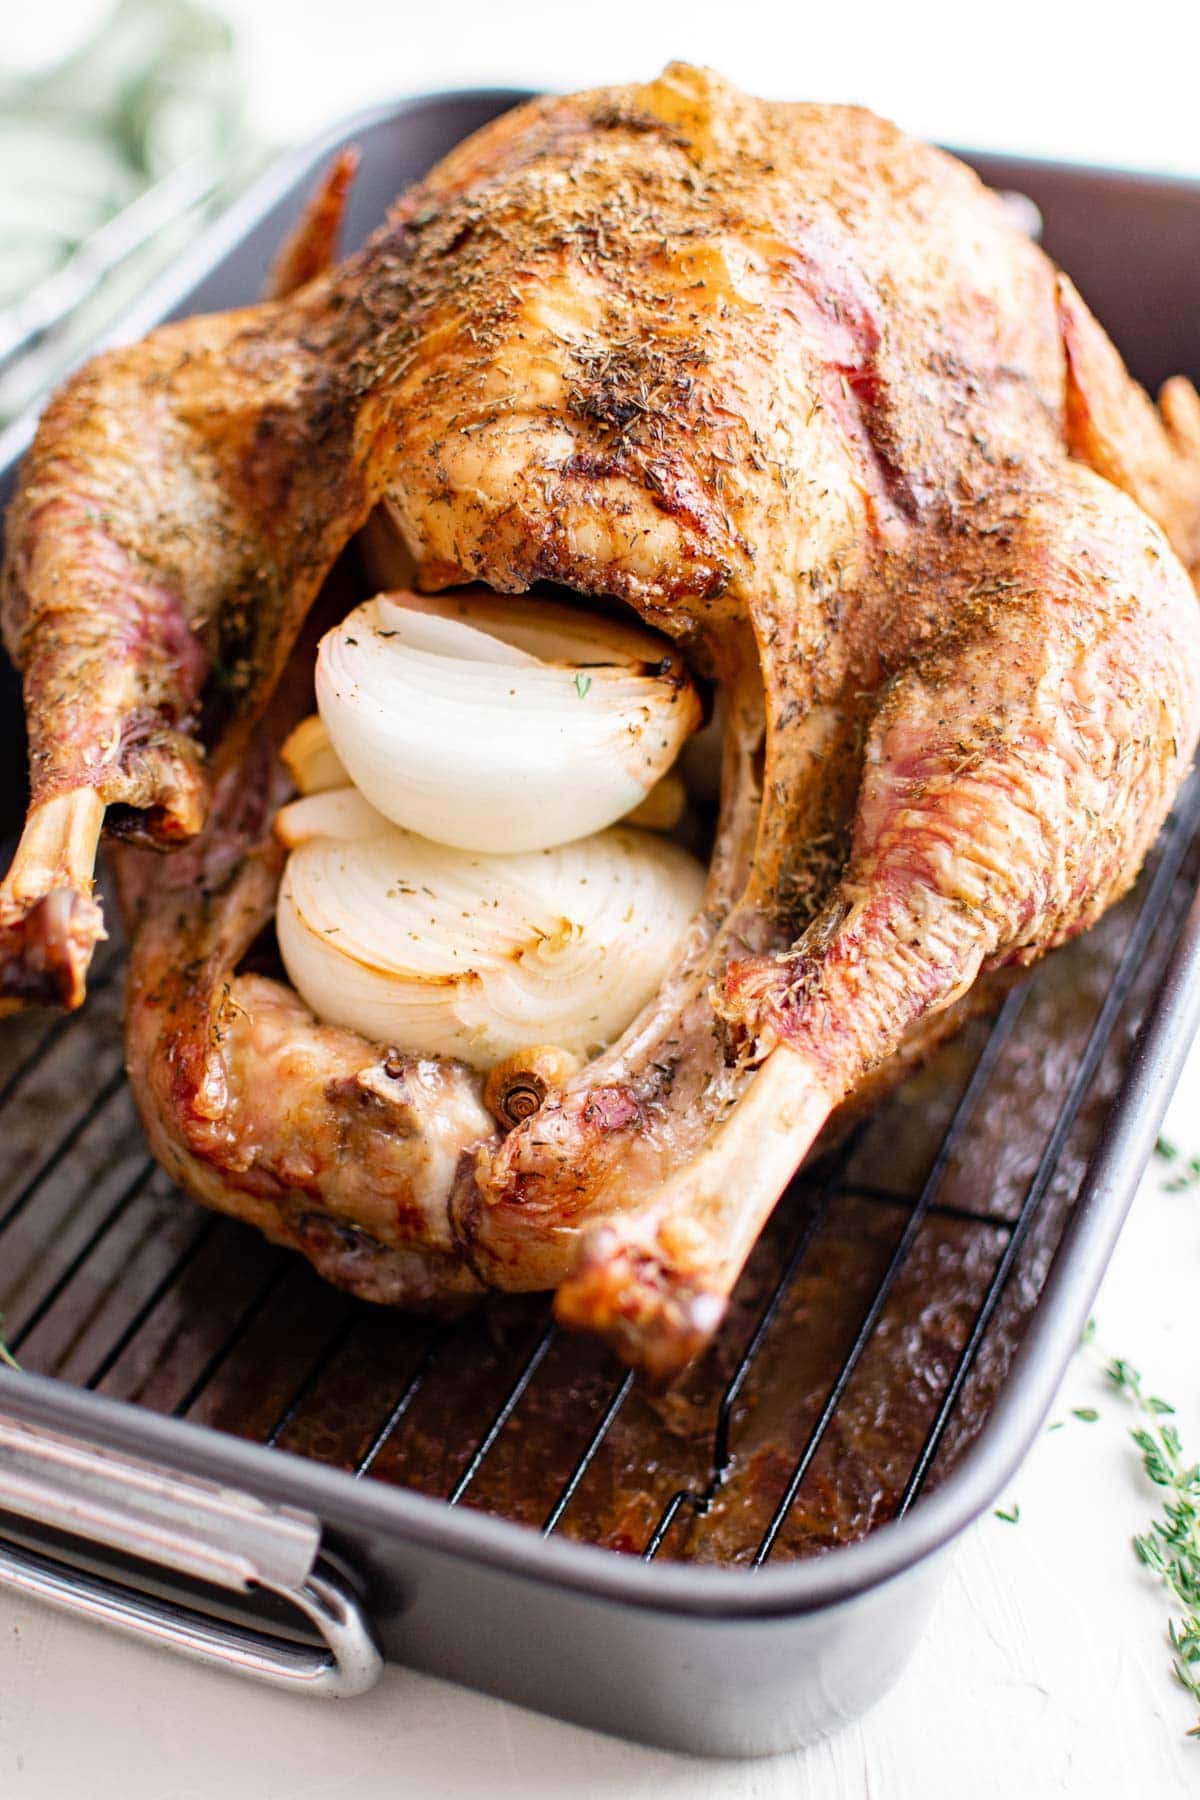
- Stuff the cavity with the onion halves and garlic cloves and transfer to a roasting pan with a rack.
You can also add fresh herbs or citrus if you like, which will flavor the drippings for gravy.
Cover the Breast with Foil
Cut a piece of foil large enough to mold over the turkey breast.
Press it down so it fits snugly. This keeps the breast from overcooking during the first hours of roasting.
Roasting Low and Slow
Preheat your oven to 325°F.
Place the turkey in the oven and roast for 2 hours (for a 12-pound turkey), adding extra time based on the size of your turkey (see chart below).
- Note: This slower start allows the dark meat to cook through without drying out the breast.
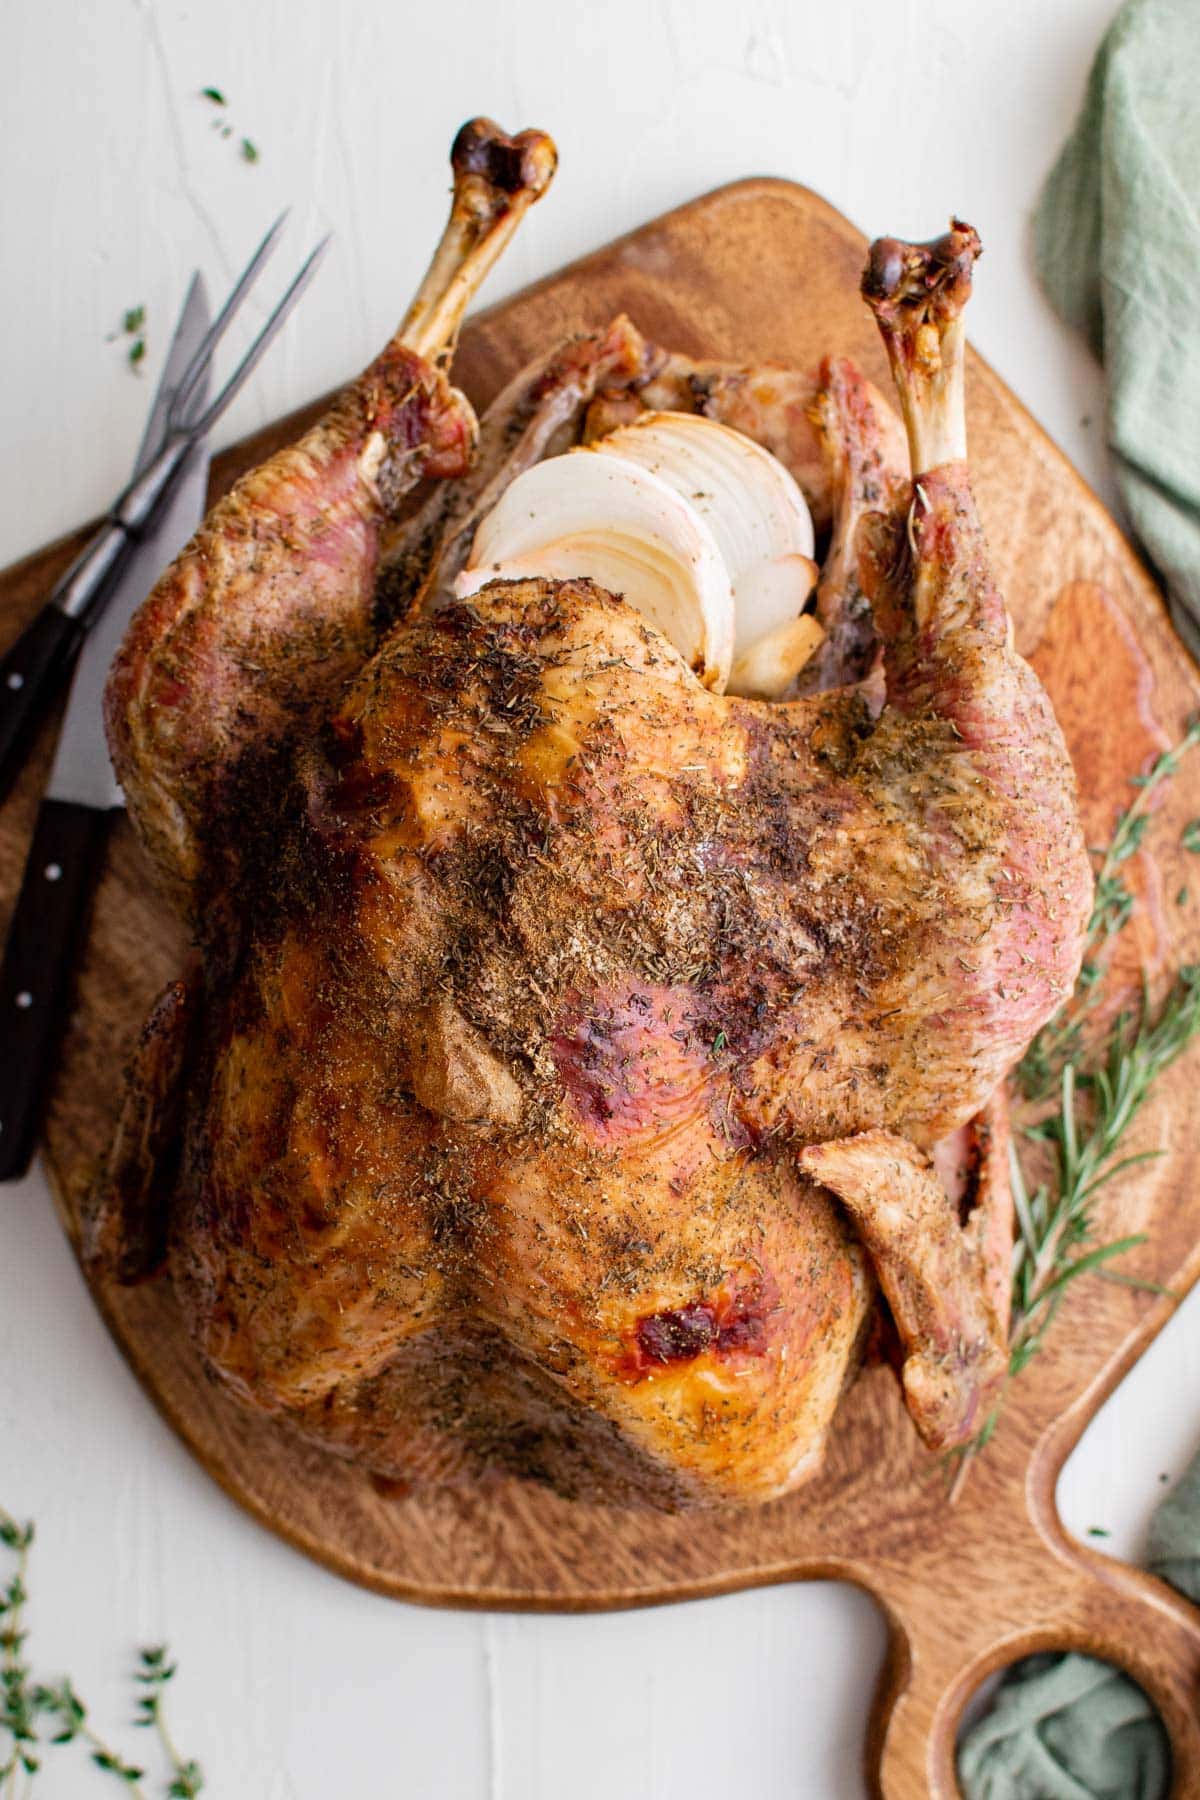
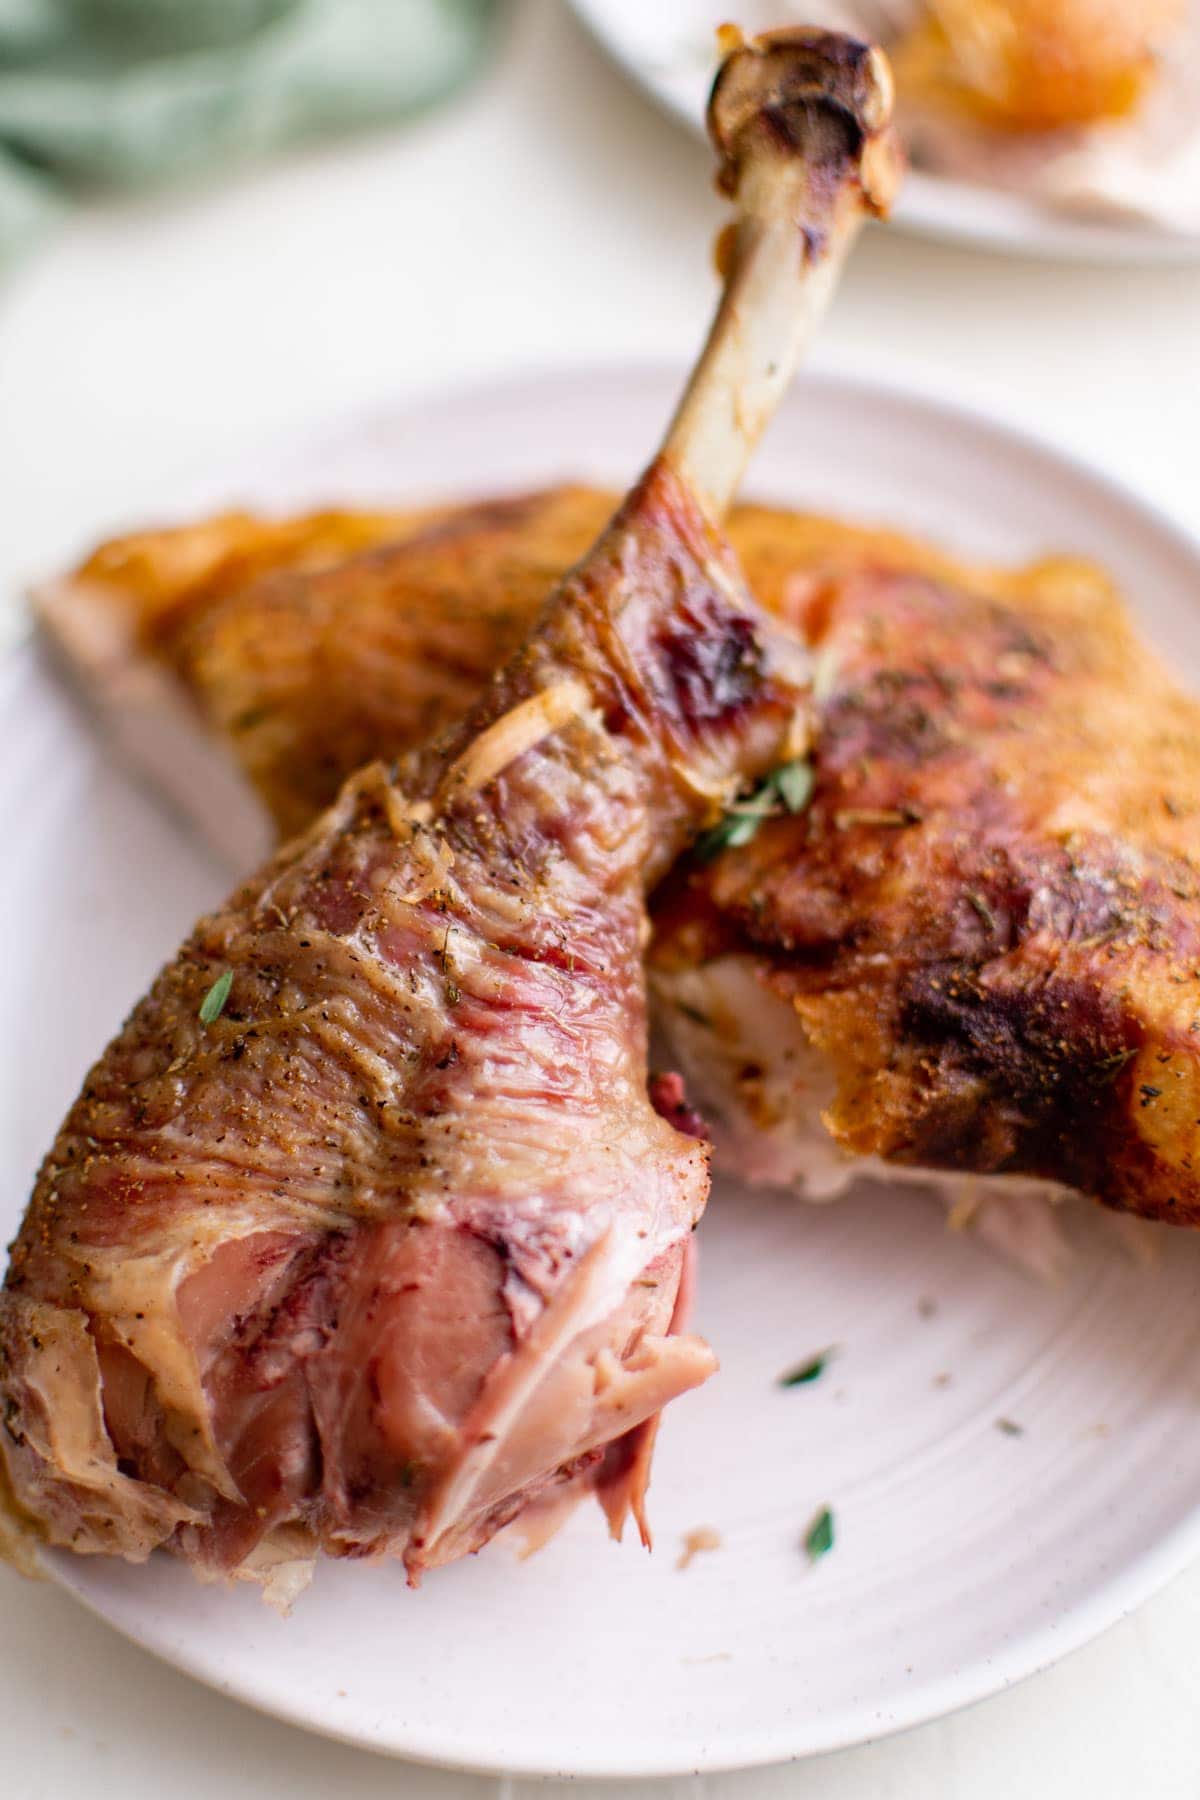
Turn Up the Heat and Crisp the Skin
Carefully remove the foil, increase the oven temperature to 400°F, and continue roasting until the turkey reaches 165°F in the thickest part of the breast or thigh.
The higher heat at the end gives you beautifully golden, crispy skin without drying out the meat.
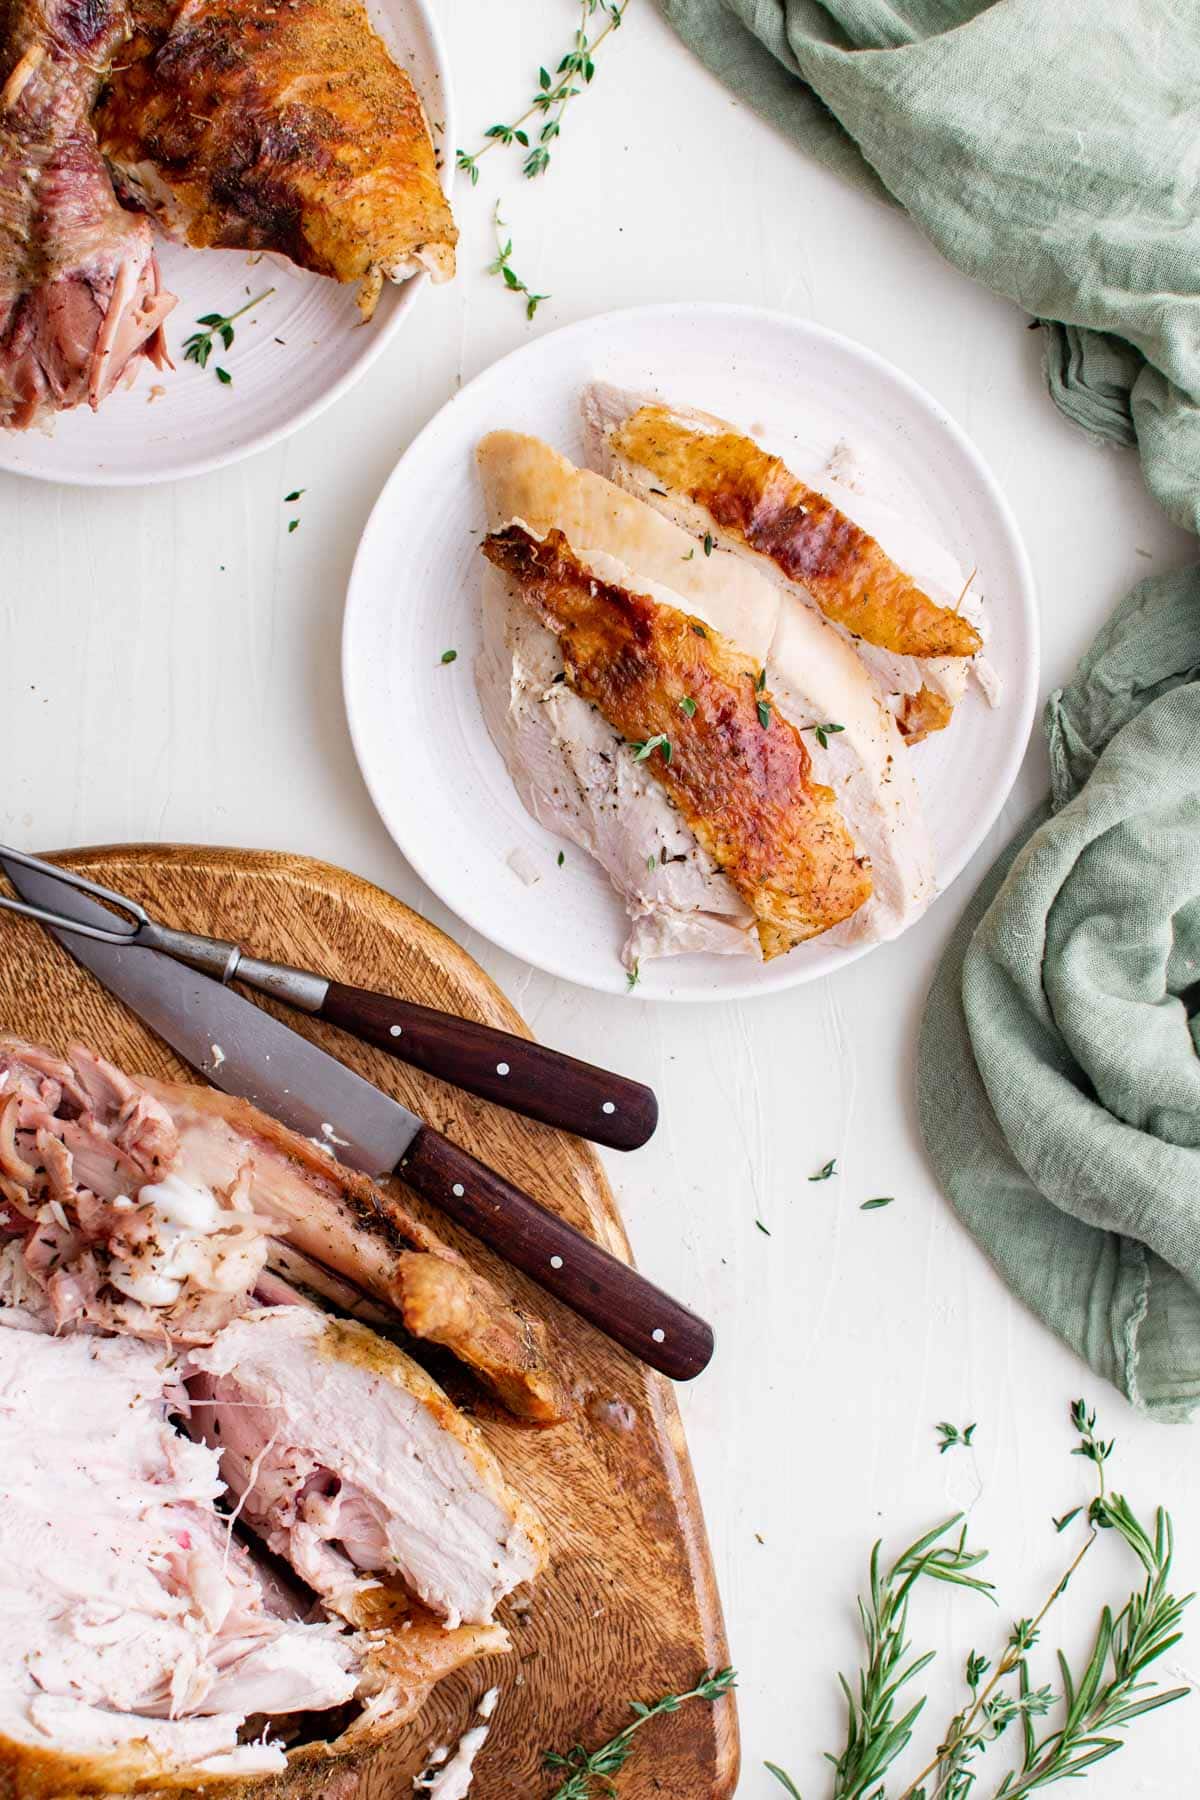
Let It Rest
Transfer the turkey to a cutting board and let it rest for 15–40 minutes before carving.
Resting helps the juices redistribute so the meat stays moist.
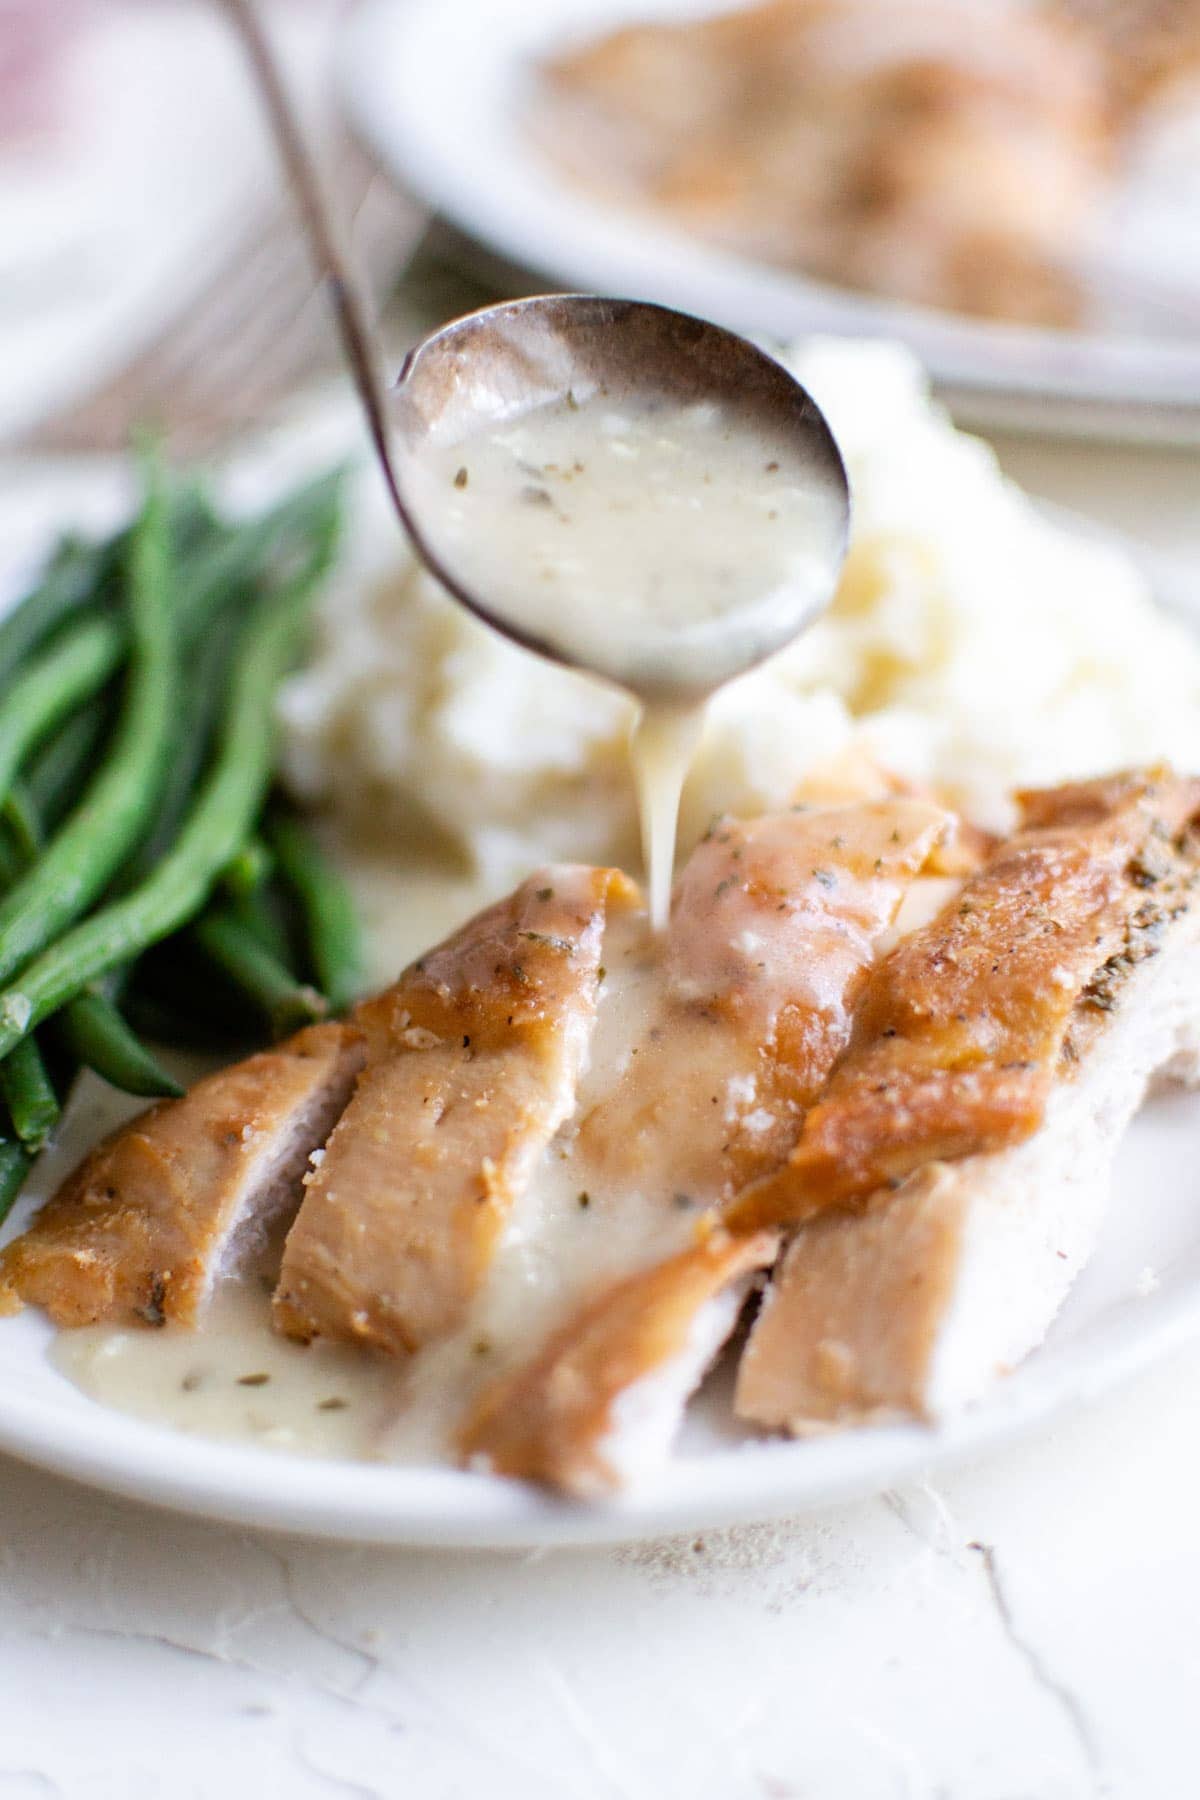
- Tip: Use this time to make gravy or warm up sides.
Frequently Asked Questions
A pound of turkey per person will feed your guests and leave them satisfied. But if you want leftovers, I recommend 1.5-2 pounds per adult and about half a pound per child. I personally think leftovers are awesome, because you can make Turkey Tetrazzini or Turkey and Stuffing Casserole.
One of the best tricks we have for keeping your cooked turkey juicy and moist is butter! Stuffing pats of butter under the skin creates a beautifully crisp skin, but it also melts and keeps the meat super moist and juicy.
Another trick I use is placing aluminum foil over the turkey breasts to help dissipate some of the heat and lock in moisture. Since dark meat takes longer to cook than light meat, this method lets the thighs and legs get their roast on while the breast gently cooks.
A turkey should be cooked until it reaches an internal temperature of 165°F. Insert an instant-read meat thermometer in the base of the breast meat or the thickest part of the thigh, careful not to touch any bone.
The actual length of time it takes to reach the correct temperature will depend on the temperature of the bird before cooking, its size, and your oven temperature.
Expert Tips, Do’s and Don’ts
Every year, we get lots of questions about how to cook a turkey, so we’ve put them all in one place. Hopefully, these helpful hints will take the guesswork out of cooking your turkey!
- Don’t wash your turkey. Washing poultry is a no-no and will just contaminate your sink. Remove from the packaging and pat dry with paper towels.
- Don’t cook stuffing inside your turkey. If you cook stuffing inside your turkey, the meat will be dry and overcooked before the stuffing reaches a temperature that’s safe to eat. Instead, stuff the turkey with aromatics like onions, garlic, celery, herbs, or lemons that will add a ton of flavor to the bird as well as to the drippings for pan gravy, and cook your stuffing in a casserole dish. You can try my yummy recipes for Classic Homemade Stuffing, Cornbread Stuffing, Sausage Stuffing, or Bacon and Onion Stuffing.
- Don’t baste or brine your turkey. These extra steps are really unnecessary for achieving the perfect roast turkey. Basting requires constantly opening your oven, which costs you valuable heat and extends the cooking time. Brining isn’t necessary with a high-quality turkey.
- Do save the turkey drippings. The drippings are used to make the gravy, and the flavor will complement beautifully.
- Do thaw your turkey. Use the handy guide that I shared above for how to thaw your turkey. If your turkey is frozen, it may not cook all the way through, leaving you with a raw turkey in the center while the outside looks done.
- Do have a meat thermometer handy. Test the temperature of your turkey by inserting the thermometer into the thickest part of the thigh. It should register at least 160℉. Remove it from the oven and tent with foil. It will continue cooking while tented and should quickly reach 165℉.
Storage Tips
Make Ahead, Storage, and Freezing
Make Ahead: Once your turkey is fully thawed, you prep it for roasting up to 24 hours in advance. Add the butter, seasoning, and aromatics, then cover loosely with foil and place in the fridge overnight. Take it out about 30 minutes before you put it in the oven so it can shake off the chill.
Storage: If you’re going to eat your leftovers within 3-4 days, store in an airtight container or resealable plastic bag in the fridge. Use for sandwiches, BLT Turkey Wraps, tacos, and Turkey Soup.
Freezing: One of the reasons I love turkey leftovers is because I can keep some in my freezer and easily toss it in Turkey Shepherd’s Pie or in soups.
Reheating: If you’re just looking to reheat a late-night Thanksgiving dinner leftovers plate, you can do that in the microwave. If it’s frozen, thaw it overnight in the fridge before adding to other recipes.
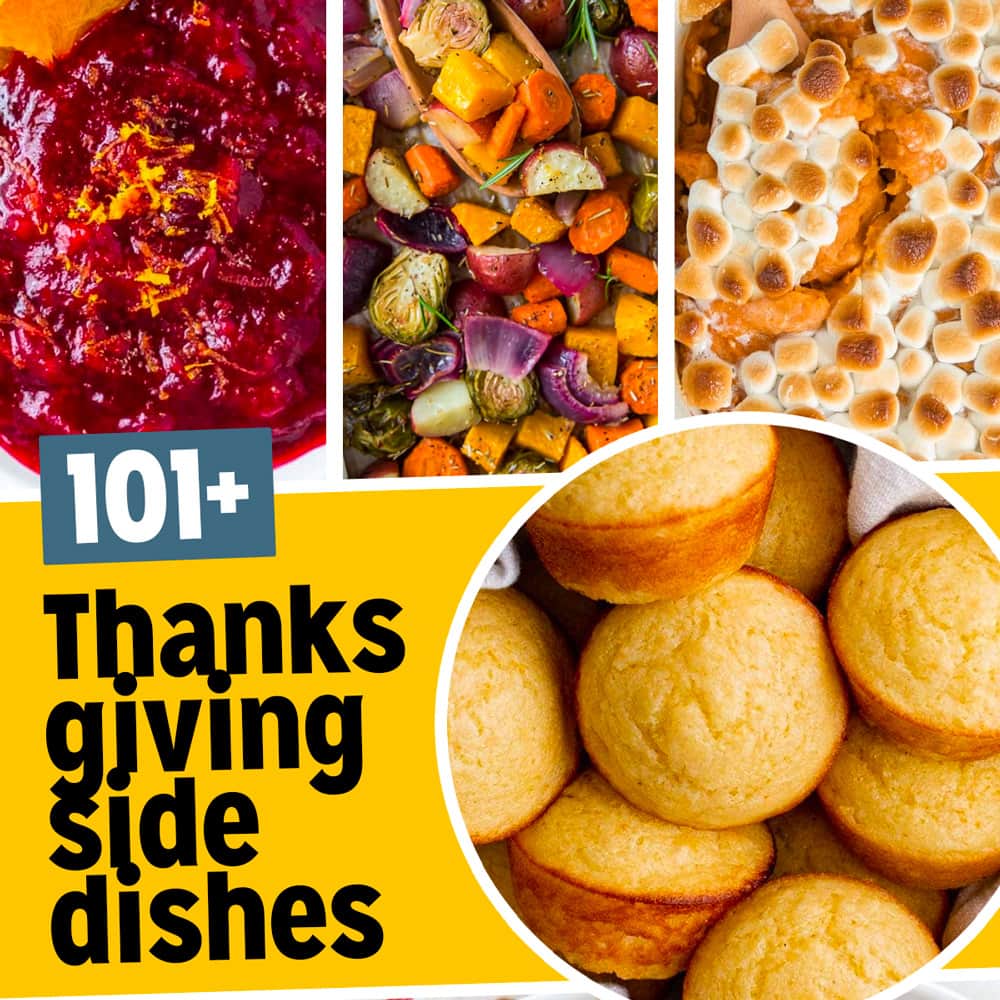
Best Thanksgiving Side Dishes
Your Thanksgiving turkey may be the best ever, but you’re still going to need to fill some supporting roles. Here are some of our favorite Thanksgiving sides that will complement your cooked turkey in the best way!
Side Dish Recipes:
- Cheesy Broccoli Casserole
- Oven Roasted Vegetables
- Slow Cooker Mac and Cheese
- One Hour Dinner Rolls
- Scalloped Corn Casserole
- Twice Baked Potatoes
- Cheesy Scalloped Potatoes
- Orange Cranberry Sauce
- Cranberry Fluff Salad
Dessert Recipes:
101+ Thanksgiving
Side Dishes
Find all the sides you could possibly want for the perfect Thanksgiving menu!
Need a smaller turkey this year? Try my other easy turkey recipes for cooking a turkey breast in the air fryer, roasting in the oven, or even an Instant Pot Turkey Breast. Any of these recipes would be a great way to feed a smaller crowd or to add extra turkey to your meal.
Best Thanksgiving Turkey Recipe
Equipment
- Roasting Pan (click the link to see the one I use)
Ingredients
- 12 pound Turkey thawed
- 6 tablespoons Unsalted butter cut into 1 Tablespoon pats. Chilled, but soft enough to spread under the skin.
- 1 1/2 Yellow onions peeled and halved
- 4 Garlic cloves peeled
Dry Rub:
- 2 teaspoons Kosher salt
- 2 teaspoons Dried thyme
- 1 teaspoon Dried sage
- 1 teaspoon Dried rosemary
- 1/2 teaspoon Paprika
- 1/2 teaspoon Black pepper
- 1/2 teaspoon Ground mustard
Instructions
- Preheat your oven to 325℉.
- In a small bowl, combine the salt, thyme, sage, paprika, pepper, and ground mustard until evenly incorporated.
- Remove the turkey from its packaging. From the bird's cavity, remove the neck and the bag containing the gizzards and heart. (You can keep these items to make stock or discard them.) Note – I do this in a large, clean container in the sink, like a wash basin or a small cooler.
- Use a few paper towels to dry off the skin of the bird and inside the cavity.
- Lift the skin over the turkey breast (on the side closest to the legs) and slide your hand under the skin separating it from the breast meat. Do this on both sides of the breast.
- Insert three pats of butter under the skin on one side of the turkey breast spreading them around evenly. Repeat on the other side.
- Sprinkle the dry rub all over the turkey – breast, legs, wings, anything you can see. Using your hands press the rub into the skin a little. If you have any extra rub sprinkle it inside the cavity.
- Place the onion halves and garlic cloves inside the turkey’s cavity.
- Transfer the bird to your roasting pan. (I like to use a pan with a rack to keep the bottom of the turkey from getting soggy.)
- Take a good sized piece of foil and place it over just the turkey breast. (You want to make sure to the foil piece is big enough to fit over the whole breast.) Press down and mold the foil to the breast. Let the ends stick out if the foil's a bit big.
- Place the turkey in the oven and roast for 2 hours. Carefully remove the foil from the turkey. Increase the oven temperature to 400 degrees and cook the turkey for another hour, or until the internal temperature of the breast reaches 165℉ and the skin is golden and crispy.
- Remove the turkey from the oven and let it rest for 30-45 minutes before carving.
Notes
- 10 pounds: 1 hour 30 minutes at 325℉; 1 hour at 400℉.
- 12 pounds: 2 hours at 325℉; 1 hour at 400℉.
- 14 pounds: 2 hours, 30 minutes at 325℉; 1 hour at 400℉.
- 16 pounds: 3 hours at 325℉; 1 hour at 400℉.
- 18 pounds: 3 hours, 30 minutes at 325℉; 1 hour at 400℉.
- 20 pounds: 3 hours, 45 minutes at 325℉; 1 hour at 400℉.
Nutrition
Nutritional Disclaimer Kristin Maxwell of “Yellow Bliss Road” is not a dietician or nutritionist, and any nutritional information shared is an estimate. For accurate calorie counts and other nutritional values, we recommend running the ingredients through your preferred online nutritional calculator. Calories and other nutritional values can vary depending on which brands were used.
Don’t leave without stopping by and checking out our Holiday Gift Ideas!
This is THE only way I make my turkey every year for Thanksgiving, it truly is the best recipe. This year I got a huge fresh bird from a local farm bc more people will be here.. 35 lbs 🤦🏻♀️. Just making sure I did the numbers right –
7¼ hours at 325 and 1hour at 400? Do you think I should let it rest more than an hour? 😩
The math looks right. I think a half hour is still enough but you could probably go 45 minutes.
Can this same recipe be used if cooking just a turkey breast? Would I alter anything? I have used this recipe for the past few years and absolutely love it, but this year decided to go with 2 turkey breasts.
Hi Jennifer, This is similar to my turkey breast recipe you can find HERE.
Hi Kristin,
Can I use an aluminum disposable roasting pan to cook this turkey. I have a roasting rack that will fit inside. Your recipe looks beautiful, but I am wondering if the disposable roasting pan will affect the cooking time. Thank you in advance.
Sure you can use a foil pan, it won’t affect the result. Enjoy!
One last thing can I substitute margarin for Butter my daughter has a dairy allergy
Yes that should be fine.
If my roasting pan has a lid, is it okay to use it, or do you still recommend covering the turkey with aluminum foil?
Go with the foil. The lid would create too much steam, adding moisture to the skin and making it harder to get it crispy at the end.
Hi Kristin can I cook this recipe in a bag?
It wouldn’t be the same and wouldn’t create that crispy skin. But, if you prefer to use the bag, you can. The skin just might be a little soggy.
Thanks Kristin I think I’m gonna go with original recipe it seems like its a no brainer.Le you know how it turns out.
Happy Thanksgiving:)
You are so welcome Mary! Happy Thanksgiving.
I make Kristin’s recipe every year and everyone LOVES it! Always comes out perfect. I have a question this year Kristin, this year I needed a bigger bird due to more guests. I went a kinda crazy and bought a 29 lb bird and I’m kind of freaking out on how to cook it using your method still. Please tell me it will still work! I guess I didn’t realize how ridiculously huge this bird was. Any advice is appreciated .
Hi Jamie, First, I’m so happy that you’ve really loved this recipe – I love it too!! As long as the 29 pound bird will fit easily in your oven, you should be able to follow the same rule of thumb as shared in the recipe. Using that formula, you should cook the turkey for 6 hours at 325℉ and an hour at 400℉. Good luck, and please come back and share the results!
So I tweaked the spices I put the recipe on the 3x amount and tweaked the spices as needed. I cooked it for I believe about 5.5 hours and kept a thermometer in it the whole time to monitor the temperature. Long story short it came out AMAZING! So juicy and flavorful. Everywhere I read said a turkey this big would be dry. Not at all. Still my go to recipe for any size bird. This would definitely work on chicken too. Thank you for another successful thanksgiving Kristin!
Hi Jamie! Thanks so much for coming back to share your feedback. I’m so happy to hear that your bird was perfection!!
I made Kristin’s best turkey recipe last year for Thanksgiving and it truly is the best turkey recipe! All 25 family guests loved the turkey and I didn’t have leftovers. Thanks, Kristin!
You are so welcome Michelle! Awesome feedback, thanks for stopping by.
I will use your recipes this Thanksgiving,they sound wonderful and baking the turkey with your recipe has to be wonderful!!! I can not wait to use them
Thank you so very much! Shirley
I have been using this recipe for the last couple of years. It always turns out so good. I had searched for years for a good recipe and this is by far the best.
Thanks for the awesome comment Kelly.
I’ve made this recipe 3 years in a row and everytime my turkey turns out perfect. Everyone is always so impressed by how good and moist it is. I was very intimidated by making a turkey at first but this recipe makes all the difference!
Nice! Love the comment Krista, thanks for stopping by to share.
As most others have said, this turned out amazingly moist. I guess cooking low and slow works! Next time, I’ll have to do it according to the recipe. I had no garlic and no onions, so I just added garlic powder and onion powder to the dry rub. Will proably do that again, but also add the garlic and onion to the cavity.
Love the feedback dAN! Thanks for sharing.
This turned out so good, tender and tasteful. Great recipe, thanks.
You are so welcome Nielsen! Thanks for stopping by.
kristin you are a QUEEN and I now have an altar of you in my house that I kneel before, each day.
I’m a first time turkey roaster and I had the bright idea to host a Friendsgiving. was so stressed with how to prepare this thing and cook it.
but this recipe! so simple! an absolute clown such as myself was made to look like a Top Chef!!!!!
so delicious and so easy I’m using this recipe + method every year!!!
Favorite. Comment. Ever. Thank you Angel!
This is my go to Thanksgiving Turkey recipe. It comes out super flavorful. Juicy on the inside and crisp on the outside. Thank you for sharing!
You are so welcome Briana! Thanks for stopping by.
Hands down THE best turkey I’ve ever made. I’ve tried different recipes – much more complicated – in the past, and none even compared to this. I adjusted the amounts for a 16lb turkey and it came out perfect! Juicy, flavorful, and that extra hour at 400 degrees crisped up the skin beautifully. I used garlic, onion, celery, and lemon for the cavity aromatics. I loved how easy this was, and the most delicious turkey. This is the only one I’ll make every year from now on.
Nice! Awesome feedback Andi! Thanks for stopping by to share.
I will never NOT use this recipe!!! It was FANTASTIC! First time hosting ever and for 15 people, no less. The turkey came out perfect!!! Made it as written with the exception of Rosemary because I’m not a huge fan so I didn’t have any. I also seasoned the turkey the night before. Threw the onion and garlic plus the butter in the cavity, rubbed butter under the skin and cooked for 3h45m @325 then and hour at 400 (19lb bird). Perfection! Thanks for this awesome recipe!!!! Simple and delicious!
You are so welcome Ash! Thank you so much for taking the time to share this Awesome feedback with us.
Everyone reading this review this in Not a 5 ⭐️ It’s a 10 ⭐️ Recipe.
I have not cooked a lot of Turkeys and came across this recipe. I followed the instructions to a tee and the house smelled so good and the Turkey was so moist and delicious. My mother in law said she couldn’t shovel it fast enough in her mouth. She also said this was the Best Turkey she has ever eaten. She’s a young 85 and has eaten a lot of Turkeys. Everyone raved about it. Thank you for sharing Kristin you made my Thanksgiving a hit!
Hi Sue, you are so welcome! Thank you so much for the awesome feedback. Glad it was a hit.
9/10! And only because I never give 10/10 lol. 49 years, 29 years of making Thanksgiving dinner and this is by far the best Turkey. The unsalted butter (globs is what I call them) really do make a difference and I could actually taste the butter and dry rub all over! 22lb Turkey and not a dry piece of meat. I love the idea of an hour at 400 at the end not the beginning I truly think that helps it from drying out. I’m so happy with this and so was the Fam! Thanks for the recipe and Happy Thanksgiving 🍁🦃
Hi Sandy, we are so honored that we made it to 9. Thanks for taking the time to share with us. Happy Thanksgiving.
my butter would not stick to the turkey at all!! even room temp, with dry skin. how do you get it to stick?
Only thing I can think is that the skin was too loose. Because the skin is usually pretty tight and will hold the pats of butter pretty tight.